As every other application, Intuit also releases regular updates for its QuickBooks Desktop application. These updates are mostly the maintenance release or patch updates that help to improve the functionality. However, many times, as the users try to download or install the latest release updates, they face more frequent errors than usual. One such error that users generally encounter while doing the same is QuickBooks Update Error Code 1625.
The error code 1625 will mostly annoy you if any Microsoft-related program, like Windows Installer or any other, is running in the background. The error message states that “This installation is forbidden by system policy that occurs when installing or updating QuickBooks.” However, this blog will discuss the causes and some effective solutions to fix this error, so go through it carefully.
Don’t let QuickBooks Install Error 1625 slow down your financial progress. Take action today by reaching out to our QuickBooks support at the Toll-free number +1-(855)-955-1942 Get the help you need to knock out this pesky error from your system.
What are the causes for QuickBooks Update Error Code 1625?
The error code 1625 in QuickBooks occurs when you try to start or shut down the system after updating the application. An issue with the Windows Installer can be the primary reason behind this error. However, the other reasons are discussed below.
- If your device is missing or has a corrupted Windows Installer File, then you may face error code 1625.
- Not operating the QuickBooks application or Windows as an admin user may also result in this error.
- If your system shuts down while you are refreshing the information saved on it.
- If the QB component files or support files are accidentally deleted, then it may lead to this error 1625.
- Downloading malicious files or programs can also result in such an error.
- You might have corrupted the installation framework of your device.
- A malware or virus has infected your Windows registry.
What are the Instances for QuickBooks error code 1625?
There are some common instances where the error message about code 1625 may appear on your screen. These instances are described below:
- You may encounter the QuickBooks error message 1625 while installing the QuickBooks program.
- If you have recently updated the QB application and now you are either shutting it down or starting it again, then the error message may appear.
- It can also appear on the screen during the installation of Windows.
- If an unverified user has accessed your QB Desktop application, it may result in the error code 1625.
You may also get other update errors like QuickBooks Update Error 403, QuickBooks Update Error 12031 or QuickBooks Update Error 1642 while updating the QB application.
What are the Ways to Rectify the QuickBooks Update Error Code 1625?
The methods to fix the QuickBooks error code 1625 are simple and can be easily followed once you understand the reason behind its occurrence. A few effective steps are given below:
Method 1: Verify the Obsolete gadget drivers
One of the ways to fix the QuickBooks install error 1625 is to check if the obsolete drivers are working properly and refresh them. The Windows drivers can work fine one day and can become outdated the other day if Windows gets updated and not the drivers.
And the use of incorrect drivers can lead to this error, so it is necessary to verify them. It is recommended that you use the driver doc to refresh the gadget drivers. It will help you to enhance the overall functioning of the system drivers and enhance your working with the QuickBooks application. Additionally, you can go to the Windows Update section in Settings and check for any additional updates.
Method 2: Turn off the UAC Settings on the System
The other method to rectify the error doe 1625 while updating the QuickBooks Desktop is to change the User Account Control manually. The steps are mentioned below:
- To start the method, press the Windows Key and open the Start Menu.
- After that, click on the Control Panel option and go to the User Accounts.
- Then, again choose the User Accounts option and then move forward by clicking on the Change User Account Control Settings.
- Next, click Continue when the UAC window asks for your confirmation.
- Then slide your cursor down and click on the Never Notify option followed by the OK button.
- Now, restart the system and install the updates again.
Method 3: Turn off the Non-admin Prohibition on Windows
Many computer systems are configured in such a way that they ask for admin privileges whenever you perform any installation on them. So, you need to perform certain steps to configure these settings. The steps are slightly different for Windows Vista 7, 8, 10, and Windows XP. So carry out the following steps with utter care:
Steps to be performed on Windows Vista 7, 8, or 10
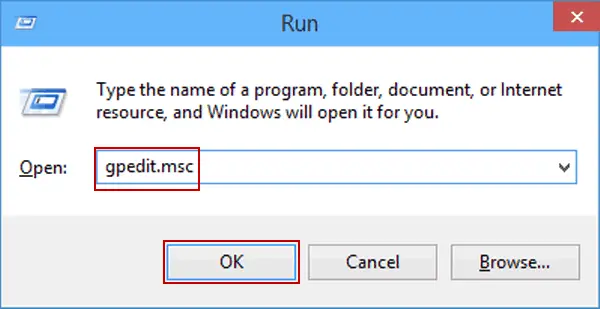
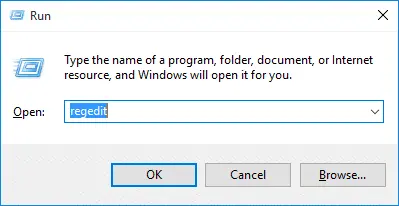
- For the first step, press the Win + R keys together and access the Run window.

- Then, in the Run window, type the word gpedit.msc in the space and hit OK.
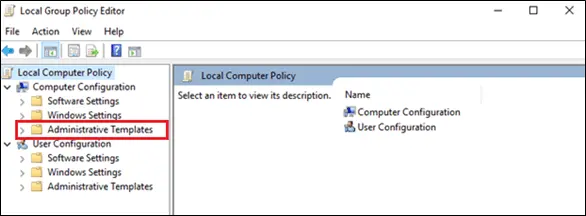
- Simultaneously, you have to move to the local computer policy window and select the Computer configuration option.
- Then, head to the option saying administrative templates.
- Now when you are done with it, go to the Windows components option, and click on the Windows Installer option.
- After that, from the applying vendor-signed updates section, click twice on the prohibit non-administrators option.
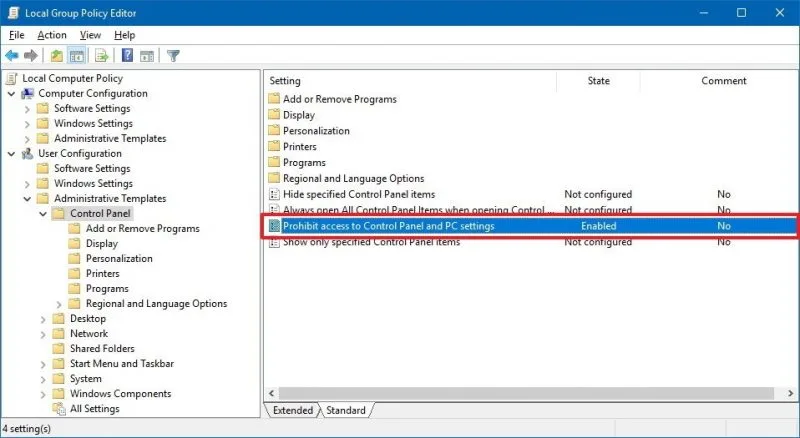
- Lastly, hit the disabled option, followed by the OK button.
Steps to be performed on Windows XP
- Proceed ahead with the Start menu on the taskbar and open the Run window.
- Then, type the word gpedit.msc in the space given on the run window and hit OK.
- After that, go to the local computer policy window and click on the computer configuration.
- Then, go to the Admin templates option.
- Now, move to the Windows components and hit on the Windows Installer option.
- Then, from the applying vendor signed updates, click the prohibit non-administrators option twice.
- Then, finally, move to the disabled option and click on the OK tab.
Method 4: Configure System’s Software Restriction Policy
The software restriction policies are responsible for identifying the programs and running them on the domain. However, the same policies can also be the reasons for the QuickBooks install error 1625, and thus you need to make changes to its settings. You need to configure it such that it allows QuickBooks to install the updates.
- First, navigate to the Control Panel and click the System and Security tab.
- After that, go to the Administrative Tools, followed by the Local Security Settings option.
- Then, choose the Software Restriction Policies. And if you find no restrictions there, then go for the Software Restriction Policy Node and right-click on it.
- After that, hit the option saying New Software Restriction Policy and click twice on the Enforcement option.
- Now, under the Enforcement Properties window, look for the All users except local administrators option and hit a click on it.
- Lastly, restart your system after clicking OK.
Method 5: Run regedit File
For this method, you have to run the regedit file to fix the QuickBooks Update error 1625.
- Click on the Start button, and type in the word command in the search bar. But do not press the Enter key.
- Now, hit the ctrl+shift keys together and hit the Enter key.
- After that, click on the Yes button when the permission dialog box appears.
- Now, when you see a black box with blinking cursor, type regedit and hit Enter.
- Then, hit the export button from the File menu.
- Next, type a name for your backup file in the space given. You can name it Windows installer backup.
- Now, opt for the selected branch followed by the export range box.
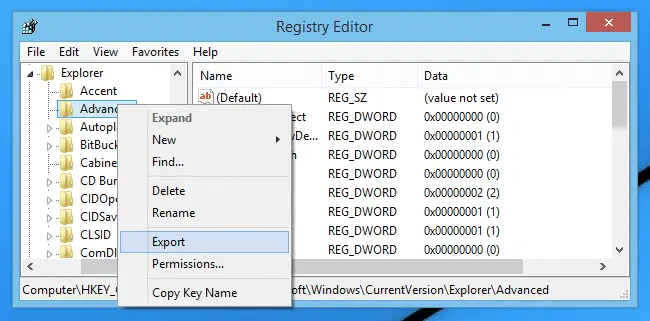
- To move ahead with the process, click on Save button and save the file with the .reg file extension.
- Now, you would need to use the backup of the Windows installer.
Conclusion
The methods given above should be enough to fix the QuickBooks Update Error Code 1625. In case none of the solutions work, then it is best to seek help from an expert. You can connect with an expert from Data Service Solution. They will understand your issue and will give you the best possible solution to rectify it. So, call the Toll-free number +1-(855)-955-1942 now and connect with them.
Frequently Asked Questions
QuickBooks Error 1625 occurs when the software is unable to update because of permission issues, often related to your computer’s security settings or Windows policies. This error can prevent QuickBooks from installing the latest updates, causing issues with program functionality.
To resolve QuickBooks Error 1625, follow these steps:
1. Run QuickBooks as an Administrator by right-clicking the program and selecting “Run as Administrator.”
2. Make sure your computer’s security settings allow QuickBooks to update.
3. Temporarily disable any antivirus or firewall that could be blocking the update process.
4. Ensure your Windows is up-to-date with the latest security patches.
Yes, you can prevent future occurrences of QuickBooks Error 1625 by regularly checking for updates to both QuickBooks and your operating system. Additionally, maintain proper security settings and ensure that your antivirus or firewall software doesn’t block QuickBooks updates.
