No matter how large or small your business is, with each entry you add to the company file, it grows larger and ultimately reaches a limit where you start noticing performance issues. A large company file is also susceptible to unexpected errors and glitches. When it comes to the file size limitation, Intuit claims there are no size limits for the data file. On the contrary, several users have experienced severe issues with large company files, and experts suggest keeping the file size under 150 MB for QB Pro and Premier versions and 1.5 GB for QB Enterprise. But limiting your company file size is not an ideal solution, and this is where QuickBooks condense data utility comes into play, which helps compress the company file size without manual efforts. In this article, we will discuss every possible question you might come up with while condensing data files using the QuickBooks condense tool.
A Brief On QuickBooks Condense Data Utility in Desktop Application
QuickBooks condense data utility helps compress the company file that has grown enormous in size with time to restore the performance of QuickBooks Desktop. It removes unused list elements and summarizes the old closed transactions into summary journal entries to shrink the company file size. The condense data tool also comes in handy when you plan to import your company file from the Desktop to the Online version of QuickBooks. Once you condense the data, QuickBooks creates a permanent copy of the data file, which is also called an archival copy of the file. However, the advantages aren’t restricted to these, and there are several other benefits as well. Before you proceed with the condensing process, there are certain factors that you must consider, which we have covered in the next section of this article.
Factors To Consider Before Condensing QuickBooks Data File
Given below are some of the crucial considerations that you must go through before running QuickBooks File Condense Utility.
It is an Irreversible Process:
Condensing the company file is an irreversible process which means you can’t revert the process back. Thus, before you condense the data ensure to try every possible solution to handle the situation. The following are some of the scenarios where you can consider running the QuickBooks Condense Data Utility.
- Your company file is too large in size.
- You are about to exhaust the list limit.
- If you have recently upgraded your system’s hardware.
- You have already discussed the matter with the and your accountant, and they suggest you proceed with data condensing.
Company File Size Might Remain Unchanged:
When you compress a company file in QuickBooks to reduce its size, you might not always get the expected results. This usually happens for the following reasons.
- The condense data utility reduces the file size by removing transaction details and list entries, which usually is not a lot of data.
- If you have any open transactions, they won’t get condensed, and thus the file size won’t be affected.
- You will not be able to condense the data file if there is nothing much to compress.
May Not be Able to Fix Data Corruption
Condensing the data file does not always guarantee data repair. If you compress the data file and still find corruption in it, you can try the following workarounds.
- Use QuickBooks Verify and Rebuild Data Utility and File Doctor to fix the data damage.
- Try restoring a recent backup of the company file.
- If nothing works, you can create a new company file.
Certain Transactions Will Not Get Removed:
Here is a list of all those transactions that will not be affected by condensing the company file.
| Transaction | Description/Reason |
| Payroll transactions | If you condense the data before 12/31/2018 or if you haven’t reviewed an employee’s W2. |
| Invoices, payments, credit memos, and refund checks | If you haven’t linked these transactions properly with each other. |
| Payments recorded to Undeposited Funds | If these transactions are not deposited to a bank account. |
| Bills, bill credits, and bill payment checks | If you haven’t linked these transactions properly with each other. |
| Estimates linked to invoices | Journal entries are posting transactions, whereas Estimates are non-posting entries, and thus, they can’t be condensed into journal entries. |
| Sales tax not paid in Pay Sales Tax | If you have used checks to pay your sales tax, it will leave the invoices open and thus will not be condensed. |
| Transactions linked to a non-condensable transaction | Example: You entered an invoice on 12/16/2020 and the corresponding payment on 1/16/2021, then tried condensing the data file through 12/17/2020. You will not be able to condense both. This happens as the invoice is linked to a payment that falls outside the period. |
Several Reports will be Affected:
Several reports might be affected by condensing the data file and we have listed all of them below.
1. Account-based and Item-based Reports:
There won’t be any change in the account-based reports as entries on accounts are not affected by the condense data utility. These reports include:
- Profit & Loss (accrual)
- Balance Sheet (accrual)
- Statement of Cash Flows (accrual)
- Trial Balance (accrual)
However, the item-based reports will be blank because all of the item data will be deleted by the QuickBooks Condense Data Utility. These reports include:
- Sales and Purchase reports
- Job Costing reports
- A/R and A/P Aging reports
2. All Cash Basis Reports:
The cash basis reports will be inaccurate for the condense period. Also, you’ll not find any links from Cash Into Income or from Cash Out to Expenses.
3. Reports Filtered by Class:
Any transactions summarized by the QuickBooks Condense Data Utility will not have classes assigned. Therefore, if you run a Profit and Loss by Class report, it will show all amounts in the unclassified column.
4. Sales Tax Liability Report:
Sales tax and invoices are now non-existent. A Condensed journal entry has an amount credited to income accounts, but QuickBooks has no way of knowing what part of the income is taxable and which part is non-taxable. Also, the Tax Collected is received from the invoices which no longer exist and thus show zero.
5. The Sales and Purchase Detail Reports:
The data on these reports comes from items on invoices and bills. Since the invoices and bills no longer exist, there will be no more items, and the reports will appear blank.
6. The A/R Collections Report:
Condensed journal entries will display under No Name in the A/R Collection report. These entries contain open A/R entries not linked to closing transactions. As every invoice in this file has been paid, the total amounts to zero.
A/R Aging reports do not display condensed journal entries because their default filter is set to Names = All Customer: Jobs. Removing this filter will result in condensed journal entries appearing in the A/R Aging reports.
7. The Audit Trail Reports:
As this Tool removes transactions from your company file, the transactions will be removed from the Audit Trail report as well.
- When condensing, only modified, voided, and deleted transactions are eliminated from the audit trail report.
- Condensing the data file will not remove the audit trail report.
- After condensing, every transaction activity will still be visible in the Audit Trail report.
- If there are a lot of edited, voided, or deleted transactions in a company file, the Condense Audit Trail Info option will be available.
8. Reconciliation:
- As the condensed journal entries are cleared transactions, the opening balance for your subsequent reconciliation will be accurate.
- Your reconciliation reports can be missing or inaccurate because your checks and deposits no longer exist.
- As the latest reconciliation might have been lost, the statement date might not be accurate.
Note: To keep your reports secure, you must create a backup of the Company File before condensing your company file using the QuickBooks Condense Data Utility. If for any reason, you ever need to view the data from both the post-condensed company file and archival backup file, just merge their data in another program.
Steps to Preserve Your Reports Before Condensing Data in QuickBooks
One must know that the original reports are preserved in the backup and archive copy, and in any other backups that you created. An archive copy If you’re confused about what an archive copy is a regular QuickBooks company file used to view historical data that is not included in your condensed file. QuickBooks automatically creates a file named ‘[Your Company File Name] Copy MM/DD/YY’ in the original company file folder.
You can also automate the process of QuickBooks data backup by scheduling the backup. If you face issues with that, refer to our blog on QuickBooks Scheduled Backup Not Working.
Make sure to reconcile all accounts, print all reconciliation and discrepancy reports, or save these reports in PDF format, and back up your company file before you run the condense data utility.
How to Condense Company Data in QuickBooks Desktop?
Given below are the instructions to condense the company file in all versions of QuickBooks Desktop.
Condensing QB Data While Keeping All Transactions Intact
When compared to the previous condense feature, which only removes transaction details and creates a consolidated journal entry for data prior to the selected date, the latest data condense feature provides an option to remove the audit trail, which reduces your file size, leaving all your transactions as it was. No doubt, it is a much faster method than the standard File Condense. Here’s how you can condense your company data in QuickBooks and still have all your transactions in it.
- Navigate to the File menu and select Utilities. From there, select the Condense Data option.
- After that, click on the option “Keep all transactions but remove audit trail info to date. from the given options and then, click on Next.
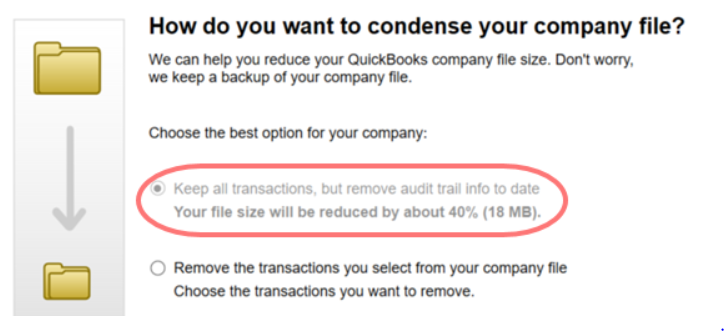
- Once completed, a window opens advising you of the total reduction in your file size as well as the location of the backup prior to the file optimization.
Condensing QB Data by Deleting Selected Transactions
Here are the instructions to condense the company file in QuickBooks Desktop and get rid of transactions that you no longer need.
Step 1: Find Transactions that will not Condense
Before you begin to start condensing your company file (QuickBooks Desktop Premier and Enterprise 2018 and older version) using the QuickBooks Condense Data File Utility, make sure to follow the below-listed steps to back up the transactions that will not be covered in the condensation of the file. You can try to save or print them through the link that will be given in the report. Further, you may follow the steps below to condense your company file:
- Firstly, navigate to the File menu and select Utilities. From there, select the Condense Data option.
- In the first window of the wizard, select Transactions before a specific date then enter the appropriate date.
- Make sure to mark the checkbox labeled: Optional: Create a report showing which transactions cannot be removed.
- Then, click Next and choose Summarize inventory transactions (recommended).
- Further, you need to select how your inventory will be condensed and click Next.
- Choose the transaction groups you wish to remove and then, click Next.
- Click Begin Condense. QuickBooks won’t begin condensing as of now but only runs the report.
Note: Try to fix all the transactions by bringing it to the screen and selecting Apply Credits to link them with existing credits.
Step 2: Prepare your Company File
After you have run the report, you need to prepare your company file for condensing by following the below-listed steps:
- Remove your data file Closing Date. You cannot condense data for periods after the closing date.
- Firstly, go to the Edit menu and select Preferences.
- Now, select Accounting and go to the Company Preferences tab.
- Further, you have to select the Set/Date Password option in the Closing Date area.
- Lastly, delete the data in the Closing Date box and click OK.
- Moving ahead, you need to run the Profit and Loss and Balance Sheet (accrual basis, all dates, by year) to find transactions that you entered before your company’s starting date. If, for any reason, these transactions aren’t edited to a specific date, then you won’t be able to fix them after the Condense.
- Make sure to re-sort lists.
- To ensure that there is no data damage, you have to run the Rebuild and Verify Data utility.
- At last, copy your company file and back it up. Once done, save it to a secure location.
Step 3: Save Comparison Reports
After that, you have to print or save the following data as PDFs to compare them with the condensed data and check if all your data is still intact:
- Accrual-based Profit & Loss for all dates
- Accrual-based Balance Sheet for all dates
- Statement of Cash Flows
- A/R and A/P Aging Detail for all dates, as of the report date
- Any other reports that you, your accountant, or recommend
Step 4: Get QuickBooks and the File Ready for Condense
Now, you’re all set to compress a Company File in QuickBooks Desktop. However, you must know that the condensing time may vary depending on the size of your company file and the system’s performance. Therefore, you’re advised to shut down all the background applications to make the condensing process faster. Moreover, if you’re trying to access the company file through a network, then we recommend you run this tool on the computer that is holding your file. However, if stored on a server, copy the file on a workstation before condensing.
Note: If the file condensing process fails or you cancel in between, then you have to restore the backup you made before condensing.
Step 5: Run the QB Condense Data Utility
The last step is to run the condense data utility to shrink the size of the company file.
- Navigate to the File menu and then select Utilities. From there, click on Condense Data.
- Select the option that says ‘Remove the transactions you select from your company file’ and hit Next.
- Click Next after selecting the transactions that you would like to get rid of.
- Click Next after selecting how you would like the transactions to be summarized.
- Again, click Next after selecting how you would like the inventory to be condensed.
- Choose the recommended transactions that you would like to get rid of and click Next.
- Click Next after selecting the list entries that you would like to get rid of.
- Lastly, click on Begin Condense.
- Once the process completes, click Close.
Note: Below we have listed all the transactions and list entries that you will be asked to remove while you begin condensing your company data. However, QuickBooks will create a backup and an archive copy before the condensing begins.
| Transactions | Unused List Entries |
|---|---|
| Uncleared (unreconciled) bank and credit card transactions. Transactions marked “To be printed”. Invoices and Estimates marked “To be sent”. ALL Estimates, Sales Orders, Purchase Order, and Pending Invoices. ALL Time and Mileage activities. Transactions containing unbilled expenses and items | Accounts. Customers and Jobs. Vendors. Other Names. Items”Done”. To-Do notes. Classes |
What is a Period Copy, and How to Create One?
A period copy is a Condensed version of your company file that only contains data for a specific time period. It is only available in Premier Accountant and QuickBooks Enterprise versions. Follow the below-given steps to create a period copy:
- Firstly, go to the File menu and select Utilities. From there, click on Condense Data.
- Once you get the What transactions do you want to remove? window, select Transactions outside of a date range (to prepare a period copy of the company file).
- Make sure to set the correct dates for the Remove transactions before and after filter.
- Follow the instructions in the on-screen wizard to create a period copy of the file.
Note: You must know that the transactions and list entries removed when creating a period copy will be the same as those removed when creating an ordinary condensed file.
Verify and Fix Errors After Condensing the Data File
After completing the condensing process of your company file using the QuickBooks Condense Data Utility, you need to make sure that the before and after condense data reports match.
- Try to run the below-listed reports. You may also print or save the following reports as PDF:
- Accrual-based Profit & Loss for all dates.
- Accrual-based Balance Sheet for all dates.
- Statement of Cash Flows
- Further, you need to compare the after reports to the ones that you saved before running the QuickBooks Condense Data Utility. It’s crucial for these reports to be identical to the pre-Condense Data reports since they are accrual-based summary reports. Follow the steps below if you come across any discrepancies:
- Note down the transactions that are creating the differences.
- After that, you have to restore the backup of your company file.
Need Help While Using Condense Data Utility QuickBooks!
We hope the information provided in this blog has helped you become aware of all the facts associated with QuickBooks condense data utility. However, if some of your queries are still unanswered regarding the functioning and usage of this tool, we would recommend you to give us a call at our QuickBooks Data Service Solutions Helpline Number +1(855)-955)-1942. Our experts will help you condense the company file without data loss in the shortest time possible.
Frequently Asked Questions
A. QuickBooks Condense Data Utility is a built-in tool designed to reduce the size of large company files by removing unnecessary audit trails, detailed transactions, and outdated data. Businesses often use it when their company file becomes too large, causing QuickBooks to slow down or experience performance issues. By condensing data, QuickBooks runs faster, file corruption risks are minimized, and storage space is saved without losing important financial summaries. This makes it especially useful for businesses that have been using QuickBooks for several years and want smoother day-to-day operations.
A. You should consider using the Condense Data Utility when your QuickBooks company file grows excessively large and impacts performance. Signs include slow loading times, freezing during simple tasks, or errors when generating reports. Businesses that have been tracking transactions for years often find their file contains outdated details no longer needed. Using the Condense feature helps streamline data, retaining only the essential financial summaries. However, it’s important to back up your company file before condensing, as the process permanently deletes certain details that cannot be restored.
A. While QuickBooks Condense Data Utility is effective, it comes with certain risks. Once data is condensed, transaction-level details are permanently removed, making it difficult to retrieve supporting documents for audits or reviews. If errors occur during the condensing process, your company file may become corrupted, requiring professional recovery. Additionally, third-party applications integrated with QuickBooks may not work properly if historical data is missing. To minimize risks, always create a full backup, test the condensed file in a separate copy, and seek professional advice if your business is subject to frequent audits.