
Taking backups at regular intervals is considered a best practice for QuickBooks users. Regular backups ensure data safety, as you always have a recent copy of your company data that you can restore in case of accidental data loss. Features like setting up reminders, data verification prior to backup, and automatic backup make QuickBooks an ideal accounting application from a data safety point of view. In this article, we will discuss the method to backup company file in QuickBooks Desktop and other crucial info that will help you safeguard your data from any potential threat.
Backing up company files is an effortless process; however, at times, errors can even restrict this simple operation. To avoid any hurdle in backing up the company file, get in touch with our experts at +1-(855)-955-1942.
How To Backup a Company File In QuickBooks Desktop?
Below are the step-wise instructions to back up QuickBooks Desktop company files that will help you avoid data loss from threats like accidental deletion and cybercrimes. But first, have a look at what does and does not backup in QuickBooks Desktop.
Note: If you’re someone who doesn’t need a full backup and just wants to move your accounting data, then, you create a portable company file.
What you Get in the QuickBooks Backup File (.QBB)?
When you run a backup in QuickBooks, it captures everything that you currently have in the company file. This data includes accounting data, letters, logos, images, templates, and other QuickBooks-related files (like QuickBooks Statement Writer, Business Planner, Cash Flow Projector, and Loan Manager). All these data can be secured and can be recovered whenever required. You must also note that the backup company file doesn’t back up your payroll forms. However, there are a few ways you can back them up, which we have discussed further in this article.
Next, in this article, we will discuss the following two methods of how you can backup company file in QuickBooks Desktop.
- Schedule automatic backups
- Backup your company file manually
Method 1: Scheduling Automatic Backup in QuickBooks Desktop
To save manual efforts of backing up your company file, you can let QuickBooks do it for you automatically. To do so, follow the below-given steps:
- Firstly, open the QuickBooks application, then go to the File menu and choose the option saying Switch to Single-user Mode.
- Again, go to the File menu, hover over Back up Company, and select the Create Local Backup option.
- Select Local Backup in the window that opens up, and then click Next.
- Then, in the Local Backup Only section, select Browse to choose the location where you want to save your backup company file.
- If required, you may also set the number of backups you want to keep.
Note: To set backup reminders, you can try out the options in the Online and Local Backup section instead of marking them it on your calendar.
- Further, select Complete Verification in from the Online and Local Backup section. It will run a test to ensure that your backup file is in good shape before you save it.
- Once your backup file is prepared, select OK.
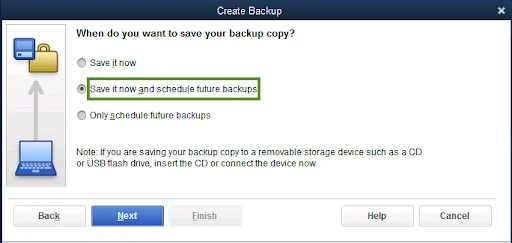
- Now, click on Save it Now to and schedule future backups and then Click Next. However, if you want to save it in the future, then select Only schedule future backups.
- After that, mark the Save backup copy automatically when I close my company file checkbox. Also, select the number of times between backups.
- If you want to create a schedule, click on New.
- To create a backup schedule, you have to fill out the data fields. You can set a particular time or day of the week.
- Click OK right after you set the schedule. Enter your Windows sign-in password when prompted, it gives QuickBooks permission to run the scheduled backup.
- At last, once you’re ready to QuickBooks Scheduled Backup Not Working, select Finish.
Important: QuickBooks creates a backup and schedules your future backups simultaneously on its own. Whenever it is done, you’ll get a confirmation message.
Method 2: Manually Backing up the Company File
In instances where you want to manually create a back up of the company file in QuickBooks Desktop, you can follow the instructions below.
- Open the QuickBooks application, then go to the File menu and select the Switch to Single-user Mode option.
- Then, again go to the File menu again and hover over the Backup Company option, and select to Create Local Backup.
- Now in the window that appears, select the Local Backup option and then hit the Next button.
- Now, in the Local Backup Only section, select the Browse option to select the location where you want to save your backup company file.
- On this window, you can also choose to set the number of backups you would like to keep. However, this is completely optional.
- QuickBooks will now run a test to ensure that your backup file is in good condition and error-free before you save it. Once done, click OK.
- Then, click on Save it now and Next.
- When the process is complete, you will receive a single QuickBooks Automatic Backup Not Working and a confirmation message.
How to Adjust Backup Settings in QuickBooks Desktop?
In this section, we will see how to adjust QuickBooks backup settings so that you can set the backup location, reminders, and backup time and date.
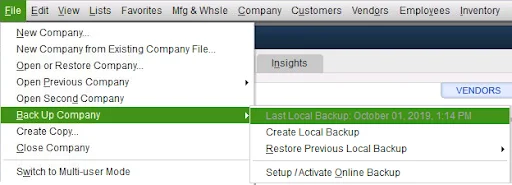
NOTE: If you want to know the last time you take a backup of the company file in QuickBooks Desktop, go to the File menu and hover over the Back up Company option. QuickBooks will display the date and time of the last backup at the top of the menu.
- Go to the File menu, hover over Back up Company and select Create Local Backup followed by Options.
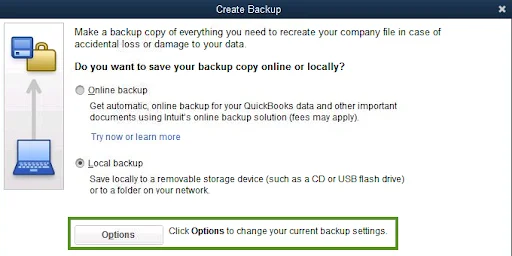
- Select Options and Browse in the LOCAL BACKUP ONLY section to set the location for the backup.
- Enter the number of backup copies you want to have in the backup folder in the Limit the number of backup copies in this folder to box.
- In the ONLINE AND LOCAL BACKUP section, set how frequently you want to be reminded to back up the company file.
- In this section, you can also set whether you want a complete verification, a quicker verification, or no verification at all.
- Click OK to save the changes you have made to the backup settings.
Now that you have created a backup for your company file, you can easily use it to restore your company file back.
However, remember if your backup files are kept on an external storage device or hosting service like Box, then it is important to move them to your local hard drive first before you start restoring your data file.
How to Move the QuickBooks Desktop Backup Company File to the Local Storage?
Follow the instructions below to move your backup company file to the local storage if you have it on external storage.
- First, make sure that you have installed the QuickBooks Desktop application on the system where you want to restore it.
- Then, create a folder on the local storage to save the backup file. Ensure that you name this backup folder something other than the original backup folder to avoid overwriting.
- Connect the external device where you have kept the backup company file and copy it to the backup folder. If you have it on the cloud, download it and save it to the backup folder.
Once you have the backup company file on the local storage of the system, follow the next section to restore it.
How to Restore the Backup Company File in QuickBooks Desktop?
Restoring the company file backup is simple; follow the instructions below to do so.
- In the QuickBooks application, go to the File menu and select the Open or Restore Company tab.
- Then, click on the Restore a backup copy option, then hit Next.
- Now, choose Local Backup and then hit Next.
- After this, browse and select the backup company file in the backup folder. The name of the company file reads something like YourCompanyName.QBB.
- Now, select a folder where you want to restore the company file, and then hit Open.
Important Note: Ensure not to save your backup file Unable to backup QuickBooks company file in the same folder where your company file is saved, or else you may overwrite it. To avoid overwriting the data, you can rename the original company file or save the backup file to a completely different folder.
- When you are ready, click the Save button. If there seems to be possibility of overwriting the data, then select the option that suits you best. But try not to overwrite anything unless you know it is important to do so.
As you have now successfully restored the backup company file, let’s see how to back up payroll forms in QuickBooks, as they are not backed up using the usual backup procedure.
How To Back Up Payroll Forms?
There are a few ways to back up your payroll forms. You can either print copies & save them to your hard drive or save them as PDFs if using QuickBooks Enhanced Payroll.
Moreover, if you want your accountant to edit your payroll tax forms, you need to send the folder containing all of your saved payroll forms.
- Click on the Windows icon, search and open File Explorer, and open it.
- Now, browse your system and look for the [your company name] Tax Forms folder in the company file folder.
- Save this folder and send it along with the Backup QuickBooks Desktop company file to your accountant.
- Once restored, your accountant has to save the Tax Forms folder in the same folder as your company file.
Let Experts Help You With Data Backup!
Hopefully, the above-mentioned steps will have surely helped you backup company file in QuickBooks Desktop. However, if you find the backup procedure a bit complex or want an expert to help you, then we suggest you reach out to our QuickBooks experts by dialing QuickBooks Data Service Solutions Toll-free Number +1-(855)-955-1942.
Frequently Asked Questions
A. Backing up your QuickBooks Desktop company file is crucial because it protects your financial data from accidental deletion, corruption, or hardware failure. Without a backup, losing your company file could mean losing years of accounting records, invoices, and payroll information. Regular backups ensure that you can restore your data quickly, minimizing downtime and maintaining business continuity. It also provides peace of mind during software updates or system crashes.
A. To create a backup, open QuickBooks Desktop, go to the File menu, select Back Up Company, and then Create Local Backup. Choose Local Backup and click Next. Select the folder where you want to save your backup and decide if you want to schedule automatic backups. Finally, click Save & Close. This ensures a secure copy of your company file is stored safely, which you can restore later if needed.
A. Yes, QuickBooks Desktop allows you to schedule automatic backups. When creating a backup, choose Save it automatically when I close my company file or set a specific schedule under Options. You can select the frequency—daily, weekly, or monthly—and the folder location for the backup. Automatic backups reduce the risk of losing data due to human error and ensure your company file is consistently updated without requiring manual intervention.
