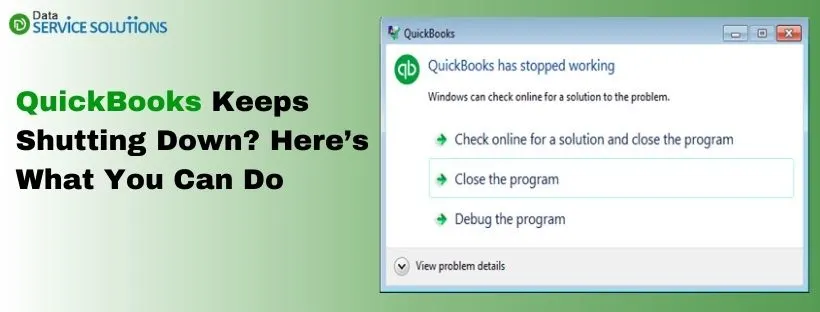
QuickBooks Desktop application provides its users with the option to get their data files backed up automatically. The feature allows you to configure your QB such that it automatically backs up all your important QuickBooks files at a fixed interval. However, sometimes it may get stuck in the middle because of the QuickBooks scheduled backup not working error.
As the error interrupts the backup process, it can jeopardize your data security. So, you need to fix this Auto Backup Not Working in QuickBooks error to avoid data loss immediately. So, read out the blog given here to get more insights on it.
Worried because QuickBooks Automatic backup Not working? Reach out to an expert at +1-(855)-955-1942 and they will guide you on how to fix this error.
Things to Check Before Troubleshooting ‘QuickBooks automatic Backup Not working’ Issue
Many minor things can cause the ‘QuickBooks automatic Backup Not working’ Issue. Just go through this list and check if these are the reasons for your error. You don’t need a complex troubleshooting process to fix them:-
- Company File Name is Too Long or Have Extra Spaces
The company file name should not be more than 65 characters as it can cause the ‘QuickBooks Backup Scheduler not working’ issue. Another reason for this error is to have extra spaces in your company file name. Remove all the extra spaces and reduce the file size to below 65 characters. Also, remove underscores and special characters from the name.
- File Size Too Large
The schedule backup feature can only back up file size up to 3 GIG.
- Not Suitable Drive or Access Permission
QuickBooks Database Server requires certain permissions to proceed with the scheduled backup. Also ‘QuickBooks Scheduled Backup Not Working’ issue can arise on your system if the location for scheduled backup is a flash drive or external drive. Ensure that QB has the required permission and that the drive you are using is suitable for creating a backup.
- Preference Settings are in Conflict
Your backup configuration set to “Keep QuickBooks running for quick startups” can be one reason for this error. It does not allow backing up to stop and creates a .tmp file.
Causes and Solution for ‘QuickBooks Desktop Scheduled Backup Not Working’ Issue
There are majorly 5 reasons that can cause the ‘QuickBooks Desktop Scheduled Backup Not Working’ Issue. They include compatibility issues, improper configuration, problems with your QB version and damage in your company file. Let’s look at these reasons in detail and also discuss the ways to fix it:-
Cause 1: Incompatibility Between Your QuickBooks and Windows Version
One of the primary reasons for the ‘QuickBooks Scheduled Backup Not Working’ issue is incompatibility between your QB and Windows versions. It means that your QB version is set to run on a different version of Windows from what you are using. The application may be running, but users can’t utilise all the features of QuickBooks.
Solution: Run QuickBooks in Compatibility Mode for Your Version of Windows
You need to check the version of Windows you are using and then run QuickBooks in compatibility mode. Through this process, you make QB suitable to run for your Windows. Follow these steps to do so:-
- Right-click on your QB application icon present on the desktop and choose Properties.
- Click on the Compatibility tab and tickmark the ‘Run this program in compatibility mode for‘ box.
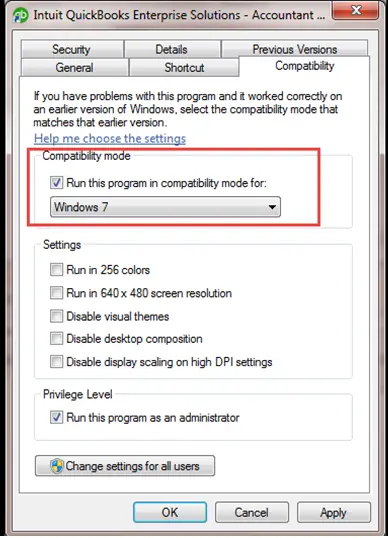
- Click on the drop-down list and choose the version of Windows you are using.
NOTE: If you are not aware of the version of Windows you are using, press Window+R on the keyboard and type in winver in Run box. Check your Windows’ version from the About Windows pop-up.
- Tap on Apply and press OK.
Now, run QB and check if the scheduled Automatic Backup service is running fine.
Cause 2: Wrong Configuration for Automatic Backup
There is a possibility that the ‘QuickBooks automatic Backup Not working’ issue is arising because you did not set up the scheduled backup process properly. Setting up this feature requires manual steps and it is very natural to make mistakes while following them.
Solution: Set-up the Automatic Backup Feature
These are the proper steps you need to follow to set up a scheduled backup feature in QuickBooks:-
- Tap on the File tab and choose Save Copy or Back Up. A new window will open up.
- Click on Backup Copy and tap on Next.
- Now click on Options and set up the location to save your backup file. Once done, press Next.
- Choose Change Location or Use this Location and tap on Next.
- Then tap on Save it now and schedule future backups or Only schedule future backups. Then click on Next.
- Now click on ‘Save backup copy automatically when I close my company file every (number) times’ box.
- Fill in the number in the field provided and click Finish.
Read Also- How to Backup QuickBooks online
Cause 3: Outdated QuickBooks Application
Using an outdated QuickBooks application can potentially lead to ‘QuickBooks Backup Scheduler not working’ issue. It can also cause a drop in the performance of your application.
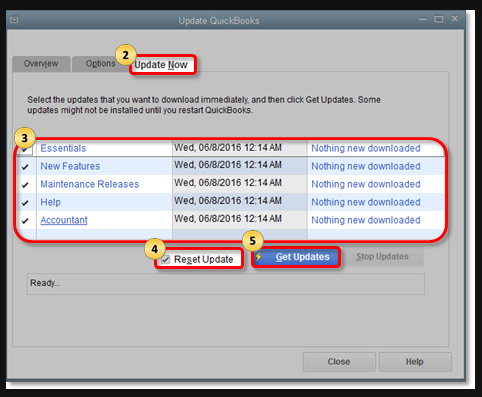
Solution: Update QuickBooks Application
You can simply fix this issue by updating your QuickBooks application. These are the steps you need to follow to do so:-
- Close your company file and then rerun your QB application.
- Go to the Help tab and choose Update QuickBooks Desktop.
- Now go to the Update Now tab and tickmark Reset Update box.
- Click on Get Updates and the download process will start.
- Restart your QB application after the download process is over.
- Click on Yes when the prompt to install the new update appears on your screen.
Note: To get more details on QuickBooks Desktop update, follow our dedicated article on the same.
Cause 4: Damage in your Company file
QB will not run a scheduled backup of your company file if the data has been compromised. The damage in your company file is a prominent reason for the ‘QuickBooks Desktop Scheduled Backup Not Working’ issue.
Solution: Run Verify and Rebuild Utility
The Verify utility helps to figure out the damage in your company file, while the rebuild utility can fix that damage. These are the steps you need to follow:-
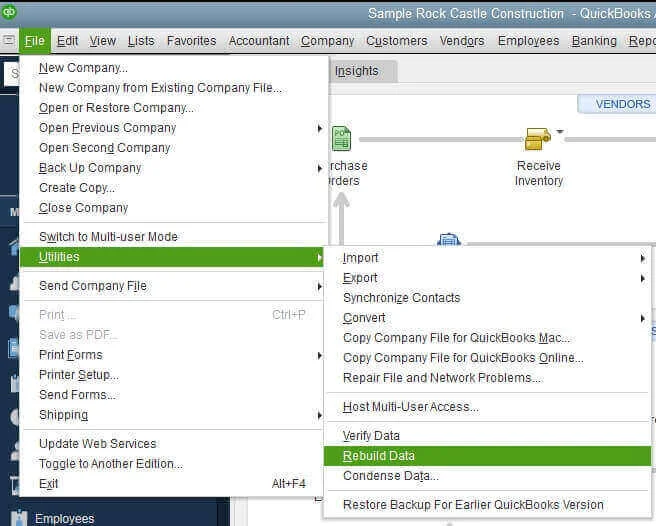
- Go to the File menu and select Utilities.
- Then select Verify Data and QuickBooks will check your company file for data issues.
- Now again click on the File menu and select Utilities.
- Choose Rebuild Data.
- QuickBooks Information window will open up, tap on OK and follow the onscreen instructions steps to save a backup.
- Allow the tool to repair your company file, you may have to wait for a while. QB may appear to be stuck, but if you are able to move your cursor, the tool is working.
- Click on OK after the process is over.
- Now rerun Verify Data utility by following the first two steps of this solution to ensure that there is no damage in your company file.
Click on OK if there is no damage in your company file.
Cause 5: Damaged QuickBooks Desktop Application
One possible reason for ‘QuickBooks Enterprise Scheduled Backup Not Working’ issue is damage in your QuickBooks Application. The damage is preventing the scheduled backup from functioning.
Solution: Use Windows Repair Tool
Windows has an inbuilt repair tool to fix damages in any application. It can also fix the ‘QuickBooks automatic Backup Not working’ issue. These are the steps you need to follow:
- Reboot your system and close all the unrequired programs that can interfere with QuickBooks.
- Backup your QB company file.
- Click on the Start button and then choose the Control Panel.
(For Windows 8/8.1- Press the Start button and click on the Search bar. Then type Control Panel and choose Control Panel from the results.)
- Choose Programs and Features and tap on Uninstall a program if required.
- From the list of programs, Click on QuickBooks and tap on Uninstall/Change.
- Then click on Continue and tap on Next.
- Now choose Repair and press Next.
- Click on Finish after the repair process is over.
- Restart your system if required.
Rerun your QB application and download the latest QuickBooks release along with the tax table.
What To Do If Intuit Data Protect Shows Scheduled Backup Does Not Run Error?
If you are using Intuit Data Protect (IDP) to back up your QuickBooks files and folders, then also you may get stuck on the QuickBooks Enterprise Scheduled Backup Not Working Error. In such a case, you can use the following methods to fix the error.
Update the Intuit Data Protect to the Latest Version
Most of the time, common IDP errors can be resolved by updating it to the latest release. The steps are as follows:
First, Download the Latest Release Of Intuit Data Protect
- Go to the Help menu in the QuickBooks Desktop application adn then choose the Update QuickBooks option.
- After this, click Update Now.
- Then, choose the Data Protect option from the list and then hit the Get Updates button.
Install the Update For IDP
- For this, click on the up arrow ^ given in the lower-right corner of your desktop toolbar near the time.
- Then, right-click on the Intuit Data Protect icon and then select the About Intuit Data Protect option. The icon will look like something like a green padlock.
- Then, select Update, and when it is done, click OK.
Also See: Intuit Data Protect has Stopped Working
Now based on how you access Intuit Data Protect (IDP) and your QuickBooks Desktop, the other methods to fix the QuickBooks Scheduled Local Backup Not Working error are as follows:
If You Access QB Desktop and IDP Locally
You need to verify that the logged-in Windows user profile is with the administrative level access. Also, when you are setting up the IDP for the first time, then also you need to be logged in as a Windows Admin and have admin-level permissions such that you can have full access to IDP and QuickBooks without any error. You can check this in the following manner:
- On the keyboard, press the Ctrl+R keys and open the Run Command panel.
- Then, type in the word Control Panel and hit OK to open it.
- After this, click on the User Accounts option.
- Here, on the User Accounts tab, you should see the word Administrator written below the User Name.
If you find it in the same way, then the user you are logged in has full access to IDP. So the user can make necessary changes and run the scheduled backup smoothly. However, if it is not the case, then you need to create a new Windows admin account for the user.
Also, note that the Windows account having admin-level privileges must be left logged in during the scheduled backup. And if you log it off and then keep your system running, then IDP will not have the admin rights and will give the scheduled backup does not run error.
If You Access QB Desktop and IDP, Remotely
You need to check your server settings and make sure that the remote session is running before and during the scheduled backup time and does not time out automatically. To check this, do the following:
- First, go to the Control Panel section, and then select the System and Security section.
- Then, in System and Security, you need to select Power Options. Here adjust your system’s settings and make sure not to let the computer sleep. This will make sure that your remote sessions keep running before and during the scheduled backup time.
Also, remember when you have a backup scheduled to run, IDP wakes your system up if it goes into Sleep mode. However, if IDP is installed on a laptop, that goes into the hibernate mode when the lid is closed or if it is running on a low battery, then the scheduled backup will not run as expected. Thus, it is also fruitful to adjust your power settings accordingly.
Call Experts!
So now we hope that you know what to do when the ‘QuickBooks Scheduled Backup Not working’ issue occurs on your system. There are many other ways to fix application damages, such as running the Quick Fix my Program and Clean install tool. If your issue is still not resolved after following the above solutions, we will advise you to reach out to an expert at QuickBooks Data Service Solutions Helpline Number +1-(855)-955-1942 and they can provide further assistance.
Frequently Asked Questions
You face QuickBooks Scheduled Backup Not working issue because:
1. There might be some compatibility issues between your QuickBooks and Windows Version.
2. The damage in the company file or QuickBooks Desktop application can also cause you to face QuickBooks automatic backup not working.
Yes, you can run QuickBooks Backup Automatically. The QB makes a backup of your company file each time you close the document. You can also set the recurrence of how regularly QB creates the backup. This backup document is stored on your hard drive under the QuickBooks index in an organizer named “Auto Backup”.
You can change the number of backups in QuickBooks by choosing the Local Backup option. Then in that particular location, you need to choose the Browse option and select the folder to save your company file. Along with that, you will also get the quantity or number of backups. However, you can sometimes face QuickBooks Scheduled Backup Not working after setting the automatic backups. In that case, you can contact our support team by ringing +1-(855)-955-1942.
If your QuickBooks backup is not responding, you can undertake the solutions mentioned in the blog above. Further, also make sure that your company file name or size does not exceed the limit. If it does, then you can compress the size of your company file. You can connect with Data Service Solutions and utilize their data compression service for the same.