
The multi-user mode in QB Desktop enables multiple users to access company files simultaneously on the network. Sometimes, however, you might find QuickBooks multi-user mode not working and you might not be able to access your company data saved on the server from workstations. In such cases, there are multiple error codes that can appear on the screen, such as H202, H303, H505, and H101.
Generally, the multi-user mode stops working in QB due to network disruptions, improper hosting settings, and imprecise Windows permissions. This issue can cause significant delays in completing various essential tasks as you are not able to share company data with other users. The good thing is that you can effortlessly resolve this problem using various methods.
Alright, then, let’s go through the guide to explore the common reasons behind this glitch and discover how we can fix it immediately.
If you need instant assistance whenever you find QuickBooks multi-user mode not working, you can dial +1-(855)-955-1942 to connect with a QB professional.
You might find QuickBooks multi-user mode not working due to the following major reasons:
- You may not have ensured proper Windows folder permissions on the server.
- Mis-configured hosting settings may lead to QuickBooks Multi User Mode Not Working issue.
- Antivirus software or Firewall is preventing communication between user computers.
- The database server is unable to open the company file.
- Improper installation of QB Database Server Manager.
- Essential QB services might not be running on your server computer.
- You might not be using Windows with admin privileges on your system.
- It is possible that you might not have enabled the network discovery feature.
Now that you are aware of the common reasons behind this issue, let’s move to the following section to discover how to fix it easily.
10 Fixes to Try When QuickBooks Multi-User Mode Not Working
Here are the troubleshooting methods that you can implement each time you find QuickBooks multi-user mode not working. Ensure that you use these solutions in the order they are detailed.
1. Check the Folder Permissions On Your Server Computer
The folders that you want to access in the multi-user mode need to have the right Windows permissions. It ensures that the folder holding your company files has permission to be on your network.
- Click on the Windows icon and open File Explorer.
- Right-click the folder in which you have stored your company file. Then, select Properties.
- On the Security tab, select Advanced> QBDataServiceUserXX> Edit.
- Make sure to set the following settings to Allowed:
- Traverse Folder/Execute File
- List Folder/Read Data
- Read Attributes
- Read Extended Attributes
- Create Files/Write Data
- Create Folders/Append Data
- Write Attributes
- Write Extended Attributes
- Read Permissions
Steps to be followed if your Permissions aren’t set correctly:
- Right-click the folder in which your company file is saved and select Properties.
- After that, select Security followed by Edit.
- Choose QBDataServiceUserXX and select Full Control, then Allow.
- Lastly, click on Apply, then OK.
Aren’t you able to fix the QuickBooks 2022 Multi User Mode Not Working error? If yes, then don’t panic! You can jump to the next solution.
Recommended To Read –Troubleshooting Methods to Eliminate QuickBooks Error H202
2. Install QuickBooks Database Server Manager
QuickBooks Database Server Manager (QBDBMgrN) allows you to share your company files with other computers over your network. Besides, it also allows you to monitor your multi-user network. It’s essential to have QuickBooks Database Server Manager running while setting up a network, for accessing the company files. A scan option for the company file on the server computer is also provided by it and ultimately helps you resolve the QuickBooks Not Working in multi user mode error.
Steps to Install the QBDBMgrN
After downloading the exe file for the QuickBooks Database Server Manager, you need to install it in the following manner.
Note: If you are the one who hosts multiple versions of QB Desktop on the network, then install them all in order. Start by installing the oldest version first, then end with the most recent one.
- First, close all open programs on the server computer, including QuickBooks Desktop.
- Then, open the install file you just downloaded. It is the Setup_QuickBooks.exe file.
- Now, follow the onscreen instructions, but before that, get your product information handy.
- After this, when QuickBooks asks you to choose an install type, select the Custom or Network Options. Then, you need to hit Next. Remember not to select the Express option.
- Note: The Express option installs the QuickBooks Desktop application over your previous version of it. However, you might need your previous version for comparison and troubleshooting purposes, so it’s better not to choose that option.
- Then, after this, you need to choose the options that suit the best for your network setup and then select Next. Both options will install the Database Server Manager on the system. If you already have the QuickBooks Desktop installed on your server computer, this step won’t overwrite any existing company data. However, here you will get two options you can choose accordingly:
- If you want both Database Server Manager and QuickBooks Desktop on your server system, select I will be using QuickBooks Desktop on this computer, AND I’ll be storing our company file here so it can be shared over out network option. We strongly recommend you choose this option.
- If you only want Database Server Manager on your server system, then select I will NOT be using QuickBooks Desktop on this computer.
- Then, follow the other given on-screen instructions, and when you are done, select Install. Windows will then ask you for some permissions.
Also See: ow to Fix Database Server Manager Network Diagnostics Failed?
3. Create a Windows User Account With Admin Rights.
When you use multi-user mode in QuickBooks Desktop, then you have to make sure to sign in to Windows as a user with admin rights to resolve Quickbooks Problem with Multi User Hosting Setup. With this, firewal settings and folder permissions can be changed. Moreover, you also need to provide admin rights to programs like Database Server Manager. Follow the below-given steps to create a Windows user with admin rights so you can set up programs and change settings in Windows.
- Close QuickBooks Desktop in the first place.
- Click on the Windows icon to open the Control Panel. From there, select User Accounts.
- Further search for the QBDataServiceUserXX for your version of QuickBooks Desktop. For QuickBooks Desktop 2021, look for QBDataServiceUser31. For the 2020 version, look for QBDataServiceUser30. The number goes down for each version.
- Then, you need to Change the account type option followed by Administrator. Again, you need to select Change Account Type.
- Select Apply (to save changes).
NOTE: For each version of QuickBooks Database Server Manager that you use, you need to repeat these steps.
4. Scan Your Folder Using the Database Server Manager
Before sharing your files, scan the folders holding them using the Database Server Manager to access your file over the network:
IMPORTANT: Following the below steps might share all your folders if you’re using Database Server Manager 2019. Therefore, if you want to give access to specific users then, you must set your folder permissions.
- On your server computer (the one that hosts your company files), click on the Windows icon.
- To open QuickBooks Database Server Manager, Type Database in the search space.
- Click on browse (From the Scan Folders tab) to select the folders that hold your company files (QBW).
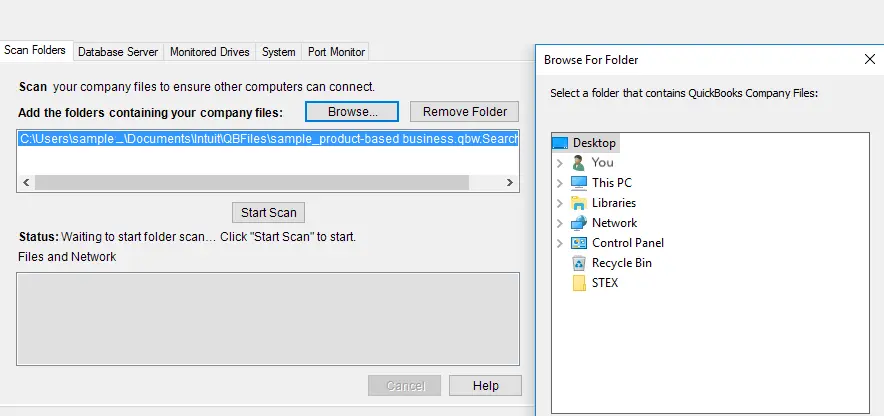
- Once done, click OK.
- At last, click on Start Scan.
Once the scan completes, you can see the folders in the QuickBooks company files found section. It will allow you to access the company files from these folders from other computers on your network.
5. Enable Hosting On Your Server Computer
You must try to turn on Multi-user Access on your server computer to resolve the Multi User Mode Not Working QuickBooks issue. The only computer with this feature turned on is your server computer :
- Go to the File menu (In QuickBooks Desktop).
- There, select Utilities followed by Host Multi-User Access.
- Lastly, click on Yes (to confirm).
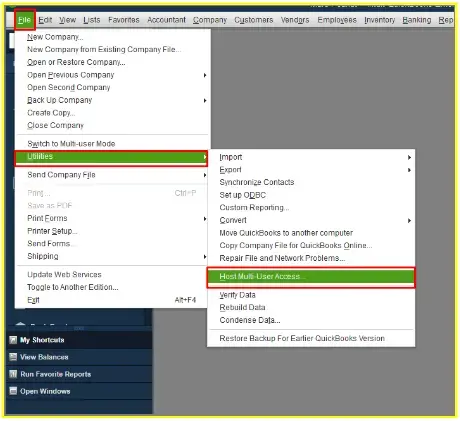
Sign in as a user (To access your multi-user network) with admin rights on your server computer and workstations.
6. Make Sure QuickBooks Services are Running On Your Server Computer
Follow these steps to check QuickbooksDBXX. Then, repeat them for QBCFMonitorService.
- Click on the Windows icon type Run into the search and open Run Window.
- Type services.msc into the Run window, and then press the Enter key.
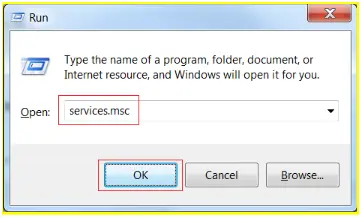
- Find and double-click QuickBooksDBXX on the list. [Here, XX notes your version of QuickBooks.]
- After that, select Automatic for the Startup Type.
- Make sure the Service status is either Running or Started. If it’s neither, select Start.
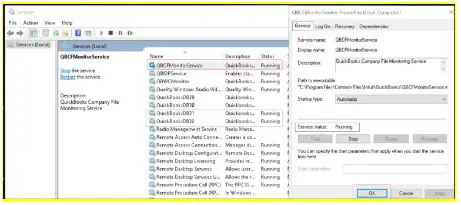
- Go to the Recovery tab and click on Restart the Service from each of these drop-down menus: First failure, Second failure, and Subsequent failures.
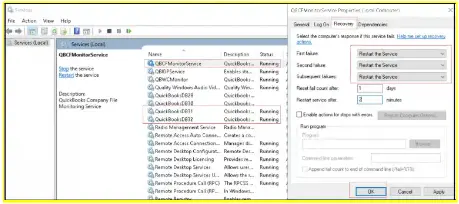
- Select Apply and then OK to save the changes.
- Once done, open QuickBooks on each workstation. Go to the File menu and select Switch to Multi-user Mode.
- Type services.msc into the Run window, and then press the Enter key.
7. Add the Server to the Windows Host File
Adding your server details to the Windows Host file can help Windows to identify and connect easily with the server system. So, follow the given steps:
- Access the Windows Host file using the Notepad on the system facing the QuickBooks multi-user mode not working issue.
- You will get the host file on the location: C:\Windows\System32\Drivers\Etc\
- You can also open the Notepad as admin if required.
- Then, type the IP address of the server after the last IP address.
- Then hit the Tab key and then type the server name.
- Lastly, click on the Save button from the File menu and Exit the file.
8. Ping Your Server From a Workstation
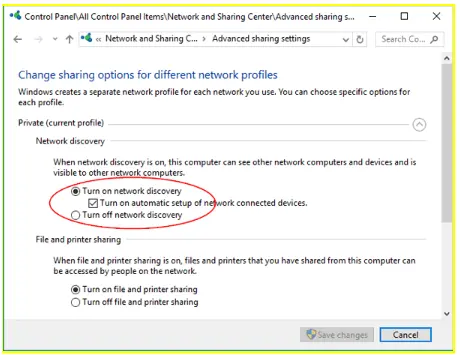
You need to turn on the Network Discovery option before moving ahead with the given steps to resolve the QuickBooks multi-user not syncing error. And turn it on on both the server system and the computer system facing this error, then follow the given steps:
- Open the Start menu on the server and the workstation which is getting this error.
- Then, in the search space, type the word Network and open the Network and Sharing Center.
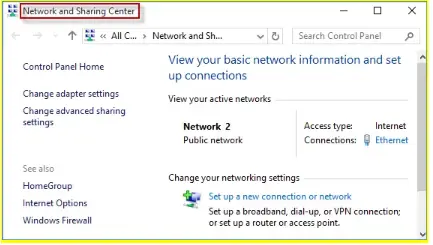
- Here, you need to click on the Change Advanced Sharing Settings option.
- Inside this, you have to turn on the Network Discovery & the File and Printer Sharing.
- Then, you need to get your server name.
- And into the Run window, type the Cmd and hit Enter.
- Now, in the CMD window, you need to put the ipconfig/all text and click Enter.
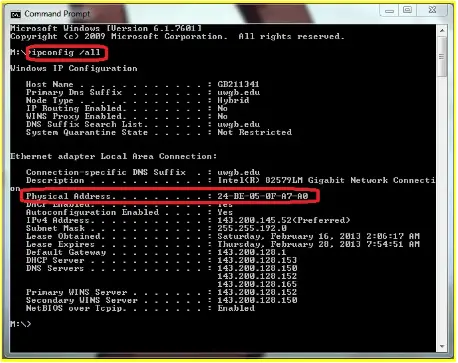
- Look on the screen, and note down the Host Name written in front of the server name.
- Then, to test the server, you have to move to the workstation.
The steps ahead are a bit technical, and if you are new to this, make sure to get these steps done under the supervision of an expert. For assistance, call the toll-free number +1-(855)-955-1942.
- For this, click on the Start menu and choose to open the Run command window.
- Again type the word CMD in the Run window.
- Now, you need to type exactly ping_[your server name] and hit Enter. [Note: Type your server name without brackets.]
Repeat the above steps for all the workstation systems on which you are not able to run QuickBooks in the multi-user mode.
9. Check that QuickBooks is Able to Send Data
This is a two-step solution that you can perform to fix the multi-user mode issue in QuickBooks:
Step I: Check that QuickBooks is Able to Transmit Data
If the firewall or the antivirus is the leading cause of the issue behind the multi-user mode, then you need to set up exceptions in its settings for QB. This will allow QuickBooks to transmit data without getting interrupted. So, follow the given steps to set the exceptions.
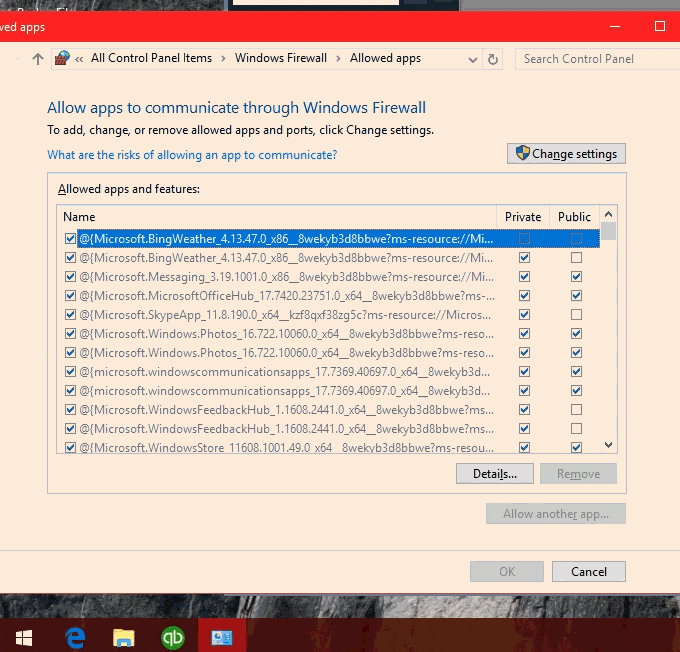
- Click on the Windows key and land on the Control Panel.
- Then find and click the Windows Firewall option.
- Next, click on the option saying Allow an app through the Windows firewall.
- Here, you need to click on the Change Settings option followed by clicking the checkbox under the public list for the QB application.
- Next, hit the OK button and click on the Public option for the application.
- Finally, run the QB Desktop in multi-user mode and check if it’s working.
Step II: Check the Path and Make Sure QuickBooks Can Communicate Easily With the Server
For this step also, you need to turn on the Network Discovery option. Check the steps mentioned in Solution 8 of the blog. After following the steps mentioned there to turn on the Network Discovery, follow the steps given below:
- Press the Windows + R key and open the Run command window.
- Then, type the word ping [servername], and hit Enter key.
![ping [servername], and hit Enter key](https://dataservicesolutions.com/wp-content/uploads/2023/07/ping-servername.webp)
- Now, on the system, use the UNC, which is Universal Naming Convention, and reach the shared folder on the server.
- Lastly, use this UNC path to switch back to the QuickBooks company file.
- Go back to the company file using the path and check if it is correct.
10. Download the Tool hub and Use QuickBooks File Doctor
You can use the File Doctor tool to check the files you are trying to access. Do this with the following steps:
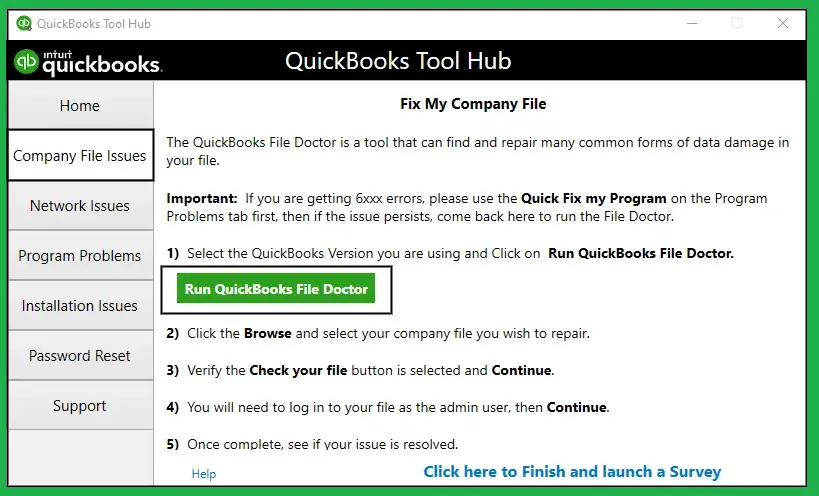
- Close the QB application.
- Then download the most recent version of the QuickBooks Tool Hub application and save the file somewhere you can find it easily. If you already have the tool hub on the system, check its version from the Home tab and update it if required.
- Now, open the file you downloaded, i.e., QuickBooksToolHub.exe.
- Then, follow the on-screen instructions to install it and agree to the terms and conditions.
- When the installation finishes, click twice on the icon and open the tool hub application.
- After this, select the Company file Issues tab.
- Now, select the Run QuickBooks File Doctor option and give it some time to open.
- Then, you need to select the company file from the drop-down menu, or you can use the Browse button to search for your company file.
- After this, you need to hit the Check your File option and Continue.
- Lastly, you need to enter the admin password and then hit Next.
These steps will help you check and rectify any issues with your company file, and then you will be able to access it easily.
Preventive Tips You Can Try For QB Multi-User Mode Issues
Here’s what you should do to ensure that you don’t experience difficulties when running QB Desktop in multi-user mode on your system:
- Dedicated Server System: Ensure that you store the company file on a dedicated server computer to reduce performance issues.
- Reconfigure Firewall Settings: Reset your Windows Firewall settings to ensure seamless communication between the server & workstations.
- Perform Regular Data Backups: Always store a backup copy of your company file to ensure adequate data protection.
- Monitor Network Stability: Regularly check your network configuration & bandwidth to ensure proper connection between various systems.
- Install QB Updates: Ensure that your QB application is updated on the server & workstations.
- Check DNS Settings: Verify that the DNS settings are accurate on all computers connected to the network.
Winding Up
By performing the above-listed methods you can surely resolve the QuickBooks multi-user mode not working error without any hassle. However, if you get stuck and need further assistance, we would suggest you give us a call on our QuickBooks Data Service Solutions Helpline Number +1(855)-955-1942.
Frequently Asked Questions
Here’s how you can check if your QB application supports the multi-user mode feature:
a. Open the Menu: Launch QB Desktop and go to the File menu & choose Utilities.
b. Check For the Option: If you can find the Host Multi-User Access option, it means your QB version supports the multi-user mode facility.
To enable the multi-user mode in QB Desktop, follow the given steps:
a. Install the QB application on all the systems you want to use in multi-user mode.
b. On the server computer, go to the File menu and then to Utilities.
c. Click the Host Multi-User Access option. Then, confirm your move by clicking Yes.
d. Once the hosting configuration is completed, go to the File menu again and Switch to Multi-user Mode.
e. Now, you can access the company file on the other systems. Just open the QB application and choose the Open or Restore Company option from the File menu.
Yes, it is important to update the QBDBMgrN to the same version as the QuickBooks Desktop application. Not having the same version for both of them can trigger errors like the QuickBooks multi-user mode not working error.
To update the QBDBMgrN to the same version as QB Desktop, you need to install the latest QuickBooks updates. The QBDBMgrN utility will automatically update alongside the software. Alternatively, you can completely reinstall QB Desktop on your computer.