Quickbooks accounting application is prone to face many types of errors like installation errors, payroll errors, and company file errors. These errors have some specific reasons for their occurrence and thus have some special troubleshooting steps along with some common ones. Here in this blog, we will discuss one such common payroll error, the QuickBooks Payroll error 12002. It is a common error that appears when the users try to download or update the QB Payroll.
If you are struggling with the QuickBooks payroll update error 12002, then read out the complete blog. This blog will help you understand the main reason for its occurrence, along with suggesting you some solutions to resolve it.
Need expert’s advice to resolve QuickBooks Error 12002? Talk to our professionals at +1-(855)-955-1942 and get your issue resolved in minimum time.
QuickBooks Error 12002: A Brief Introduction
QuickBooks Error 12002 is a common 12-series error that appears when the user updates the QuickBooks desktop or payroll. It comes in the middle of the process and interrupts the entire procedure interfering with the user’s routine. The error message for the error 12002 QuickBooks update says that:
QuickBooks Update Error: Problem
Error 12002: A network timeout that is preventing QuickBooks from accessing the server.

QuickBooks Error 12002: Reasons behind its appearance
QuickBooks error 12002 generally occurs when the QB fails to use the Internet connectivity on your computer. Thus the slow internet connection or the network timeout is the main reason for its occurrence. The other reasons are as follows:
- QuickBooks error 12002 is not able to access the server because of the network timeout.
- Incorrect SSL settings can also lead to this error code 12002 in QuickBooks.
- The Internet Security or Firewall settings can also disrupt the connection and lead to this error 12002.
- A poor internet connection can also lead to the error 12002 in QuickBooks.
- If Internet Explorer is not set as the default browser, then also you may face the QuickBooks payroll update error 12002.
QuickBooks Error 12002: Important Steps before troubleshooting it
Instead of jumping directly to the troubleshooting steps, we recommend you perform the given steps first:
Step 1: Create a backup for your Company File.
- To begin the process, open the QB application on your system.
- Then, you need to go to the File menu and then choose the Backup Company file option.
- Next, you have to make a backup of your data by clicking on the Create Local backup option.
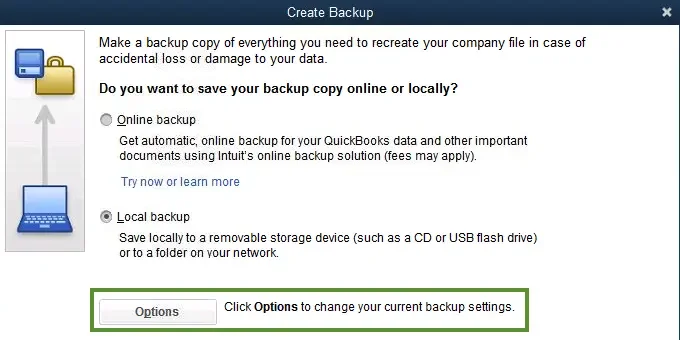
- Now, proceed forward and create a backup by following the on-screen instructions.
Step 2: Update your QuickBooks Desktop Application.
- Begin the process by heading toward the QuickBooks Help menu and clicking on the Update QuickBooks option.
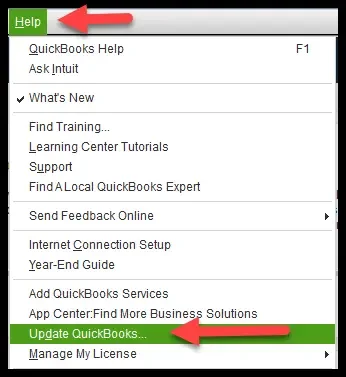
- Then, choose the Update Now option here.
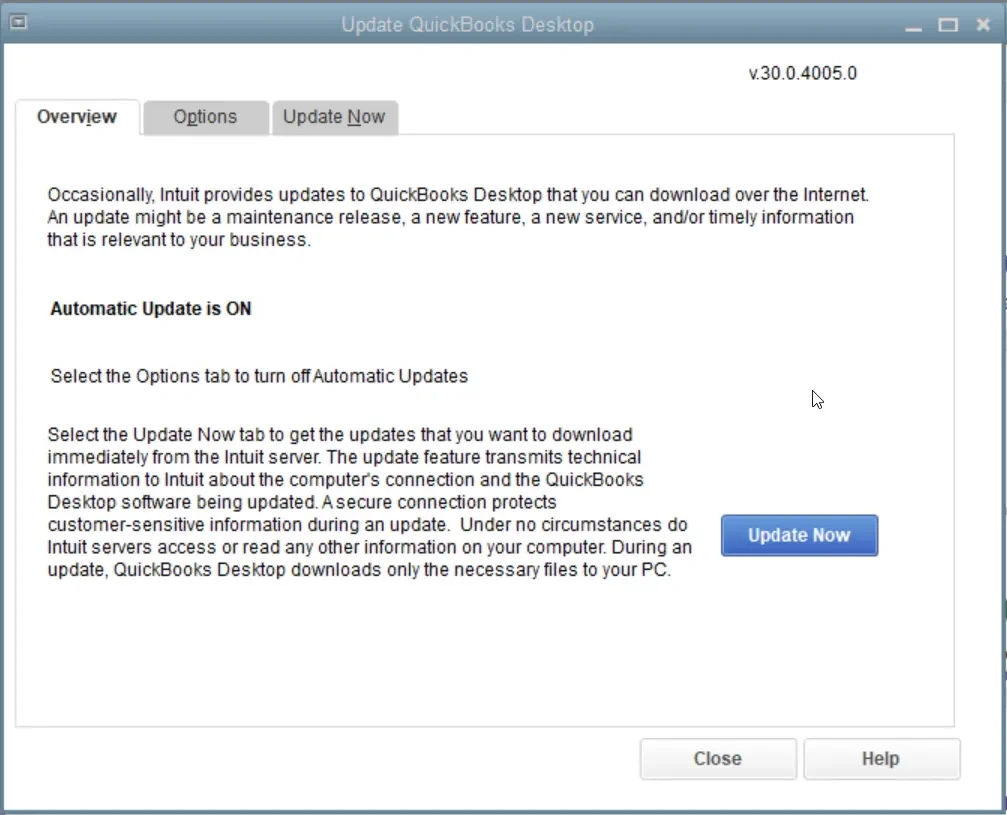
- Now, click on the Get Updates option and wait for the process to complete.
- It may take a moment to Sync with the server, and then it will show all the available updates.
- Once it shows the updates, click on the Update Now button and get the required updates.
Step 3: Complementary Steps.
- Download and Operate the TLS 1.2 utility.
- Also, make Internet explorer the default browser.
- Try accessing any secure website outside the QuickBooks Desktop, like the website of your financial institute.
QuickBooks Error 12002: Troubleshooting Solutions to Follow
Since the main reason for its occurrence is a poor internet connection. Thus the troubleshooting methods for error 12002 QuickBooks update revolves around verifying and configuring the internet connectivity settings on the system.
Solution 1: Configure the Internet Explorer Settings
- First, close the QB application and open Internet Explorer.
- Then go to the Tools menu and then head to the Internet Option.
- Further, you need to choose the Security Settings option and set the settings to the Medium High option.
- Next, click on the Globe icon given there and then choose the Content tab.
- After that, you need to ensure that you have enabled the Content advisor button there.
- When it is done, you need to click on the Connection tab and follow the below-mentioned steps:
- Find and Choose the Never a Dial connection option.
- Then make sure that you select the right ISP and then hit on the OK button.
- After that, select the LAN setting option.
- Here, you need to check if the Automatically detect settings check box is enabled.
- Also, check if you have the Use a Proxy Server disabled or not.
- In case you find there the Port 80 option, you need to Uncheck its box.
- After you are done with all the steps mentioned above, click on the OK button.
- Next, you need to also click on the Advanced Tab and follow the given steps:
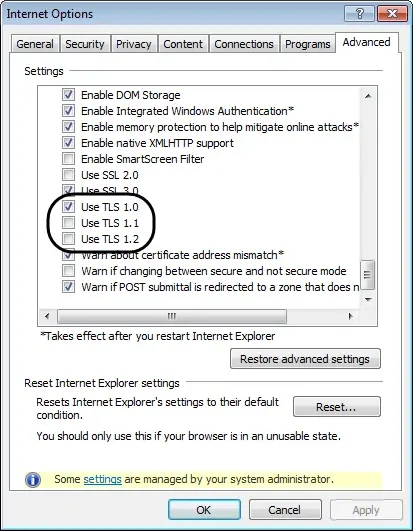
- First, click on the Restore Advanced Settings option.
- Then search for the Use TLS 1.0, Use TLS 1.1, and Use TLS 1.2 options.
- After that, you have to make sure that you have checked the box against Use TLS 1.0 and kept the other two unchecked.
- Once you have done all this, close the Internet Option and then hit on the OK button.
- Next, you also need to close Internet Explorer and restart the system.
- Lastly, after this, open QB and update it again.
Still Confused? Talk to Our Professionals.
Give us a call at +1-(855)-955-1942
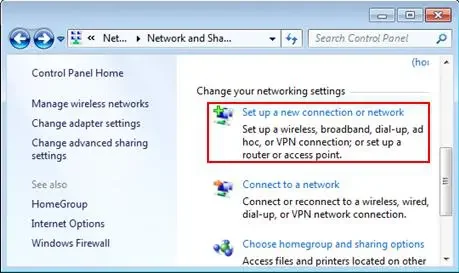
Solution 2: Verify the Internet Connection
If the above-mentioned solutions did not help to solve the error for you. You need to play with the Internet settings on your system.
- First, go to the Select the Help option, and afterward, click on the Internet Connection Setup.
- Then, select the ‘Use my computer’s internet connection settings to establish a connection when this application accesses the Internet option.

- After doing this, update it again.
- For this, in Quickbooks 2008 and recent versions: Go to the Help menu and click on the Update QuickBooks followed by the Update Now tab.
- For QB 2006 and older versions: Select the File option, Click on the Update QuickBooks option, and then on the Update Now tab.
Solution 3: Set up an Internet Connection
- Open Quickbooks, and thereafter, go to the Help menu and click on the Internet Connection Set up option.
- After that, click on the Internet Connection Set Up option.
- Then click on the Next and Done buttons.
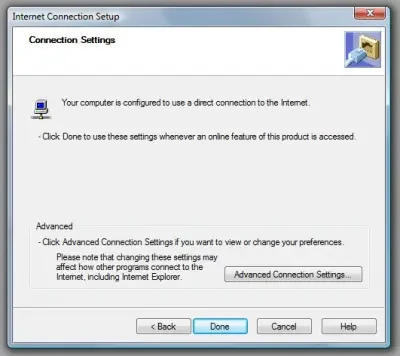
- Lastly, update your QuickBooks application and check if the error is resolved or not.
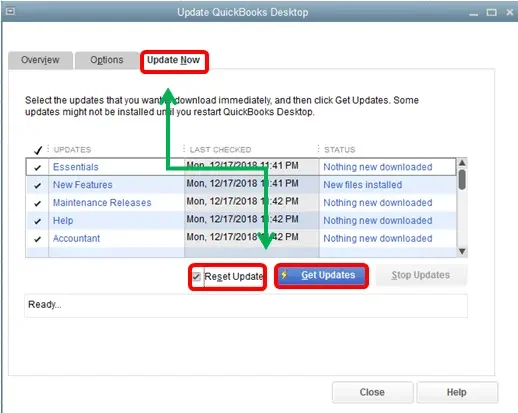
Solution 4: Reset Updates settings in the Internet options.
You can also reset the updates settings in the internet options to resolve the QuickBooks error 12202. Follow the given steps for the same.
- For the first step, you need to choose the Update Now tab.
- Followed by selecting the Reset Update Checkbox.
- Further, hit on the Get Updates option. In case it fails to update, carefully follow the below-mentioned steps:
- Click on the Advanced Settings Option first.
- Then look for the Use TLS 1.0, USE TLS 1.1, and Use TLS 1.2 options.
- And ensure that you have this Use TLS 1.0 checked and that the rest two are unchecked.

Solution 5: Add QuickBooks to the Windows Firewall Exception Port to resolve the QuickBooks Error 12002.
- Click the Windows Start button and then type Windows Firewall in the Search Programs and Files search box.
- After that, click on the Windows Firewall option from the top of the list.
- Go to Advanced Settings from the left pane and then right-click on the Inbound Rules option.
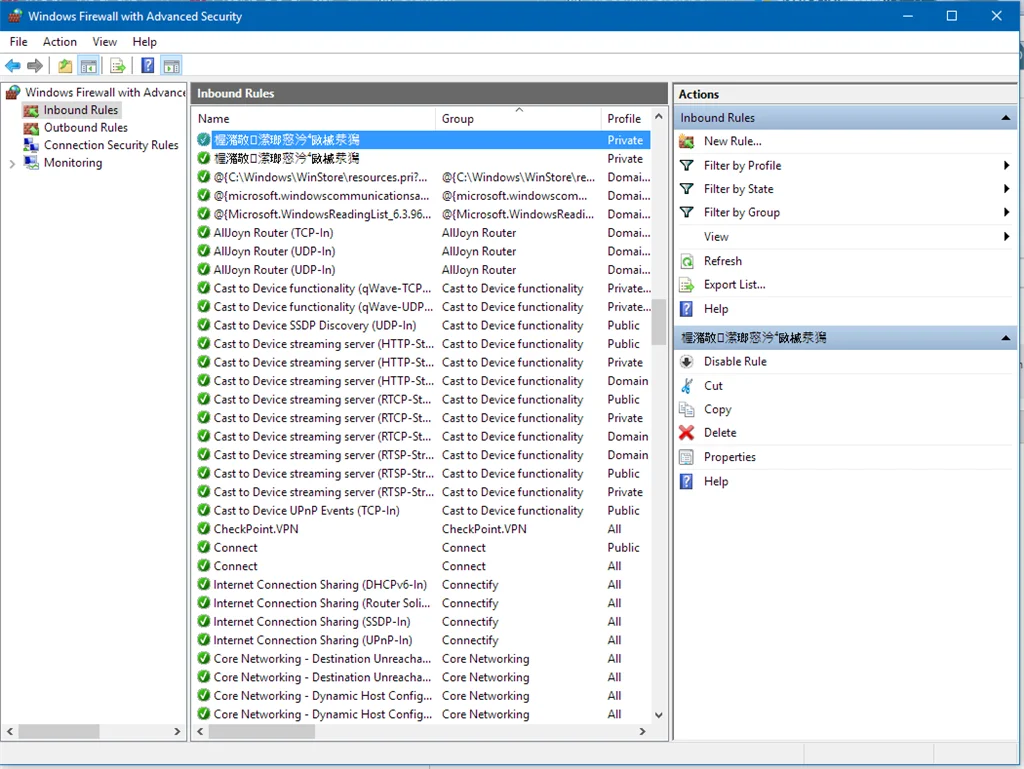
- Then choose the New Rule and then select the correct Port.
- After that, click Next and ensure that here the TCP option is selected.
- Now, type the correct Port for your version of the QuickBooks Desktop.
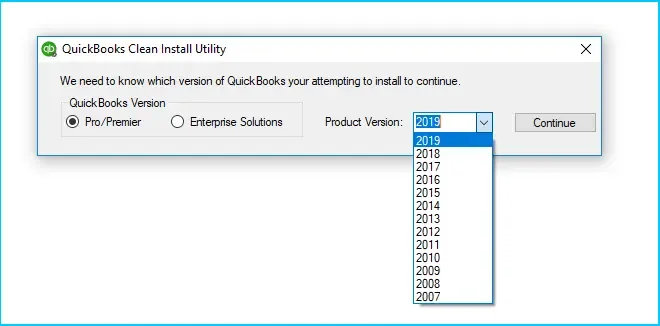
- For example, for QuickBooks 2019, the port number is 8019; for QuickBooks 2018, the port numbers are 56728, 55378-55382; and for QuickBooks 2017, they are 56276, 55368-55372.
- Then, choose the Allow Connection button and then hit Next.
- Ensure that all the profiles that are displayed in the pop-up are marked and checked.
- Click the Next button and type a name for this new rule.
- Lastly, hit the Finish button and follow similar steps and set up the Outbound rules.
Still having issues? Call us at +1-(855)-955-1942
Solution 6: Make Internet Explorer your Default Browser and fix the QuickBooks Error 12002.
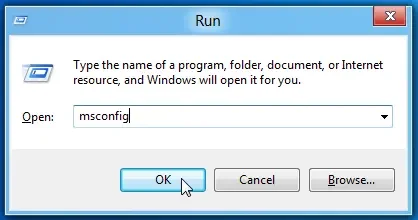
- First, launch the Run box by hitting the Windows and R keys together on the keyboard.
- Then, in the Run window, type INETCPL.CPL and hit OK.
- Further, choose the Programs tab and click on Make Internet Explorer, and set it as the default browser option.
- It will pop up a default window app open on your screen. Here, in the web browser section, you must choose Internet Explorer as your default app for browsing on your computer.
- Once you’re done, you can check for QuickBooks Desktop error 12002.
- Alternatively, the procedure will look as follows:
- First, Double-click on the Internet Explorer option on your desktop.
- Further, you need to hit the Gear icon in the upper right corner of your IE window.
- Then choose the Internet Options, followed by the Programs tab.
- Now, under the Default Web browser, click the Make Default button.
- Lastly, hit OK to save the changes.
Solution 7: Update your Chrome browser to fix the QuickBooks error 12002.
Another option is to install the latest version of the Chrome browser on your system. If the Chrome browser is outdated, the error 12002 is likely to appear. As a result, you need to upgrade the browser by following the procedure given below:
- To begin, first, open the Chrome browser on your computer.
- Then, from the upper right corner, you need to click on the More button.
- There, you need to choose the Update Google Chrome option.
- Now, wait for a while and update the browser.
- Once the process is over, you need to click on the Relaunch option.
Solution 8: Install and Uninstall the QuickBooks application in the Selective Startup Mode.
Prior to this step, we hope that you have already taken a backup of your data. And also kept your QuickBooks Desktop license and product details handy. If you are done so, follow the next steps:
Step 1: Start Your System in Selective startup mode
Switch to the Selective startup mode to prevent the other applications from interfering with the QB repair process. If you are not comfortable carrying out the instructions at any point during the process, please contact a Windows expert or call us at +1-(855)-955-1942, and our experts will help you out.
- Press the Win + R keys together to get the Run command box on the bottom left of your computer screen.
- Then type the word msconfig and select the OK tab.
3. After that, you need to head to the General tab and choose the Selective startup and Load system services option.
4. Then, hit click on the Services tab and then choose the option to Hide all Microsoft Services.
5. Now you need to select Disable all option.
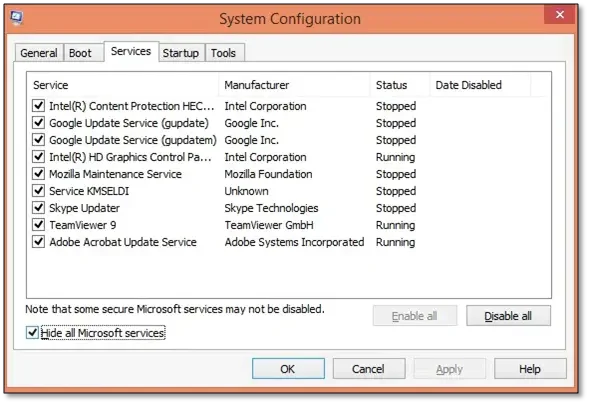
6. You now have to Uncheck the option called Hide all Microsoft services.
7. Then, select OK after verifying that you have selected the Windows Installer checkbox from the list of services.
8. Lastly, on the System Configuration window, you need to click the Restart button.
Step 2: Uninstall or Install QuickBooks Desktop to fix the QuickBooks Error 12002
- After you start your computer in the selective startup mode, you need to clean install the QB Desktop.
- For this purpose, you can use the QuickBooks clean Install Utility or QuickBooks Clean Install Tool.
Step 3: Switch back to Normal startup mode.
After you have successfully uninstalled and installed QuickBooks Desktop, you need to restore your system to its normal configuration.
- First, in order to access the Run command box, press the Win + R keys on your keyboard.
- Then type the text Msconfig and tap the OK button.
- Next, choose the General tab, and then opt for Normal startup.
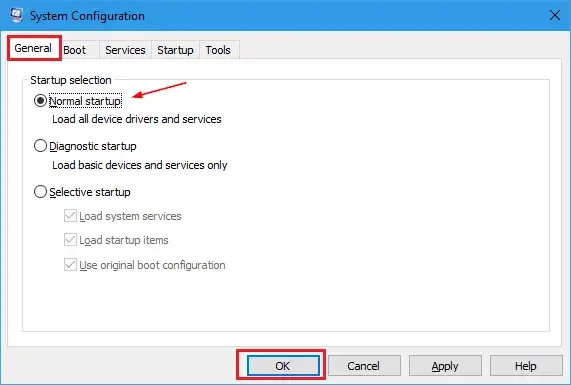
- Now, you need to choose the OK button.
- Lastly, select the Restart option on the System Configuration window.
To Sum Up
Hopefully, these given steps will help you resolve QuickBooks Error 12002. However, you may also take the help of QuickBooks Tool Hub to resolve the QuickBooks payroll update error 12002. It is an app integrated with several tools that may help you resolve common installation and update errors. In case, even after that, you get stuck with this error 12002 QuickBooks update, then you may connect with our QB experts by calling us at our Toll-free number +1-(855)-955-1942.
Frequently Asked Questions
A. QuickBooks Error 12002 occurs when the software cannot connect to the internet to update payroll or QuickBooks Desktop. This error usually appears during updates due to network timeouts, incorrect firewall settings, or proxy server restrictions. Users often see a message like “Connection Timeout” or “Unable to connect to the server.” Resolving this error ensures your QuickBooks payroll updates and other services function smoothly.
A. Several factors trigger QuickBooks Error 12002. The most common causes include slow or unstable internet connections, outdated QuickBooks versions, incorrect SSL settings, misconfigured firewall or antivirus programs, and invalid proxy settings. Temporary server outages from Intuit can also result in this error. Identifying the root cause is essential before applying fixes to prevent recurring issues.
A. To fix QuickBooks Error 12002, start by checking your internet connection and ensure it is stable. Next, verify that your firewall and antivirus settings allow QuickBooks access to the internet. Go to QuickBooks, navigate to Help > Update QuickBooks Desktop, and select Reset Update. Also, make sure your Windows operating system and QuickBooks are up to date. If using a proxy server, configure it correctly in Internet Explorer settings.