
QuickBooks helps you streamline your accounting process by providing you with various features like connecting your bank account, importing your transactions, processing employee payroll, etc. It also makes it easy to keep your bank transactions record by allowing you to Import Bank Transactions Into QuickBooks Desktop. It provides you with two ways to import the transactions, one through Direct Connect and the other through Web Connect. In this article, we will guide you step-by-step through both processes of Importing Bank Transactions into QuickBooks, so continue reading the blog.
Get help while importing bank transactions into QuickBooks Desktop and Online from our experts at Data Service Solutions. Reach out to them at the toll-free number +1-(855)-955-1942.
Vital Reasons to Import Bank Transactions into QuickBooks from Excel
Multiple reasons to upload transactions to QuickBooks desktop and online based on concerns around safety or issues with the application are:
- Users don’t want to connect their bank account or credit card with the application.
- Users want to enter transactions prior to the date from which QuickBooks can retrieve data.
- Credit card or bank account is unable to connect directly to QuickBooks.
- It saves time and energy as it automatically updates data.
- It simplifies the reconciliation process.
- Your Books of Accounts must be always updated.
Things you should remember before you Import Transaction Into QuickBooks Desktop
Since this step of importing the bank transaction in QuickBooks is in continuation with setting up your account for Bank Feeds. You need to set up that account first. After you have set up the bank feed account, you need to follow the given points before proceeding ahead:
- First, back up your QuickBooks company file before you start downloading bank transactions in QB.
- QuickBooks does not allow you to download the transactions to the same company file more than once. But, your bank can reopen the transactions on their side; in such a case, QuickBooks can download them again. However, you might need to reach out to your bank to get help regarding this.
- The Web connect method only works with files having .qbo extensions. The other types of files, like QFX and QIF Quicken files, do not work with them. You will require other applications for them that can handle the QIF files.
How to Import Bank Transactions Into QuickBooks Desktop and online?
With the help of Direct Connect or Web Connect, You can import bank transactions into QuickBooks desktop and Online. Direct Connect allows you to download your transactions and transfer funds to another account within QuickBooks. However, with Web Connect, you need to use a web browser to import transactions into QuickBooks.
Steps to Import Transaction Into QuickBooks using Direct Connect (For Windows)
The first time you connect your bank account with QuickBooks, it automatically downloads the maximum number of transactions available from your bank account. These historical transactions may go up to a year, depending on the bank. However, for most banks, it may only download 90 days of historical transactions.
The steps to download the back transactions into QuickBooks using Direct Deposit for Windows operating system are as follows:
- Log into Your Bank Account through QuickBooks desktop
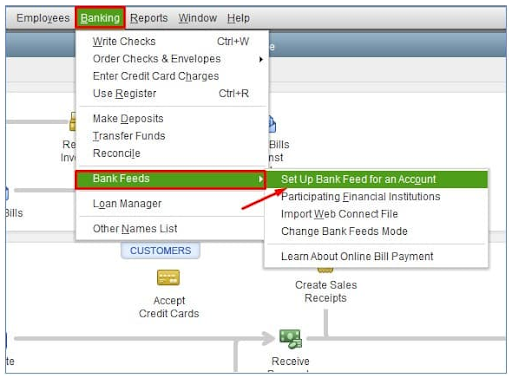
- Open the QBD home page and Tap on the Banking menu.
- Click on Bank Feeds and then choose Set Up Bank Feed for an Account.
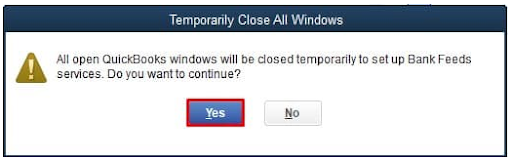
- A pop-up telling you to temporarily close all running QuickBooks windows will appear on your screen. Tap on Yes to continue.
- A bank feed setup screen should appear after clicking on Yes, enter your bank’s name.

NOTE: The process of connecting a bank account to QuickBooks varies from bank to bank. You need to follow the on-screen instructions and enter the required details.
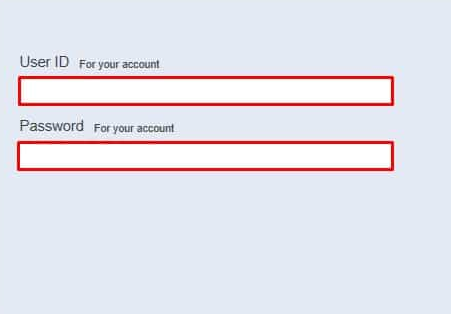
- Enter your bank account login credentials in the logging window (if you haven’t already signed up for online access at your bank).
- Your transactions will be directly imported once the bank feed is established.
- If you have downloaded the transactions but did not review them, you can review them by going to the Transaction List.
- Now, click the Synchronize button.
- If you only want to download the transactions for a specific account, then you need to select the Sync this account option.
- If you want to download the transactions for all the accounts at the same time, then choose the Sync all for this Bank option.
- After this, in the Access window, enter your PIN or password and connect to your bank.
- After that, hit OK.
NOTE: To manage and review your transactions, You can use your bank feed center. When you try to import a Web Connect file, the method of managing your transactions in the bank feed center is the same.
Steps to Import Bank Transactions into QuickBooks using Direct Connect (For Mac)
Through Direct Connect your transactions are directly downloaded from your bank to QuickBooks. The transactions are made available in your register when you download (No need to import your transactions).
Execute the below-given process to Import Bank Transactions Into QuickBooks Desktop and online Mac using Direct Connect:
- Open QuickBooks Desktop on Mac.
- Tap on the Banking menu and click on Downloaded Transactions.
- From the QuickBooks Account list, choose the account you want to connect.
- Click on Download.
Steps to Import Transaction Into QuickBooks Desktop using Web Connect (For Windows)
IMPORTANT: Web Connect allows users to Import Transaction Into QuickBooks without actually connecting both accounts. The process of importing transactions using the Web connect feature is different for both Mac and Windows versions.
If you don’t want to allow QuickBooks access to your online bank account, use the Web Connect approach. A Web Connect file (.qbo) is a file downloaded from your bank’s website. A majority of banks accept this type of file.
- Download a QuickBooks Online file when you’re importing into QuickBooks from your bank’s website.
NOTE: Ensure the file has .qbo extension.
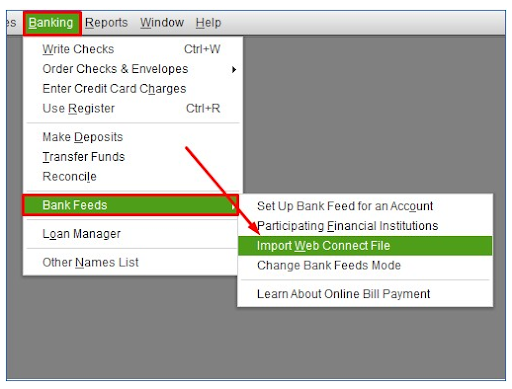
- Go to the Banking tab and select Bank feed.
- Select Import Web Connect File.
- Browse and open the file you downloaded from your bank account.
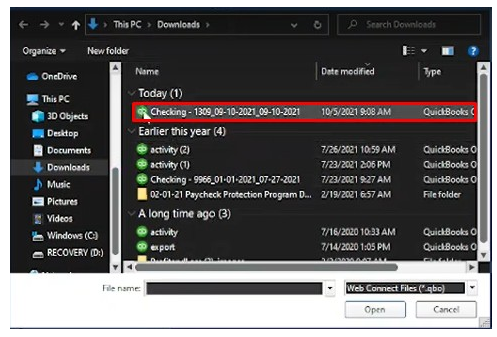
QuickBooks Desktop has now received your Web Connect file. In the banking center, you may review and control your transactions.
Also See: QuickBooks Web Connector Error QBWC1085 and QBWC1039
Steps to Import bank Transactions Into QuickBooks Using Web Connect (For Mac)
QuickBooks opens .qbo files when you download transactions via Web Connect. Here’s how to get this file into QuickBooks by downloading it and importing it:
- Go to the Banking tab.
- Click on the Website. It will open up a browser window to your website.
NOTE: Transactions can also be downloaded outside of QuickBooks. Simply open a browser and navigate to the website of your bank.
- Sign in to your Online banking account.
- Go to your transactions and type in the time you want to see. You’ll notice the maximum number of transactions your bank allows if date range is not specified.
NOTE: The steps for downloading QuickBooks Web Connect files differ depending on the bank. Contact your bank if you need assistance downloading the .qbo file from their website.
- Open the QuickBooks application and tap on the Banking tab.
- Select Downloaded Transactions.
- Choose the Import file option and then browse for your .qbo file.
Ways to Import Bank Transactions into QuickBooks Online?
QuickBooks offers an option to import files either in .QBO format or .CSV format. You can configure your system to import banking transactions automatically in QuickBooks online or manually download them and then import them using a CSV file.
How to Import Bank Data into QuickBooks Online Automatically?
The username and password you use to enter into your bank’s website are all you need to connect your bank account to QuickBooks. QuickBooks will stay connected and download transactions regularly when you provide your credentials.
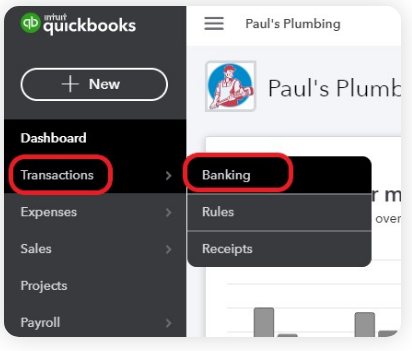
- Open QuickBooks Online, tap on Transactions from the left menu, and select Banking.
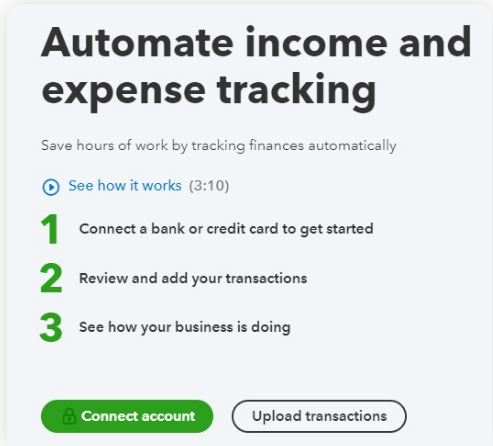
- To add your bank account, Tap on the green Connect button.
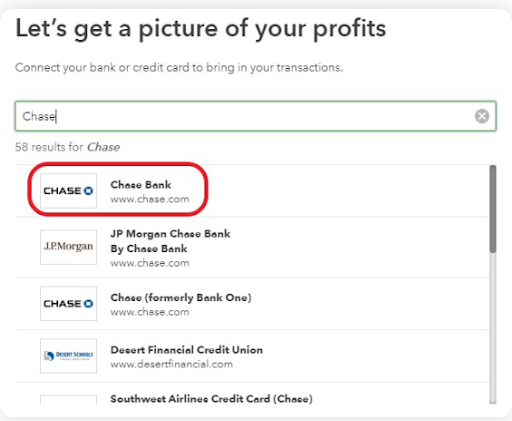
- Enter either the bank name or the bank’s website URL to find your bank.
NOTE: Import your bank transactions with a QBO file or through Excel using a CSV file in case your bank is not on the list.
- Click on the green Continue button after selecting your bank and you will directly be taken to the bank’s sign-in page on a new browser window.
- Enter in your login credentials for your bank account.
- Click on Agree when your bank asks if you want to share your banking information with Intuit.
- Once you agree to the terms and conditions, you will be taken back to your QBO account.
- Choose all the bank accounts you would want to link to your QBO account.
- Click on Accounts and the list of accounts will open up carrying Charts of Accounts.
- In case the account you added is already in the Charts of Account, select it.
- Create a new checking account if the account you are connecting is not included in the Chart of Accounts. Tap on Add New.
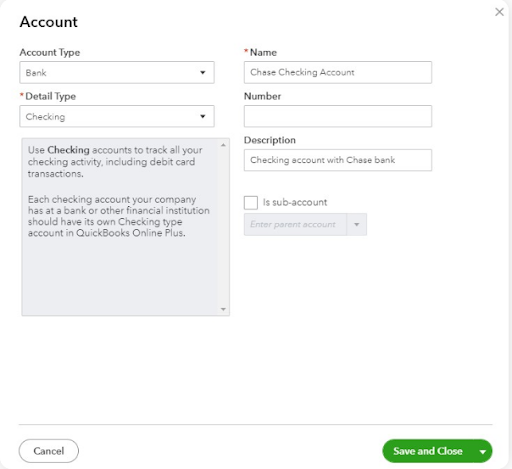
- Choose Bank for Account type and Details type as checking.
NOTE: If you have more than one Checking account with the same bank, add the last 4 digits.
- After entering all the required information, click on the green Save and Close button.
- You will be taken back to the prior screen with a new account added.
- Select the range for which you want to import transactions.
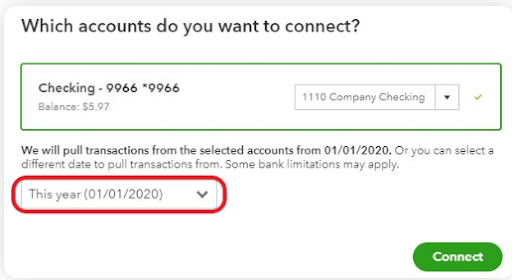
#NOTE: The beginning of the year is the default start date for pulling transactions. It would be best if you tried to go back in time to the date you want to start using QBO. If your bank or QuickBooks won’t let you go back that far, you’ll have to use QuickBooks Online or a CSV file to transfer the older transactions.
Now that your bank is connected, newer transactions will be imported automatically.
Steps to Manually Upload Transactions into QuickBooks Online
While users always have an option to automatically import the transactions in QuickBooks, there is a limit to which date QuickBooks can retrieve the data. There is no limit to the date for which you can manually upload transactions in QuickBooks Online. Here are the steps to do so:-
- Open QuickBooks and Move to the Accounting Menu.
- Go to Chart of Accounts and look for the bank or credit card account for which you want to upload the transaction.
- Click on View Register.
- Find the oldest transaction’s date and write it down (The opening balance is usually the oldest transaction).
- Now, Sign in to your bank or credit card’s website.
- To download CSV files of your transactions to your computer, follow your bank’s instructions. Each financial organization has its own set of procedures.
- Examine the download’s date range. It should be at least one day before your oldest transaction’s date.
- Download a copy of your transactions. Save the file to a convenient location, such as your computer’s desktop.
Important Note: Keep your record books clean by deleting duplicate transactions in QuickBooks right from your bank feed. However, the way to delete them depends on the mode you’re using, so read our blog about it to get clarity.
Tip: You may get a choice for the type of file you want to save. Choose the QuickBooks Online data (QBO) format. These have been specially designed for QuickBooks Online. You can also use a CSV or Quicken (QFX) file to import transactions.
- Open the file you downloaded and ensure that it is in the correct format. The file size should be a maximum of 350KB. Shorten the date range in case the file size is too large.
- Manually upload the transaction now. The steps you need to follow are based on whether your account is connected or not:-
- For Accounts that are connected to Online Banking
- Open QuickBooks Online and select the Banking or Transaction menu. Go to the Banking tab.
- Choose the blue tile for the account to which you’d like to upload the transactions.
- Tap on the Link Account list and then Upload from the file.
- Go to Browse and then select the file you downloaded from your bank’s website. Tap on Next then.
- Select the account you wish to upload the transactions to from the QuickBooks account dropdown. Then tap on Next.
- To match the columns on the file with the correct fields in QuickBooks, follow the on-screen instructions. Then tap on Next.
- Choose the transactions you wish to import and then tap Next.
- Click on Yes.
- Click on Let’s go once you are ready.
- For accounts that are not connected to Online Banking
- Open QuickBooks Online and navigate to the Banking or Transaction menu.
- Click on Upload Transactions.
- Choose Browse and then select the file you downloaded from your bank. Then tap on Next.
- Select the account you wish to upload the transactions to from the QuickBooks account dropdown. Then tap on Next.
- To match the columns on the file with the correct fields in QuickBooks, follow the on-screen instructions. Then tap on Next.
- Choose the transactions you want to import and then click Continue.
- Click on next and Tap on Let’s go when you are ready.
- For Accounts that are connected to Online Banking
IMPORTANT: You might not have an account to upload the transactions if you’re using QuickBooks for the first time. If you don’t see one, click on Add New from the dropdown menu to create one.
After you review the transactions, they go into your accounts. If you set up any banking rules or recognize transaction descriptions, QuickBooks Online will automatically enter certain details. The last step is to reconcile the transactions. This guarantees that your books are correct and that no transactions are duplicated.
Steps to Manually Import Transactions Into QuickBooks Self-Employed
QuickBooks self-employed version is totally different from QuickBooks desktop and online thus the steps to import transactions are also different. You can add transactions from a CSV file into the self-employed version in order to import bank transactions into QuickBooks from Excel.
Follow these steps in order to do so:
- Go on your bank’s website and download a CSV file for your account.
- Open QuickBooks self-employed.
- Tap on the Profile icon and choose Imports.
- Choose Import Transactions.
- Follow the on-screen steps in order to upload the CSV file.
- Tap on Import.
Also Read: [Solved] How To Resolve QuickBooks Error 179?
Contact Experts to Import Transaction Into QuickBooks!
You may effortlessly Import Transactions Into QuickBooks Desktop, Online, and Self-Employed by following the procedures outlined above. If you aren’t tech-savvy and are having trouble following the instructions, please contact our experts or give us a call on QuickBooks Data Service Solutions Helpline Number +1-(855)-955-1942.
Frequently Asked Questions
A: To import transactions into QuickBooks smoothly, follow these steps:
1. Prepare your transaction file in CSV, QBO, or OFX format.
2. Open QuickBooks and go to File > Utilities > Import > Web Connect Files.
3. Select your file and follow the prompts to upload.
4. Match transactions with existing accounts for accuracy.
5. Review imported data carefully before saving.
This method saves time and reduces manual entry errors. Need help? Call +1-(855)-955-1942 for quick support anytime.
A: Common problems include:
1. Unsupported file formats causing import failure.
2. Duplicate transactions if files are imported multiple times.
3. Missing fields leading to inaccurate records.
4. Incorrect account mapping during import.
To avoid issues, always back up your QuickBooks data before importing and verify your file format. For expert assistance, dial +1-(855)-955-1942.
