
In QuickBooks, entering the opening balance accurately is vital for maintaining precise accounting records. It signifies your company’s financial status at the start of a new financial period or when setting up your QuickBooks account. QuickBooks automatically generates an Opening Balance Equity account when you create a bank account and enter an opening balance. It aids in tracking and maintaining account balances from the beginning, ensuring an accurate representation of assets, liabilities, equity, income, and expenses. Go through this guide to learn how to record opening balance in QuickBooks in the Assets, Liabilities, and other types of accounts, as properly managing them is crucial for financial accuracy and stability in QuickBooks.
Are you concerned about keeping your financial data balanced? If so, seek expert guidance to ensure accurate recording of your QuickBooks opening balance. Call our toll-free number, +1-(855)-955-1942, for immediate assistance
Why it is Important to Record Opening Balances in QB Desktop?
Before learning how to record beginning bank balance in QuickBooks, it’s essential to understand its importance. Your QB accounts should align with real-life bank and credit card accounts for accurate tracking. When creating a new account in QuickBooks Desktop, you must select a start date for transaction tracking and input the balance of your real-life bank account for that chosen day. This establishes the opening balance for your QuickBooks account.
Choosing an easy date to QuickBooks starting balance is advisable. For example, if you’ve just opened a new account, use that date. If you already have an account, align your opening balance with the start of your next bank statement. Simply obtain the account balance from your bank statement for the chosen day.
Here’s How to Enter Opening Balance in QuickBooks Desktop
To record opening balances in QuickBooks for a bank, credit card, and other types of accounts, you can proceed with the steps below.
Step 1: Entering an Opening Balance
The steps to record the opening balance in QuickBooks depend upon the type of account for which you are recording the opening balance. So, follow the below-given steps accordingly.
Bank or Credit Card Accounts
Before creating a new account on the QuickBooks Chart of Accounts, make sure you know what you should enter for your opening balance.
You can record the opening balance for the bank account you just created or for the one you have been using for a while. Once you choose the bank account for which you are recording the opening balance, follow the below steps.
- To start entering the opening balance, go to your bank’s official site or get your bank statements.
- Now, launch QuickBooks and go to the Company menu. Then, choose Charts of Accounts.
- Select New by right-clicking anywhere on the Charts of Accounts.
- Choose Bank or Credit Card for the account type and then click Continue.
- Name your account. If you are using multiple accounts in the same bank, give them unique names to keep them apart.
- Enter the rest of the required data.
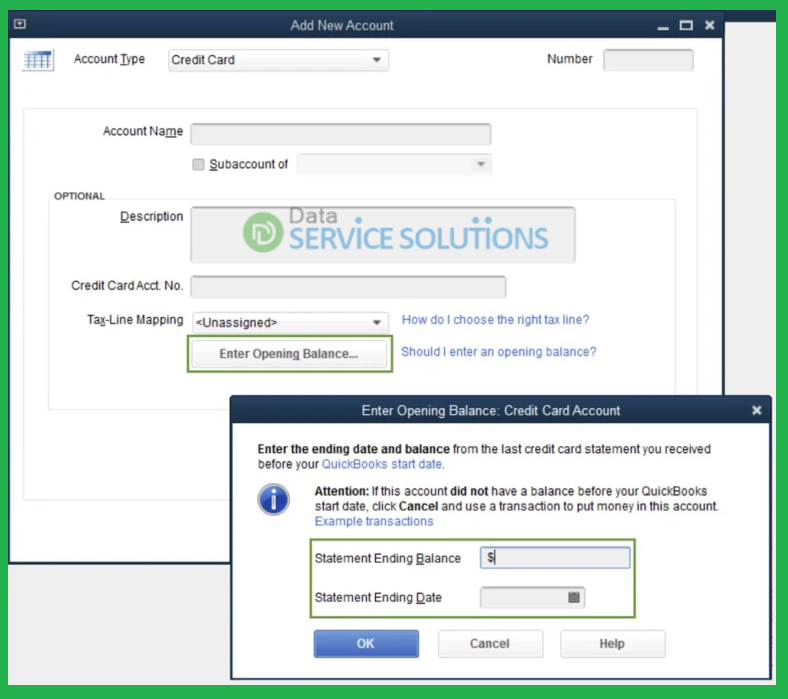
- Click Enter Opening Balance. If you want to change the entered opening balance, you will find a Change Opening Balance button just after you successfully enter the opening balance.
- Depending on how you wish to manage your previous transactions, you can specify the following as the opening balance:
- If you don’t plan to enter older transactions that come before the opening balance date in QuickBooks: You can just enter the ending balance and ending date for your most recent bank statements and then click OK. It will automatically summarize all of your past transactions. Once done, you can start tracking your new transactions.
- If you want to enter your past transactions in detail: Choose the past date that is older than the oldest transactions you want to track. The opening balance will automatically summarize everything prior to the date you choose.
- Once it’s done, click Save & Close to record the opening balance.
If your credit card or real-life bank account has any pending transactions, don’t worry; you can adjust your opening balance once you clear the pending transactions with the bank.
Here’s how you can adjust your pending transactions entry:
- Sign in again to your bank’s website or get your bank statement.
- Go to the Company menu in QuickBooks and select Charts of Accounts.
- Find your account, right-click on it, and then select Edit.
- Click the Change Opening Balance button.
- Edit the amount if required, and you can also adjust the date.
- Once you’re done, click Record to save your changes.
Move to the section below to record the opening balance in QuickBooks using Assets, Liabilities, and related accounts instead of bank or credit card accounts.
Asset, Liability, and other Types of Accounts
To enter the opening balance for your real-life bank account, you can utilize either the newly created account or the existing one you’ve been using until now.
Also, carefully enter the opening balances on the Balance Sheet for your account. It includes Fixed Assets, Equity, Long-term Liability, Other Assets, Other Current Asset, and Other Current Liability accounts. Let’s guide you with the steps that need to be followed:
- Get your bank statement or sign in to the bank’s website.
- Now, select the Company menu in QuickBooks and then choose Chart of Accounts.
- On your Chart of Accounts, right-click anywhere and choose New.
- Select one of the Fixed Asset, Loan, or Equity options. If you are using other types of accounts, choose the Other Account Types dropdown and then select one of the accounts. Then, click Continue.
- Name your account. Also, if you have multiple accounts of the same type or linked to the same bank, name them uniquely to differentiate them easily.
- Enter the rest of the required data in their specific fields.
- Now, select Enter Opening Balance. Once you successfully enter the opening balance, it will change to Change Opening Balance. Also, keep in mind that what you enter for the opening balance always depends on how you managed your past transactions:
- If you don’t plan to enter older transactions that come before the opening balance date in QuickBooks: In this case, enter the ending balance and the ending date of your most recent bank statement, then click OK. QuickBooks will automatically summarize each of your past transactions. Furthermore, you can track new transactions going forward.
- If you want to enter your past transactions in detail: First, choose the date of the opening balance you want to enter. Choose a date older than the oldest transaction you want to track in QB Desktop. The opening balance summarizes every transaction prior to the date you chose. Now, enter the date you selected in the Ending date field. Further, enter the balance of your real-life bank account for that date in the Ending balance field.
- Finally, record the opening balance by clicking Save & Close.
Note: If you are looking for an alternative to the main method, you can enter and record the opening balance by creating a journal entry. This method is quite tricky, so get help from your accountant or reach out to our experts.
Income and Expense Accounts
Recording opening balances in QuickBooks for income or expense accounts are not required, as these accounts simply track earnings and spending.
Customer or Vendor Balances in Accounts Payable and Accounts Receivable
If any of your customers or vendors have an outstanding balance before your opening balance date, then you need to enter the individual unpaid invoices or bills in QuickBooks. Doing this will automatically create open balances that would collectively result in your Accounts Payable and Accounts Receivable opening balances.
Recommended To Read – How to Add New Company to QuickBooks Online & Desktop Easily
Step 2: Review the Opening Balance Entry
Once you have successfully recorded the opening balance in QuickBooks, go to your account register and ensure that it’s accurate. Also, make sure there is no remaining balance in the Opening Balance Equity account.
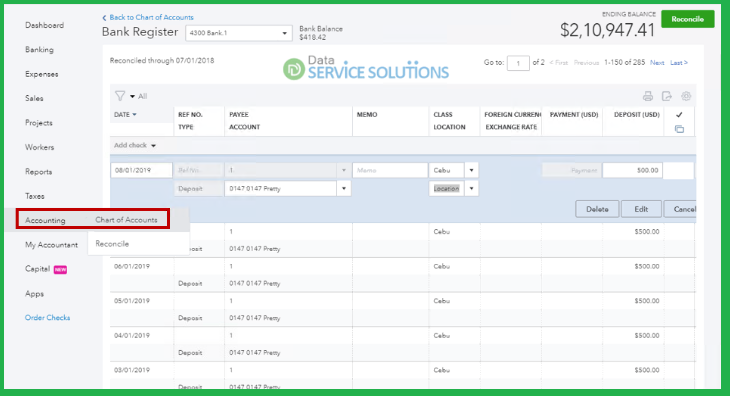
- Select Chart of Accounts from the Lists menu.
- Search the Opening Balance Equity account and open it.
- Further, check the account balance, as it should be 0.00.
However, if the balance isn’t 0.00, then note down the remaining balance. Once done, run a Balance Sheet Report for last year.
- Go to the Reports menu and hover over to Company & Financial.
- Choose the Balance Sheet Standard.
- Now, select Last Fiscal Year from the Dates dropdown.
- Make sure to check the Retained Earnings balance in the Equity section.
- Finally, compare last year’s Retained Earnings balance with the remaining balance in the Opening Balance Equity account.
If the retained earning balance matches the opening balance equity, you’re good to go. However, if they don’t match, contact your accountant or our accounting experts for help balancing your account.
Conclusion
The steps provided above should help you record opening balance in QuickBooks smoothly. However, if you encounter any challenges during this process, getting expert assistance is necessary. Feel free to contact our dedicated ProAdvisor team at QuickBooks Data Service Solutions Helpline Number +1-(855)-955-1942. We are committed to ensuring your experience with QuickBooks is seamless and hassle-free, providing the assistance you need to resolve any issues promptly.
Frequently Asked Questions:
A. An opening balance in QuickBooks represents the starting amount in an account when you begin using QuickBooks or add a new account. It ensures your financial records are accurate from day one, helping reconcile past transactions and maintain consistency in reporting.
A. To record a bank account opening balance, go to the Chart of Accounts, click “New” to create a bank account, enter the account name, select the type, and input the opening balance along with the date when the account started. Save the changes to reflect it in your accounts.
A. To reconcile, compare your QuickBooks opening balances with your prior accounting records or bank statements. Adjust any differences using journal entries or corrections so that your QuickBooks account accurately reflects historical balances.
