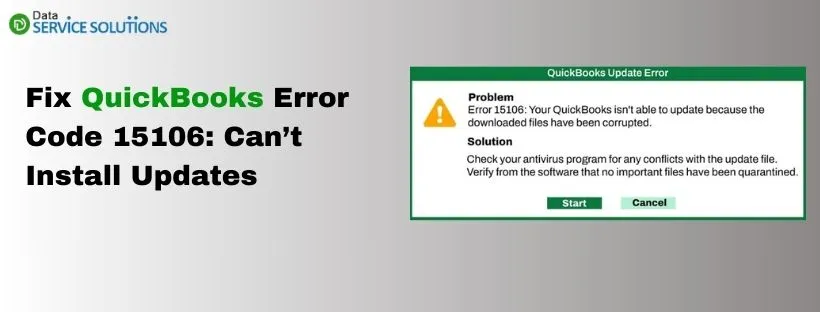
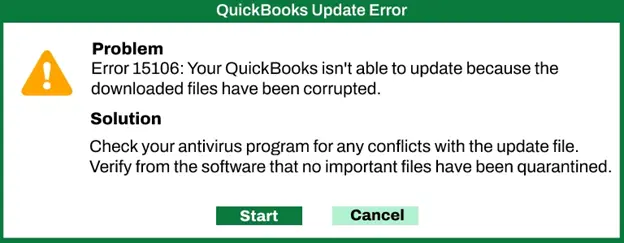
When attempting to install QuickBooks updates, sometimes, you might run into QuickBooks error code 15106. As a result, the software update process will halt immediately. Here are the error messages that you might see on the screen:
| “Error 15106: Your QuickBooks isn’t able to update because the downloaded files have been corrupted” |
| ‘‘Error 15106: The update program is damaged” |
Moreover, you might encounter this issue when trying to download & install the latest payroll service updates. Here’s what you might observe on your computer once this problem occurs:
- The QB application window will freeze and you won’t be able to access different features & tools.
- Your computer might shut down suddenly without any prior message.
- Third-party apps won’t respond to your commands.
The good thing is that you can easily overcome this difficulty using various methods. Let’s explore the article to understand the major causes behind this glitch & discover how we can resolve it instantly.
If you want immediate assistance to eliminate the QuickBooks error code 15106, dial +1-(855)-955-1942 to contact a QB professional.
Why Do You Encounter the QuickBooks Update Error 15106?
You might encounter the QuickBooks error code 15106 due to the following reasons:
- If User Account Control settings are tuned on.
- If Windows Firewall is improperly configured, it might restrict the QuickBooks software updates.
- When you are not signed in as a Windows admin user, it might provoke QuickBooks Payroll Error 15106.
- If antivirus software blocks payroll updates.
- If the Windows OS files are damaged.
Now that you are completely aware of the main factors behind this glitch, let’s move to the following section to discover how to resolve it.
Use 6 Powerful Methods to Get Rid of QB Error Code 15106
The following are the top six ways to eradicate QuickBooks error message 15106.
1. Run QB Desktop as an Administrator
You must have admin rights to update or make necessary changes to the QuickBooks application. Learn how to do it by following the steps below.
- Close the company file and then the QuickBooks application.
- Move to the desktop and right-click the QB Desktop icon.
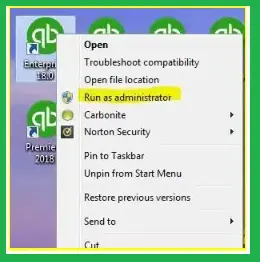
- In the drop-down list, select the option to Run as Administrator.
- At last, when you see the message, ‘Do you want to allow this program to make changes to your computer?’, click the Yes option.
Re-download QuickBooks Desktop updates to check if the above steps fixed QuickBooks error 15106. However, if the issue persists, check out the next solution.
2. Run the Reboot.bat File
Running the reboot .bat file will help you re-registering .DLL and .OCX files in Microsoft Windows. QuickBooks Desktop uses these files to work correctly on the system. Also, running the reboot.bat file will revive the damaged Windows files that might interrupt QB Desktop updates. Follow the steps below to proceed accordingly.
- Close the company file and the QB program.
- Navigate to the C:\Program Files\Intuit\QuickBooks folder and look for the reboot.bat file.
- Right-click the Reboot.bat file and select Run as Administrator.
- Reboot the system, launch the QB program, and click Install Now if prompted to install an update.
If you still cannot install QuickBooks updates, follow the steps below to delete and re-download the update.
- Close the QuickBooks software and move to the following location: C:\Documents and Settings\All Users\Application Data\Intuit\QuickBooks < versionXX> \Components. (Note: xx is the number of the QB Desktop version. For instance, QuickBooks Desktop 2023 is DownloadQB23.)
- Re-open QuickBooks Desktop, choose the Help menu and then Update QuickBooks Desktop.
- Tick mark the Reset the updates checkbox under the Update Now tab and choose Get Updates.
- After re-downloading the updates, close and re-open QuickBooks and click Install Now.
However, if the above-recommended solution does not work in resolving QuickBooks Enterprise Error 15106, implement the next one.
3. Check the Windows Firewall and Security Settings for QuickBooks
You must check the Windows Firewall settings and configure them for QuickBooks Desktop to fix QuickBooks Payroll Error 15106. By implementing the steps below, we will first configure the firewall settings using File Doctor and later configure them manually if required.
Step I: Use the QuickBooks File Doctor
To run the QuickBooks File Doctor, you must initially download and install Tool Hub on the system and then follow the instructions given below:
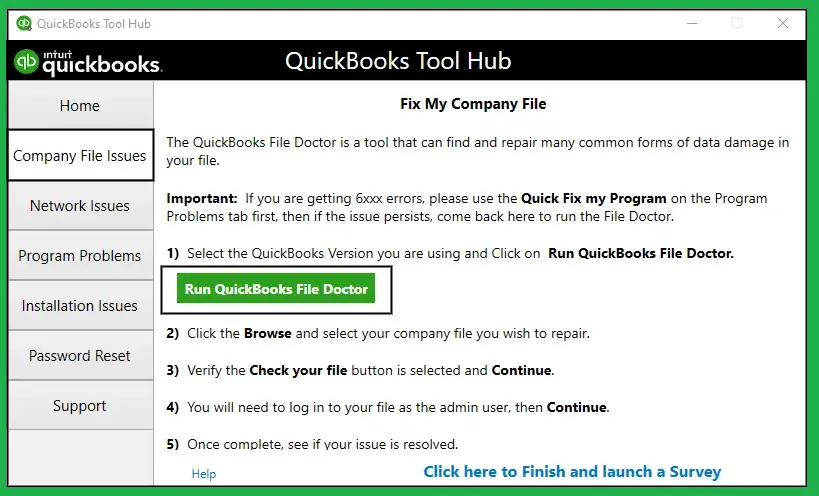
- To open the Tool Hub, double-click its icon on the desktop.
- Click the Company File Issues tab from the left section and select QuickBooks File Doctor.
Note that File Doctor can take a minute to open. However, if it doesn’t open, you must search for QB Desktop File Doc and open it manually.
- Under the File Doctor, choose the company file in the drop-down list or click the Browse and Search option to find your file.
- Click Check your file and network and select Continue.
- Enter the QB admin password and click Next.
Important: If the company file size is large, the scan time can be more than usual, which is mostly 5 minutes. When the scan ends, open QuickBooks and the company file. You must know that the results might say scanning was unsuccessful, even if it fixes the issue.
But if you are still getting QuickBooks Payroll Update Error 15106, move to the next step.
Step II: Configure the Windows Firewall Settings
If QuickBooks File Doctor fails to configure the Windows firewall automatically, you must set things up manually. For that, create a Firewall port exception for the QuickBooks application. The instructions below will also work if you are running multiple versions (years) of the QuickBooks program on a single system.
- Click the Windows Start tab, and in the search panel, type Windows Firewall.
- Hit the Enter key, and choose Advanced Settings in the Windows Defender Firewall window.
- Right-click the Inbound Rules option and click New Rule.
- Click the Port option and then Next.
- After ensuring the TCP option is selected, enter the specific ports needed for the QB year version in the Specific local ports field.
- QuickBooks Desktop 2020 and later: 8019, XXXXX.
- QuickBooks Desktop 2019: 8019, XXXXX.
- QuickBooks Desktop 2018: 8019, 56728, 55378-55382.
- QuickBooks Desktop 2017: 8019, 56727, 55373-55377
- After entering the port number in the field, select Next.
- Click Allow the Connection, choose Next, and verify all profiles are marked when prompted.
- Select Next.
- Create and name the rule, for instance, QBPorts(year), and when done, click Finish.
Important: Similarly to how you just created inbound rules, create outbound rules.
Note: QuickBooks Desktop 2019, 2020, and all the later versions use dynamic ports. These ports are assigned at the time of QuickBooks installation. These are specific ports (not a range), which ensures the QuickBooks software gets exclusive use of a given port.
Follow these steps to find the dynamic port number.
- Select the Start button, and type QuickBooks Database Server Manager in the search box.
- Press the Enter key.
- In the Port Monitor tab, you can find the Port Number for creating the firewall port exceptions.
Important: You can change the assigned port number by clicking Renew. If you want to do so, move to the Scan Folders tab and choose Scan Now to reset the Windows firewall permissions. You can only renew ports starting from Desktop 2019 and later versions.
After implementing the instructions given in Step 2, try to download QuickBooks updates. If Unable to Update payroll Error 15106 persists, move to the next step.
Step III: Make Windows Firewall Exceptions for QB
To perform various tasks smoothly, the QuickBooks program uses executable files (.exe). Following the procedure mentioned below, you must create firewall exceptions for each file listed in the table.
| Executable Files | Location |
| AutoBackupExe.exe | C:\Program Files\Intuit\QUICKBOOKS YEAR |
| Dbmlsync.exe | C:\Program Files\Intuit\QUICKBOOKS YEAR |
| DBManagerExe.exe | C:\Program Files\Intuit\QUICKBOOKS YEAR |
| FileManagement.exe | C:\Program Files\Intuit\QUICKBOOKS YEAR |
| FileMovementExe.exe | C:\Program Files\Intuit\QUICKBOOKS YEAR |
| QuickBooksMessaging.exe | C:\Program Files\Intuit\QUICKBOOKS YEAR |
| QBW32.exe | C:\Program Files\Intuit\QUICKBOOKS YEAR |
| QBDBMgrN.exe | C:\Program Files\Intuit\QUICKBOOKS YEAR |
| QBServerUtilityMgr.exe | C:\Program Files\Common Files\Intuit\QuickBooks |
| QBCFMonitorService.exe | C:\Program Files\Common Files\Intuit\QuickBooks |
| QBLaunch.exe | C:\Program Files\Common Files\Intuit\QuickBooks |
| QBUpdate.exe | C:\Program Files\Common Files\Intuit\QuickBooks\QBUpdate |
| IntuitSyncManager.exe | C:\Program Files\Common Files\Intuit\Sync |
| OnlineBackup.exe | C:\Program Files\QuickBooks Online Backup |
Note: If you see Program Files (x86) with the folder name, this is an indication that you are using a 64-bit Windows Operating system.
- Select the Start button and type Windows Firewall into the search panel.
- Click Advanced Settings, right-click Inbound Rules (later on, you must create Outbound Rules), and choose New Rule.
- Select Program and choose Next.
- Click This Program Path, select Browse, and choose one of the executable files in the table.
- Click Next.
- Choose the Allow the Connection option and then Next.
- If prompted, check if all profiles are marked and again select Next.
- Create a rule and assign a name to it: QBFirewallException(name.exe).
Note: You must repeat all the instructions in the above step and create outbound rules.
Once you complete configuring the Windows firewall settings, restart the system and try to re-download the latest QuickBooks updates. However, if you fail to do so and still face QuickBooks update error 15106, proceed with the next method.
4. Disable the Third-party Antivirus Application
If you encounter QuickBooks error message 15106, turning off the antivirus application can eliminate the issue.
- To open the Task Manager, hit the Ctrl + Shift + Esc keys together on the keyboard.
- Move to the Processes tab and find [ANTIVIRUS].exe. For instance, Spy Sweeper.exe.
Note: If you get an error by implementing the above instruction, uninstall the antivirus software.
- Choose End Process and follow the instructions below to rename the QuickBooks update folder.
- Hit the Windows and E keys to open the File Explorer.
- 32-bit Windows users, navigate to the C:\Program Files\Intuit\QuickBooks(year)\Components folder.
- 64-bit Windows users, navigate to the C:\Program Files(x86)\Intuit\Quickbooks(year)\Components folder.
- Right-click the downloadqbXX folder and choose the option to Rename. Here, XX is the year of the QuickBooks Desktop version.
- When renaming the folder type .OLD at the end of the name. Example: downloadqbxx.old.
- Finally, try to update the QB program again.
If following the steps mentioned in the above solution did not help you to get rid of QuickBooks Error 15106, follow the next solution.
5. Turn off User Account Control (UAC) in Windows
The main objective of User Account Control is to safeguard the system from malicious programs. But sometimes, turning UAC off might be required when updating QuickBooks Desktop and can help you rectify QuickBooks Error Code 15106.
Note: If you can update QuickBooks after disabling UAC, it is recommended that you enable it later to avoid security risks on the system.
Follow the steps below to disable the User Control Account on Windows OS:
- On the keyboard, press the Windows and R keys to open the Run command window.
- Type Control Panel in the command box and select OK.
- Choose User Accounts and select User Accounts (Classic View).
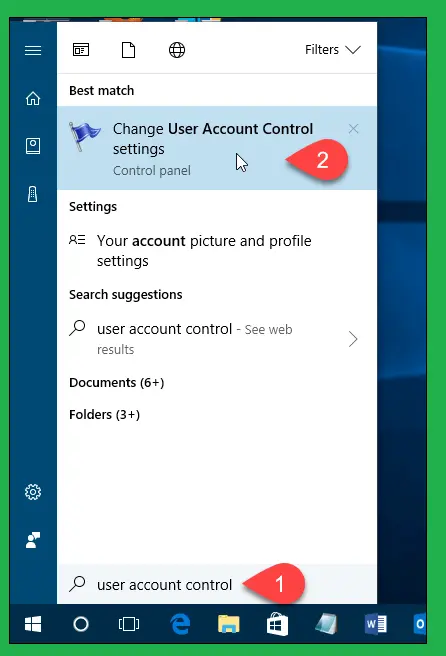
- Choose the Change user account control settings options, and if prompted by UAC, click Yes to continue
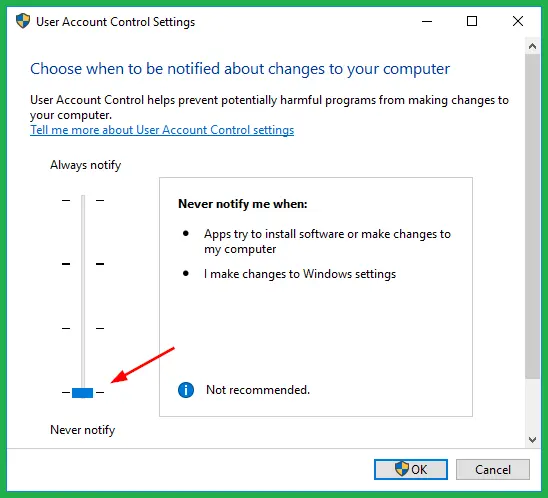
- Move the slider to Never Notify and choose OK to turn UAC settings OFF.
- If UAC prompts, click Yes to continue and reboot the system.
Try to download the latest payroll updates to check if QuickBooks update error 15106 persists. If the issue is still not eliminated, follow the next solution.
6. Reinstall QuickBooks Desktop in Selective Startup Mode
This method can help you eliminate QuickBooks Error Code 15106 if nothing else works for you. Antivirus or other third-party security programs might block the payroll or QuickBooks Desktop updates. To fix it, you must implement the steps below and re-install the QB program in selective startup.
Before proceeding, ensure that you.
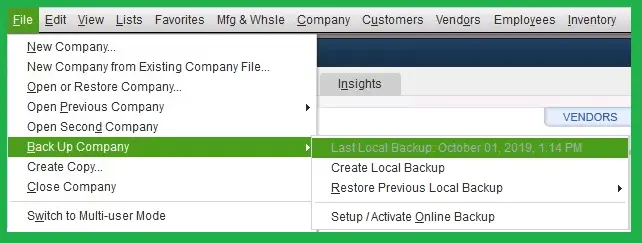
- Create a backup of the QuickBooks company file to prevent data loss.
- Note down the license number, as you will need it while re-installing
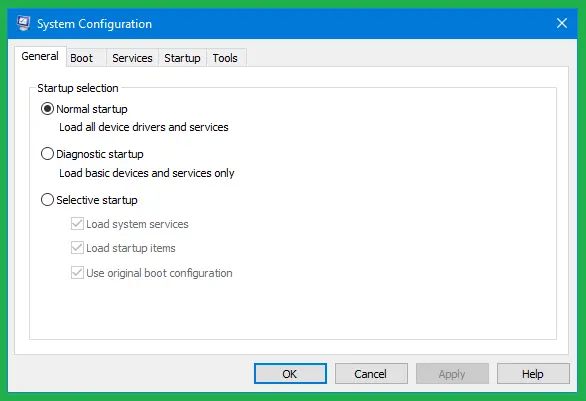
Step I: Switch to Selective Startup Mode
The following is the procedure to switch the system from normal mode to selective startup mode:
- On the keyboard, press Windows and R. It will open the Run dialogue box.
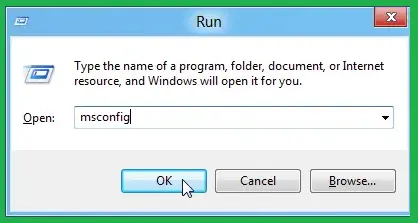
- In the command box, type msconfig and select the OK option.
- Move to the General tab.
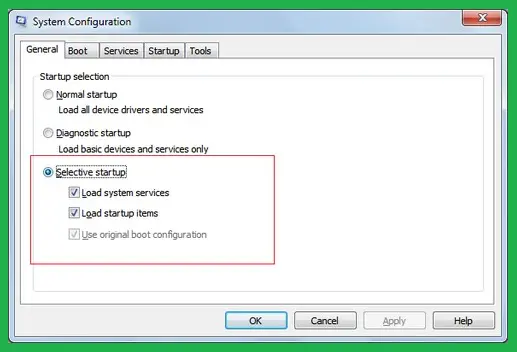
- Choose the Selective Startup and Load System Services option.
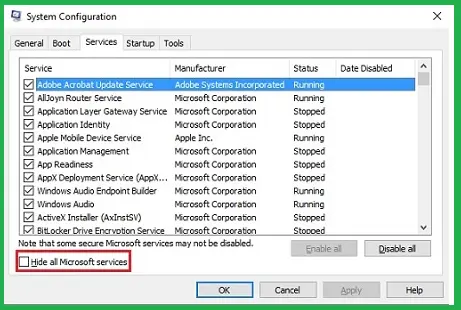
- Under the Services tab, click Hide all Microsoft Services and further select Disable All.
- Remove the tickmark form Hide all Microsoft services checkbox and click Windows Installer from the list of services.
- Click OK and choose Restart.
Step II: Uninstall the QuickBooks Desktop Program
The following are the instructions for removing the previously installed QB Desktop version on the Windows OS:
- On the desktop screen, click the Windows Start tab, and in the search box, type Control Panel and hit Enter.
- Choose the Programs and Features or Uninstall a Program option, and afterward, choose QuickBooks Desktop under the list of applications.
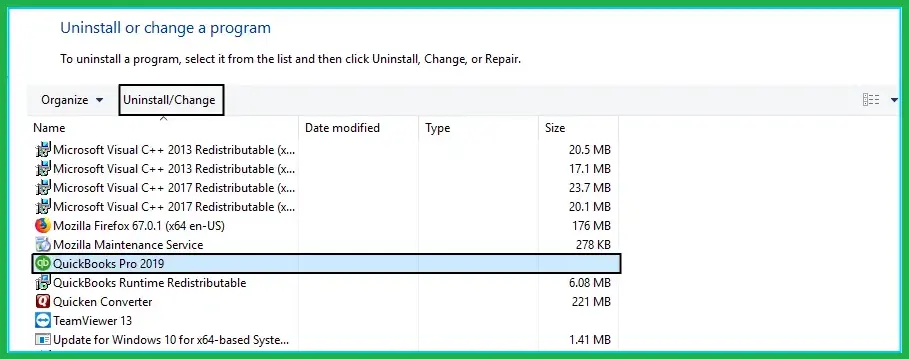
- Select the Uninstall/Change, Remove option, and then Next.
- If you do not see the above option, sign out of Windows and sign in again as an admin or a user with admin-level permission.
Step III: Download a New Installer for QuickBooks
The following is the procedure to download a new QuickBooks Desktop installer file.
- Visit the Download & Updates page and choose the Yes or Not Sure option if you run the QuickBooks application in multi-user mode. Then, choose Next.
- Select the country, product, and version for your version of QuickBooks from each drop-down menu.
- Select Search, and from the next window, click Download.
- But if you are using QB in Single-user mode, choose No and click Next.
- In the Express Setup window, select Download.
- When the downloading process finishes, the file will be saved in the downloads section, or you can manually select a location on the system.
Step IV: Rename the QB Program Installation Folders
Rename the installation folders left after uninstalling the QuickBooks Desktop in step two. Renaming these remaining folders will prevent QuickBooks from using them after the installation. But to access these folders, you must set the Windows to show the hidden files and folders.
- From the desktop screen, click Start, type File Explorer in the search bar, and press Enter.
- As the File Explorer window appears, select the View option and click Hidden Items.
- Navigate to the following locations to find and rename the leftover QuickBooks folders.
- 64-bit version C:\Program Files (x86)\Intuit\QuickBooks (year)
- C:\ProgramData\Intuit\QuickBooks (year)
- C:\Users\(current user)\AppData\Local\Intuit\QuickBooks (year)
- C:\Program Files\Intuit\QuickBooks (year)
- Right-click the QB application folder when you find it, and from the drop-down list, choose Rename.
- Type OLD at the end while modifying the folder’s name.
Step V: Reinstall the QuickBooks Program
Follow the instructions below to reinstall the QuickBooks Desktop application on the system quickly.
Note: You must have a functional internet connection to install QuickBooks.
- Open the QuickBooks.exe file that you previously downloaded in step three.
- A QuickBooks installation wizard will appear on the screen. Follow the instructions carefully given by the wizard and further accept the QuickBooks Desktop license agreement.
- Select the Next option and enter license and product numbers.
- Click Next.
- Reboot the system as you finish re-installing QuickBooks Desktop.
Step VI: Switch Back to Normal Startup Mode
After performing all the steps given above, go back to normal startup mode by following the instructions below.
- Hit the Windows + R keys to open the Run command window, enter msconfig, and click OK.
- From the General tab, choose the Normal startup and select the OK option.
- Under the System Configuration window, choose Restart.
Essential Preventive Steps For QB Desktop Update Errors
The following points describe some really crucial preventive tips that you can follow for QuickBooks update error codes:
- Maintain a Stable Internet Connection: Ensure that you have a seamless Internet connection & a stable network setup.
- Check System Date & Time: Verify that the system date and time settings are valid.
- Regularly Backup Your Data: Always create a backup copy of your company data before starting the update process.
- Install Windows Firewall Updates: Ensure that you use an updated Windows Firewall app on the computer.
- Review Your System Hardware Setup: Verify that all the system hardware components are functioning correctly.
Winding Up
Hopefully, after implementing the troubleshooting solutions in this article, you might have resolved QuickBooks Error Code 15106. At times, the solutions might not prove to be helpful if there are issues hidden deep in the QuickBooks application. To prevent this distressing scenario, you always have the option to contact a professional. Dial +1-(855)-955-1942 and get a quick consultation to fix the problem correctly.
Frequently Asked Questions
If the QuickBooks software does not possess general permissions from the antivirus application installed, you might get QuickBooks error 15106. Ensure that the antivirus program’s settings are appropriately configured and permission is granted to QB to download recent updates. But if the issue remains unresolved, you must turn off the antivirus program.
Some of the major factors that can trigger 15XXX error codes in QuickBooks are as follows:
1. Restrictive Firewall Settings: Windows Firewall may block QB updates if it finds them as a security threat.
2. File Corruption: Damaged company files can trigger internal issues.
3. System Issues: Any damage to system files & folders can provoke various problems.
4. Outdated Digital Signature: Using an obsolete digital signature of QB Desktop can cause authentication failure during the update process.
5. Imprecise System Date & Time Settings: Inaccurate date and time settings on your computer may categorize updates as invalid.
6. Damaged Web Browser: Any defect in your web browser can trigger different glitches.
You can effortlessly fix QuickBooks error code 15106 by implementing the following methods:
1. Use QB With Admin Privileges: Ensure that you are running QB Desktop with admin rights.
2. Re-register the .OCX and .DLL Files: Execute the Reboot.bat file to re-register the .OCX and .DLL files in Windows.
3. Reconfigure the Windows Firewall Settings: Grant necessary exemption to QB programs from Windows Firewall.
4. Turn Off Your Antivirus App: Ensure that your antivirus software is switched off during the QB update process.
5. Deactivate the User Account Control (UAC) Feature: You should disable the UAC feature to ensure that there is no interference when downloading payroll updates.
6. Reinstall QuickBooks Application: Reinstall QB Desktop to ensure a fresh setup of all software files & folders on your computer.