QuickBooks Autofill is a feature introduced by Intuit that allows you to pre-fill the information on checks, bills, transactions, invoices etc.
This feature saves time and effort by eliminating the need to repeatedly enter the same data. QuickBooks uses the information that you entered previously to choose employee, account, vendor, invoice, employee’s timesheet, sales receipt, invoice etc. You also have an option to edit the pre-filled information and save it. The new information will be updated whenever you choose that particular account next time.
Do you wish to use QuickBooks autofill feature but don’t know how to use it? Just contact an expert at +1-(855)-955-1942 and they can brief you everything about it.
Important Information That The QuickBooks Autofill Feature Can Fill Automatically
IMPORTANT: QBO fill the transactions automatically only when your auto-recall is turned ON.
The Autofill feature, also known as Auto-Recall, can help pre-fill a lot of things. You can use it for your invoices, sales receipts, invoices, vendors etc. Let’s look at all the sections that this feature can be used to fill in:-
For Vendors, Customer or Employee
The autofill option in QuickBooks may pre-fill nearly all of the information needed to enter bills, write checks, or enter credit cards. The user is just required to complete the date column. Simply choose a customer, vendor, or employee, and QuickBooks will fill in the details based on recent transactions. If necessary, you can edit and save any information.
For Sales Receipts and Invoices
To utilize QuickBooks Autofill, Go to the customer tab and select Sales Receipt or Invoice. However, in this category, the only information that is pre-filled is the location part. Users can pre-fill the desired information by scheduling transactions or creating a recurring transaction template.
For employee Timesheet
The pre-fill feature is not very useful for this category as it just enters details about location. The rest of the information has to be re-entered by the user. There is no option to create a template or schedule it either.
Simple Ways to Turn ON Autofill in QBO & QBD
The method to turn on the autofill feature in QuickBooks online and desktop versions varies. In QBO, you must go to the settings menu to activate this option; however, in QBD, it is available from the edit menu. So let’s take a closer look at the measures you’ll need to take:
Looking for ways to Create & File 1099 in QuickBooks? Read How to Create & File 1099 in QuickBooks.
Steps to Turn ON QuickBooks Online Autofill
You need to Go to the accounts and settings option to enable QuickBooks Online Autofill. Then follow the given steps:
- Tap on the Gear button in the top right corner.
- Click on Accounting and Settings in the Your Company section.
- Click on Advanced in the left section.
- Now tap on Automation and it will expand your options.
- Tickmark the Pre-fill forms with previously entered content box.
- Tap on Save and finally click on Done.
NOTE: To Turn OFF autofill in QuickBooks, You just need to come back and uncheck the ‘Pre-fill forms with previously entered content’ box.
Steps to Turn On Autofill in QuickBooks Desktop
Go through the Edit Menu and Tickmark the below listed option to enable autofill in QuickBooks desktop. Detailed steps are mentioned below:
- Click on the Edit tab.
- Select Preferences and the Preference window will open up.
- Go to the General menu and Checkmark the Automatically remember account or transaction information box.
- Mark Automatically recall last transaction for this name.
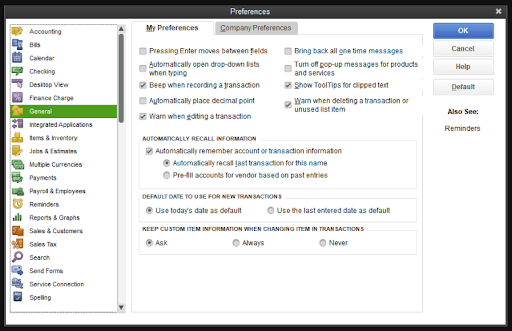
- Finally click on OK and then close the preference window.
NOTE: To Turn OFF autofill QuickBooks feature, You just need to follow the above-mentioned steps and uncheck the Automatic recall last transaction information box.
You may also like: 3 Solutions You Must Know To Fix ‘QuickBooks Error 185’
Contact Experts to enable QuickBooks Auto Recall Feature!
QuickBooks auto recall feature can help a lot if you have recurring transactions with a limited set of people. If you are still unable to use the QuickBooks autofill feature, we will advise you to reach out to our experts at QuickBooks Data Service Solutions helpline number +1(855)-955-1942 and they will provide you with better guidance.
Frequently Asked Questions
A. The Autofill feature in QuickBooks is a time-saving tool that automatically populates data fields based on previously entered information. For example, when creating a vendor bill or a sales receipt, QuickBooks can recall past entries like amounts, categories, and descriptions. This minimizes manual entry and helps reduce errors. Autofill works by recognizing patterns in your transaction history. You can turn this feature on or off under Preferences > General > Automatically remember account or transaction information. It’s ideal for repetitive tasks, especially for businesses with consistent transactions.
A. To control Autofill in QuickBooks Desktop, follow these steps:
a. Go to Edit > Preferences
b. Click on General
c. Select the My Preferences tab
d. Check or uncheck Automatically remember account or transaction information
This gives you full control over whether QuickBooks should remember previous data inputs. Disabling it is useful when transactions often change, while enabling it helps speed up repetitive entries. Always review autofilled data before saving to avoid incorrect postings.
Related Post:
Resolve QuickBooks Error PS038 in Minutes: Here’s How
QuickBooks Error H202: How to Fix Issues in Multi-user Mode?
QuickBooks crashing when opening (Try These Easy Fixes)
