
If you run a business and hire freelancers or pay your contractor by check, cash, or direct deposit, you know you must file a 1099 tax form with the IRS. It is a document referred to as “information returns” and belongs to the Internal Revenue Service. However, filling out this form can be tricky in general. But you can easily File 1099 in QuickBooks Desktop electronically with the already saved records in your account. It saves you from the process of filling it online and sending it to the IRS via post by simply creating and filing it hassle-free. Additionally, you can also directly email to your contractors or print and send them via mailing services. This article will future assist you in how to Create and File 1099s with QuickBooks Desktop.
Do not struggle alone while filing your tax forms; call the experts at the toll-free number +1-(855)-955-1942 and get help creating and filing your 1099 in QuickBooks Desktop.
Who Needs to File 1099 in QuickBooks Desktop?
There are two types of Form 1099. One is 1099-NEC, and the other is 1099-MISC. The 1099-NEC is a form filled by the business if they hire any independent contractor, gig worker, or self-employed individual on a contract basis and pay them more than $600 in a year.
However, Form 1099-MISC is filled if a business pays an individual or LLC at least $600 during a year as a rental, legal settlement, prize, or award. You can easily create both of these in the QuickBooks Desktop application and can E-file 1099 in QBD.
Additionally, if you are someone who has made multiple types of cash payments to your non-employees, you would need to categorize the contractors. You can do that on the basis of payment type, and are required to fill both 1099-NEC and 1099-MISC.
For this, you need to file both the 1099 forms for the same vendor, and create a new ledger expense account for the vendor. And then report it on 1099-NEC because a single account can only be used for one form. To do this, go to the Accounting tab in your QuickBooks Online and navigate to the Account section. Now, click New and Select an Account Type, Detail Type, and enter a Begining Balance, if there is one. Now, Save and Close once finished. You can also edit the vendor payments to move them from one general ledger account to another.
How to Create & Electronically File 1099 in QuickBooks Desktop?
Once you have created the general ledger account for your vendors, you can create a 1099 in QuickBooks Desktop and e-file it in QBD for all of your vendors. Let us understand how to do that in the next part of the article.
Step 1: Create 1099 in QuickBooks Desktop
You can create a 1099 in QuickBooks Desktop and either print it, manually file it and send it to the vendor or directly e-file 1099s in QBD. In addition, you need to perform the following steps to create 1099 in QuickBooks Desktop.
- Open your QuickBooks Desktop application and navigate to the Vendors.
- From there, select the 1099 Form.
- Now, click on Print/E-file 1099 Forms.
- Tap on Get Started and select 1099-NEC or 1099-MISC, depending upon the type of your contractors. You need first to create 1099-NEC and then 1099-MISC with the same steps as the previous one.
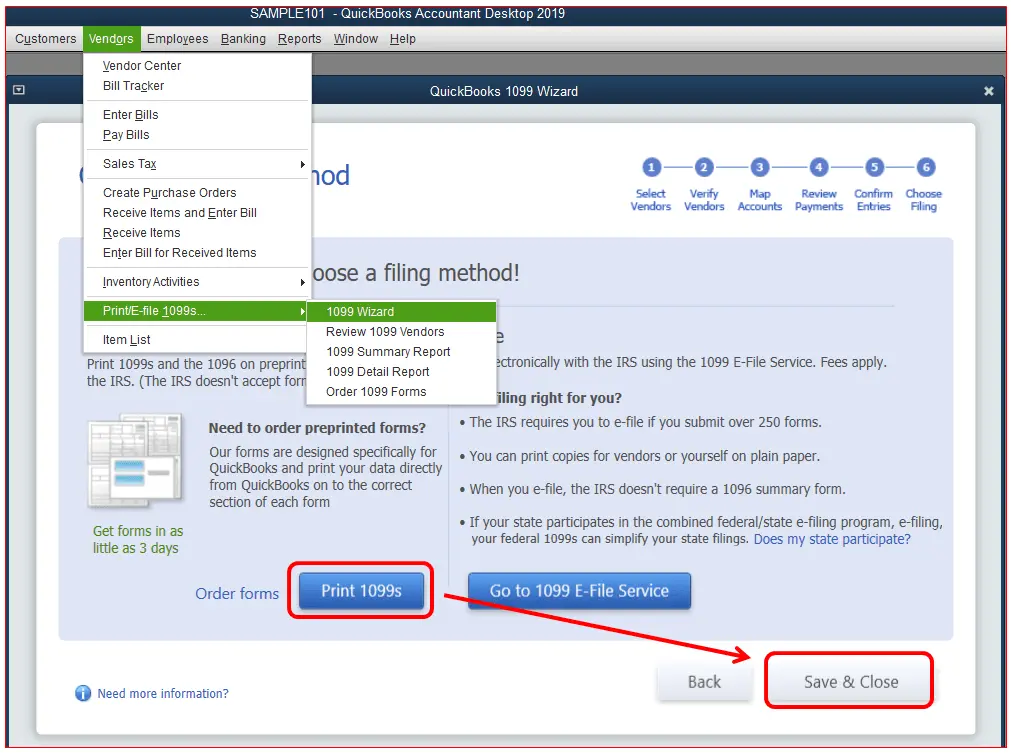
- Now, select all the vendors and contractors for whom you want to create 1099 in QuickBooks Desktop.
- You can double-click to verify and edit your vendor information before hitting continue. Hit Continue once you are done with all the verification.
- Now, click Apply for payments in this 1099 box section and navigate the dropdown menu.
- Select the vendor accounts you want to link to the particular payment. If you see the box in Gray color, it is already linked to another 1099 form.
- You can encounter an error message saying that your setting doesn’t match the current IRS threshold. If so tap on Show IRS 1099-MISC filing threshold and click on Reset to IRS Thresholds.
- Then check and view the detailed reports of the included or excluded payments in Form 1099. Click on View Excluded Payments or View Included Payments. (You can also remove any transaction from the 1099 form at this point.)
- Lastly, review the vendors and the transactions that you are going to report and select Continue.
- You will get two options: print or e-file 1099s in QBD.
- If you wish to print, select the Print option, and to electronically file 1099 in QuickBooks Desktop, follow the steps mentioned in the next section.
Steps to Create 1099 in QuickBooks Desktop For Mac
- You need first to create a backup for your company files.
- Then, go to the Vendors section, select 1099 Forms, and then Print or E-file 1099/1096.
- After that, you need to select Get Started on 1099-NECs or Get Started on 1099-MISCs for the form 1099 that you want to create. If you want to create both 1099-NEC and 1099-MISC, then repeat the steps for the other form too. Note: There are some changes to the form 1099 and boxes, so you need to choose your forms very carefully. Most of you will choose the Non-employee compensation, Box 1 on the 1099-NEC. But check once with your accountant if you have made any other kind of payments.
- After this, you need to select the vendors that need a 1099 form and verify that all the vendor information is correct. You can also edit and update any incorrect information by clicking twice on it and then by hitting Next.
- Then, you also have to map the vendor payment accounts. Then, from the Account dropdown, select the account you want to link the payments to. If you find any gray boxes, then they are mapped to some other 1099 form. However, remember to map accounts to only one 1099 form. And when complete, hit Next.
- Now, you need to review the list of your included and excluded payments.
- For this, select the View Included Payments or View Excluded Payments options to check the detailed reports, and after that, select Next.
- After this, you also need to review the vendors and amounts that you will be reporting and then hit Next.
- Lastly, choose whether you want to print 1099 or e-file it and then continue accordingly.
Read Also- QuickBooks Payroll Tax Table Update
Step 2: Import Data into Tax Form 1099
Before you proceed to e-file 1099 in QuickBooks Desktop, you need to import data through an integration called Tax1099. Follow these steps to import data to Tax1099.
- Open QuickBooks Desktop and navigate to Go to 1099 E-file Service.
- You will land on the Tax1099 landing page.
- Sign up or Log in to your Tax1099 account.
- After you have logged in, follow the on-screen instructions to import your data prep [ared into QuickBooks Desktop into Tax1099.
- Once it is successfully imported, the Tax1099 dashboard will show you the list of vendors, amounts, and boxes.
- Follow the next step to e-file 1099 in QuickBooks Desktop.
Step 3: Electronically File 1099 in QuickBooks Desktop
These are the standard steps to file both 1099-NEC and 1099-MISC in QuickBooks Desktop. Follow the given steps to e-file 1099s in QBD.
- Click on the Edit button or Select the vendor name to update any information.
- Fill in the information under suitable state boxes to e-file 1099s with your state.
- Check the boxes next to the Date column for all the vendors you want to e-file for and hit Next.
- You will get three options to choose from on how you want to send the copies to the recipients:
- USPS mail (you need to pay an extra charge for this),
- Email Recipient,
- Download the PDF, and Send it Manually.
- Select anyone according to your preference.
- If you want to file 1099s with your state, select them here and click Next.
- Once done filling in all the required information on the Select Forms screen and selecting all the appropriate options, you will be redirected to the Payments Page.
- Enter your payment information and tap on Pay & Submit to e-file.
- Repeat the same steps to create and file 1099-MISC.
Step 4: Check the Filing Status for Form 1099s
Once done with filing Form 1099s for all your vendors, you can check the filling status by logging into your Tax1099 account. Follow the given steps to check the status:
- Log in to your Tax1099 account from QBD.
- On the upper right corner of the page, look for the + Sign and Click on it.
- Click on the Check on Status option.
- Enter your 9-digit reference number.
- Tap on the Check Status.
Read also – How to E-File W-2s With QuickBooks Desktop
Is it worth the Hype to E-file The 1099 Form in QuickBooks Desktop?
The main reasons why you should file 1099 in QuickBooks Desktop are:
- It is hassle-free and easy to use: If you file 1099s using QuickBooks Desktop, you can save time and effort in filling the form as it uses the already saved data from the account to file it electronically. You can directly import your data from QuickBooks and e-file 1099s in QBD.
- It saves you from manual work: AS discussed earlier, there are two ways to create and file From1099 for non-employee wages. The first is to do manual work, purchase the 1099 kit, fill it up manually, and send it to the IRS, and the other is a straightforward way, i.e., to E-file Form 1099 in the QuickBooks Desktop application. The second option can save you from a lot of manual work as you can directly create and file Form 1099 in QBD and email to your contractors. Also, you can download and send the copies.
The Final Note
QuickBooks is just the right way for you to file Form 1099 with ease. Additionally, it also informs you from time to time about the changes made by the federal government regarding Form 1099s. So, follow the steps mentioned above to file 1099 in QuickBooks Desktop, and in any case, you get stuck over any other thing, you can connect with us at +1-(855)-955-1942.
Frequently Asked Questions
A. Form 1099 is used to report payments made to non-employees, such as contractors or freelancers, to the IRS. In QuickBooks Desktop, filing 1099 ensures your business complies with tax regulations, avoids penalties, and keeps accurate records of payments made throughout the year. The software helps track payments eligible for 1099, making reporting easier and faster.
A. To set up a vendor for 1099 filing, go to the Vendor Center in QuickBooks Desktop, select the vendor, and click Edit Vendor. Under the Tax Settings tab, check Track payments for 1099. Enter the vendor’s tax ID and confirm other required details. This ensures that all payments to the vendor during the year are properly included in your 1099 report.
A. Yes, QuickBooks Desktop can automatically track payments that qualify for 1099 based on categories you assign to expenses and accounts. By mapping accounts to 1099 boxes and ensuring vendors are set up correctly, QuickBooks Desktop will calculate totals throughout the year, helping you generate accurate 1099 forms without manual calculations.
