
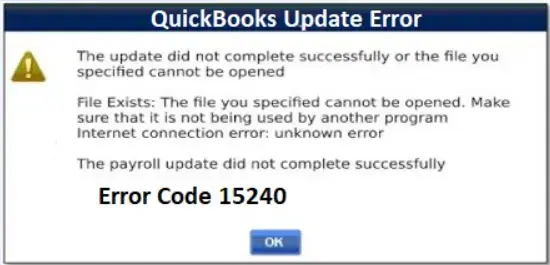
Various problems can disrupt the QuickBooks payroll update process. One of the most challenging issues that you might encounter is QuickBooks error 15240 which can also appear when updating the software. Here’s the error message that you are likely to see on the screen:
| “The update did not complete successfully or the file you specified cannot be opened File Exists: The file you specified cannot be opened. Make sure that it is not used by another program. Internet connection error: unknown error The payroll update did not complete successfully Error Code 15240” |
When you are unable to update payroll, you cannot perform crucial tasks related to employees’ salaries & taxes. This can cause huge problems for your business’s overall performance and reputation. Therefore, you must resolve this glitch as quickly as possible.
Fortunately, there are several methods that you can implement to troubleshoot this problem seamlessly. Let’s explore the blog to learn about the main causes of this issue and discover how we can eliminate it effortlessly.
If you want instant guidance to fix QuickBooks error 15240, dial +1-(855)-955-1942 to contact a QB professional.
What are the Major Factors Behind QB Update Error 15240?
Any of the reasons listed below might cause QuickBooks Desktop Error 15240 in your application. Therefore, pay attention and read them before applying the correct solution to rectify the issue.
- If the Shared Download location is not mapped properly.
- When a file or component is missing, which is a crucial part of payroll updates.
- Your system firewall settings are improperly set to treat the QuickBooks application as a threat, blocking all the updates for the application or the payroll service.
- Disabling the File Copy Service in QB.
- If QB cannot verify your digital signatures, that might trigger the QuickBooks payroll update error 15240.
- Utilizing an old version of the QuickBooks Desktop application.
- When the installation files are corrupted.
- One of the most common reasons is corrupted or damaged company files in the software.
- If your system date and time are not set correctly according to your time zone.
- When you are not logged in as a Windows admin or do not have admin-level permissions to initiate QB updates
- Misconfigured the Internet Explorer settings.
- If you are accessing the company file in multi-user mode and trying to install QB updates, it may provoke QuickBooks error 15240.
How Do You Identify the QuickBooks Update Error 15240?
One of the main symptoms that help you identify the QuickBooks error 15240 is facing issues while updating the QuickBooks desktop application or even downloading payroll updates. However, other symptoms state the presence of QuickBooks Desktop Update Error 15240.
- Facing issues while updating the payroll in QuickBooks.
- Not being able to adjust the paycheck in QuickBooks after facing the error message once.
- Not being able to install the latest maintenance version of the QuickBooks desktop.
- Degrading performance of your system.
- The QuickBooks application won’t accept your command or takes too much time.
Important Note: We recommend you go through a similar article on QuickBooks Error 15241 to learn more about other QuickBooks update errors.
12 Ways to Seamlessly Troubleshoot QuickBooks Error 15240
Prior to implementing the solution, backup your company file as if anything goes wrong while troubleshooting, there are chances of data loss or damage. Therefore, it is always advisable to back up the company file in timely intervals or schedule automatic backups. To create a backup, go to the File tab in QuickBooks Desktop and click on the Backup Company File option.
The following are the robust solutions every user troubled by the QuickBooks Desktop error 15240 must try.
1. Operate QuickBooks Desktop as an Administrator
Sometimes, the error can be rectified by simply providing the QuickBooks application with admin rights.
- Close your QuickBooks application and click right on its icon.
- Choose the Run as Administrator option.

- Now go to the Properties tab and check the Compatibility for all the users.
- Hit Yes if any popup prompts and close.
2. Properly Configure the Internet Explorer Settings
The essential security settings are an integrated part of IE that shields the system from websites with threats. So, re-configure the setting to add Intuit domains as safe websites.
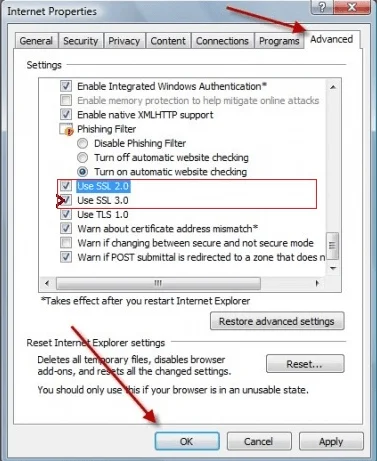
- Go to Internet Explorer and open the Settings page.
- Choose the Internet Connections option.
- Now click the Advanced option from the menu.
- Next, navigate to the bottom of the page and select SSL 2.0 and SSL 3.0.
- Now, check the square boxes present in front of both words.
- At last, click on Apply and then click OK to confirm all the changes.
3. Grant Windows Permissions in the QB Installation Folder
- Begin by closing the QB application.
- Now, navigate to C:\Program Files\
- However, if you are a 64-bit user, navigate to C:\Program Files (x86)
- Now, when you see the Intuit folder, by right-clicking on it, choose the Properties option from the drop-down menu.
- Then, click on the Advanced option under the Security Tab.
- Now, make sure that the User Group is the owner of the folder. If this is not the case, you must take ownership of the Intuit folder.
- To take ownership, you should:
- Click on the Advanced Security Settings and click Change against the Owner Name.
- Then, to select the field, type Users in the object name and then choose the Check Names option.
- Further, click on OK.
- In the sub-containers and objects section, mark Replace Owner and click on the Apply option.
- Then, choose OK.
- After that, in the Permissions window, choose Users and then click Full Control.
- Choose Apply, and afterward, OK.
- Lastly, retry downloading the updates.
- However, if the QuickBooks Desktop update error 15240 has not been rectified, so repeat the first six steps for the following folders:
- C:\Program Files\Common Files\Intuit
- Then, C:\Users\Your User Name\AppData\Local\Intuit
- (64-bit users) C:\Program Files (x86)\Common Files\Intuit
- C:\ProgramData\Intuit
4. Check the System Date & Time Settings
- Click on the date and time displayed on the right corner of your screen and tap on the Change date and time settings.
- Set the date and time correctly.
- Then hit Apply and OK.
5. Revise the Windows Firewall Settings
If you are using any third-party firewall on your computer, make sure it allows QuickBooks files to have full access to go through it uninterrupted.
- Open the Settings tab of the Firewall Program you are using on your system.
- A list of the programs restricted by firewall security will be displayed on the screen. Make sure the files given below are not excluded from the list.
- qbw32.exe
- qbupdate.exe
- Also, ensure that the firewall does not block Port 80 and Port 443.
6. Run the Quick Fix My Program Tool
First, Install QuickBooks Tool Hub
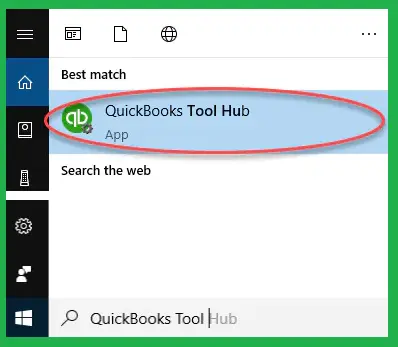
(For a better experience, utilize QB Tool Hub on Windows 10, 64-bit.)
- If you are using the QB program, it’s best to close it and then open your internet browsing.
- Then, from Intuit’s official website or any trusted source, begin to download the Tool Hub.
- After downloading it, keep the file on the system. Save it where it is easily accessible, for example, your downloads section or desktop.
Note: If you have previously downloaded the Tool Hub, check the version. When you click on the Home tab, you will find the version at the bottom of the desktop page.
- Now, to open the downloaded QuickBooksToolHub.exe file, you should double-click on it.
- Proceed to follow all the steps properly to install the Tool Hub.
- Further, double-click the Tool Hub icon to open it when the process ends.
Note: If you cannot locate the icon on the desktop screen, search for it in the Start menu.
Secondly, Access the Quick Fix My Program
It is a handy utility that quickly repairs your QB application after shutting down all the background processes that QB uses.
- Start by double-clicking on the QB Tool Hub and open it.
- Then, choose the Program Problems option.
- Under it, click the Quick Fix My Program option and initiate the repair process.
- After the repair process ends, close the application and reboot the system to see if the QuickBooks Desktop update error 15240 is fixed.
7. Use the QB Install Diagnostic Tool
If running the Quick Fix, My Program was ineffective, try utilizing QB Install Diagnostic Tool, another utility to fix QuickBooks issues.
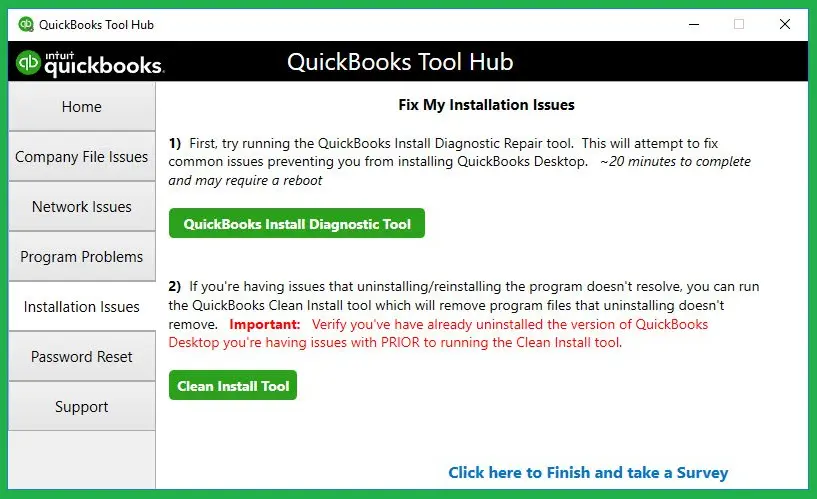
- Begin by opening the QuickBooks Tool Hub and choosing the option to fix Installation Issues.
- Then click on the QuickBooks Install Diagnostic Tool and let it repair the QB issues.
- After that, reboot your computer and open the QB Desktop. Then, access the company file.
- Lastly, if you can update the QB application, the QuickBooks update error 15240 is eliminated.
8. Manually Update the QB Desktop Application
For Windows Operating System Users
- From the QB application, choose the Help tab from the toolbar.
- Then, choose Update Now from the drop-down and click on Get Updates option.
- After the update process is finished, close your application and open it again to install the updates.
- Further, when you get a prompt to install the recent updates, choose Yes.
- Proceed to follow all the instructions carefully and update the application.
For Mac Users
- From the Menu tab in the toolbar, choose the option to Check for QuickBooks Updates.
- Click on Install and Relaunch.
Note: If you want to install the latest updates in the future automatically, you must click on the Automatically download and install updates option.
9. Install a New Digital Signature Certificate
One of the reasons for QuickBooks payroll update error 15240 is not having a verified digital signature certificate updated in the application or the previous one expired. The following are the steps to install a new certificate.
- Begin by following the path for C:\Program Files\Intuit\QuickBooks.
- Now, click on the Properties option after right-clicking on the QBW32.exe file.
- Then, choose the Digital Signature option and see if Intuit is chosen in the signature list.
- Click on Details, and when a new window displays on the screen, choose the option to View Certificate.
- After that, in the Certificate window, choose Install Certificate.
- Now, choose Next until you see Finish, and select it.
- In the end, restart the computer and try downloading fresh updates once again.
10. Reinstall QuickBooks Desktop On Your System
QuickBooks Clean Install Tool can help you clear all the junk that may have been collected over time and thus helps to prevent your company file from getting corrupted or damaged.
- Press the Windows +R keys and open a Run Window
- Now, type appwiz.cpl and click OK.
- Choose QuickBooks under the Programs and Features option and uninstall it.
- Tap Yes, then Next, and finally click on Remove.
- It will take a few minutes to remove the QuickBooks Desktop application from your system.
- Now, you need to run the Clean Install Tool. For that:
- Download and install the QuickBooks Tools Hub on your system.
- Double-click on the icon and click Yes.
- Once it opens, go to the Installation issue tab and click Clean Install Tool.
- Now, choose your version of QB software and click Continue.
11. Utilize the Selective Startup Mode
If some third-party application continuously interferes with the QB application, consider switching to the selective startup mode. The method to perform the same is given below:
Step I: Switch to Selective Startup Mode
- Follow the given steps to enable the selective startup mode on your system.
- First, launch the Run Window by hitting the Windows + R keys on the keyboard.
- Then, type the word msconfig in the given space and hit Enter.
- When the option to switch to selective startup appears in the General tab. Hit on it, followed by Load System Services.
- Then, head to the Services tab and select the box for Hide all Microsoft Services.
- Now, choose the option to Disable all.
- After that, unmark the option saying Hide all Microsoft Services.
- Now, pick the Windows Installer from the services list and hit OK.
- Lastly, go for the Restart button on the system reconfiguration window. And let the system open in the selective startup mode.
Step II: Install, Update, or Reinstall the QuickBooks Desktop Application
You can install your QB application on the system through a CD or can directly download the QB package from the official website. You can save the downloaded QB file in the default folder and tap twice on the executable QB file for installation. Now, you need to follow the instructions, accept the terms and conditions, and complete the installation process. Then, you need to follow the given steps and update the QB Desktop application.
- Launch the QB Desktop application and go to the Help menu.
- Now, select the Update QuickBooks Desktop option.
- If you have new updates available, opt for the Get Updates option.
- Next, hit the Update Now button and proceed ahead smoothly.
Step III: Return to the Normal Startup Mode
After you have completed the installation in the selective startup mode, return to the normal mode. Follow the steps given below to go back to normal mode:
- First, you must open the Run command by simultaneously hitting the Windows and R keys.
- Then, type msconfig and hit Enter.
- Now, switch back to Normal Mode from the General tab.
- Lastly, go to the system configuration window and restart your device.
12. Clean System Junk Files
Sometimes, clearing junk files, temporary folders, etc., on the system can clear out the space for the installation of the QB Desktop application and its updates. So, follow the given steps to clean the junk files from the system.
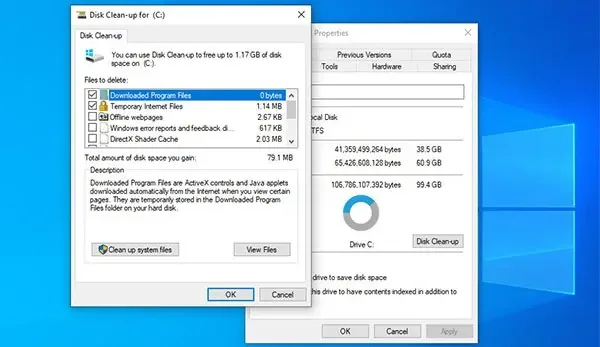
- Go to This PC from the desktop.
- Then, click right on the C drive from the My Computer.
- After that, hit on the Disk Cleanup option from the wizard box.
- Check and verify the files that are junk and that you no longer need.
- Lastly, delete them and clear the space.
Try These Preventive Measures For QB Payroll Update Errors
Here are the points that describe some really effective preventive steps that you need to follow for QuickBooks payroll update errors:
- Regularly Update Your Operating System & QB: Ensure that you always use an updated operating system & QB Desktop with the latest patches & fixes.
- Verify Your Internet Connection: Regularly check your Internet connection & ensure that it is stable.
- Backup Your Company Data: Always initiate the update process after creating a backup copy of your company file.
- Close Third-Party Programs: Do not allow third-party apps to function on your computer when you are updating QB payroll.
- Disable All Security Applications: You can temporarily deactivate Windows Firewall & the antivirus software.
- Check System Hardware Components: Ensure that all the system hardware components are running smoothly.
Winding Up
In this extensive guide, we walked you through various resolutions for QuickBooks error 15240. Hopefully, you can now effortlessly install the latest QB & payroll updates. If, however, you continue to experience severe challenges or have a query, you can connect with a QB professional for immediate assistance.
Frequently Asked Questions
Ans: Windows Vista, 8, Windows XP, Windows 10, Windows ME, and Windows 7 are among the Windows operating systems that frequently face QB error code 15240.
You might face different error codes when updating QB payroll due to the following causes:
1. Irregular Internet Connection: An unstable Internet connection can disrupt the QB payroll update process.
2. Expired Payroll Subscription: The update process will fail if the payroll subscription is inactive.
3. Restrictive Security Settings: Various security apps, such as Windows Firewall, might cause internal issues.
4. Installation Issues: Any defect in the QB installation setup can trigger multiple problems.
5. Faults in the System Hardware: Using a defective computer hardware configuration will cause various difficulties when running QB Desktop.
Here are a few key tactics that you can implement to resolve QuickBooks error 15240:
1. Run QB With Admin Rights: Ensure that you use QB with admin privileges to get access to various features & tools.
2. Use Quick Fix my Program: Repair the QB program setup using the Quick Fix my Program tool.
3. Verify System Date & Time: Always ensure that your computer has valid date & time settings.
4. Reorganize the Windows Firewall Settings: You must create exclusions for QB programs in Windows Firewall settings.
5. Install a Fresh Digital Signature Certificate: Download & install an updated digital signature certificate for your QB application.
6. Repair QB Desktop: Utilize the QB Install Diagnostic Tool to scan & repair your QB Desktop application.
