
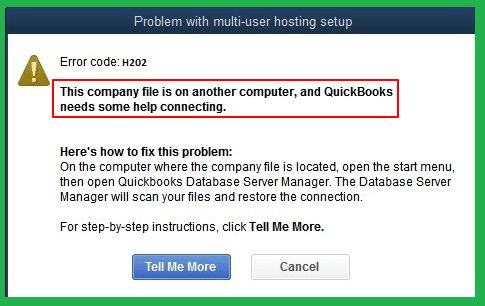
QuickBooks’ multi-user network feature allows users to access and manage the company file simultaneously on the same network. It helps save time and improve real-time collaboration. However, sometimes you might encounter QuickBooks Error H202 on your screen with an error message stating, “This company file is on another computer, and QuickBooks needs some help connecting.” The sudden encounter with the error indicates issues with your company file or the multi-user network itself. It usually means that a multi-user connection to your server computer is blocked. This blog is a complete guide to identifying the potential causes and appropriate solutions for error code H202 in QuickBooks in detail.
The error code displays the following error message:
| Error | Description |
| Problem | You are trying to work with a company file that is located on another computer, and this copy of QuickBooks cannot reach the server on that computer. (H202) |
| Problem with multi-user hosting setup | QuickBooks could not open the file in multi-user mode. (H202) |
What Causes Multi-User Mode Error H202 in QuickBooks?
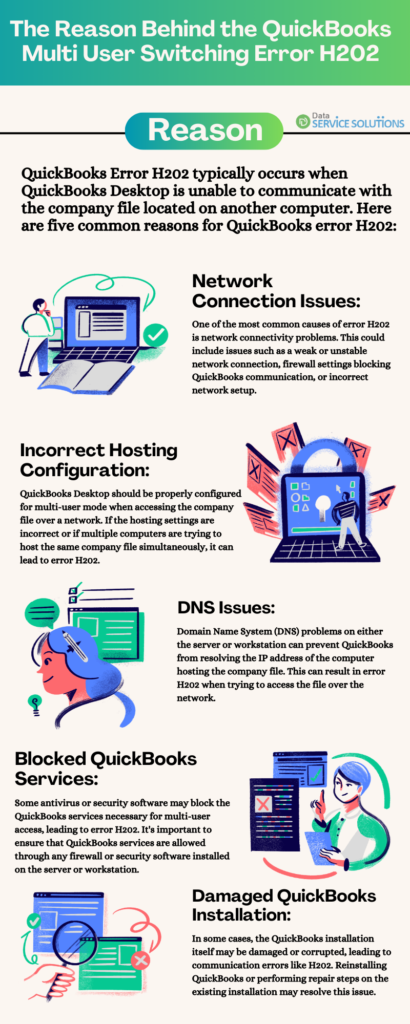
QuickBooks error code H202 mainly appears when QuickBooks tries to connect with the company file but fails to communicate with the server. The interruption connecting to the data file can occur due to various reasons mentioned below. Let’s get familiar with these causes:
- Major conflicts with the DNS server can also result in QuickBooks Desktop Error H202.
- The QBCFMonitor or QuickBooksDBXX services might not be running on your server computer.
- The QuickBooks file components .ND and .TLG might be damaged or corrupted.
- Incorrectly configured Firewall or Internet Security settings can also restrict QB when accessing the data file on the server.
- Company file hosting might be active on your workstations, which can trigger error code H202 in QB.
- The IP address of the server computer is not added to QuickBooks Desktop installed on all the workstations, and vice versa.
- Your server computer might not have the Windows admin user rights to run some specific operations of QuickBooks.
- The connection between the workstations and the server computer might fail, due to which you cannot access the files in multi-user mode.
- Not installing QuickBooks Database Server Manager for each version of QB Desktop you are using can also trigger error code H202.
- The server computer is not added to the Windows host file.
Once you have identified what causes QuickBooks Error Message h202, you must be looking for solutions to fix the error. To find suitable fixes, move to the section below and follow each troubleshooting solution step-by-step.
Important: If you try to update the QB company file in multi-user mode, you will encounter errors. Read How to Update QuickBooks Company File for detailed and stepwise procedures to avoid any issues.
What are QuickBooks Error Code H202 Symptoms and Signs?
- Inability to Switch to Multi-User Mode: Users cannot switch QuickBooks into multi-user mode, preventing simultaneous access to the company file by multiple users.
- Error Messages and Alerts: QuickBooks displays specific error messages like “QuickBooks company file error H202” or “Problem with multi-user hosting setup” when attempting to access company files over the network.
- Slow Performance or Freezing: QuickBooks is running slow and Freezing or stopped working. when trying to access company files hosted on other computers due to communication issues.
- Inability to Open Company Files: Users are unable to open company files stored on a network drive or another computer, with QuickBooks indicating that the file is inaccessible due to network problems.
- Company File Disconnection: QuickBooks users suddenly lose connection to the company file over the network, resulting in an inability to save changes or access company data.
Stepwise Solutions to Troubleshoot QuickBooks Error Code H202
You must implement the following troubleshooting solutions individually to fix multi-user mode error H202 in QuickBooks.
Solution 1: Run QuickBooks Database Server Manager on your Server Computer
To run QuickBooks Database Server Manager, you need to download and install the QuickBooks Tool Hub on the server computer. Once the Tool Hub is installed, go to the home screen of your computer and double-click on its icon to open it.
Note: Your server computer is the one that hosts your company file. So, ensure you are running the database server manager on it.
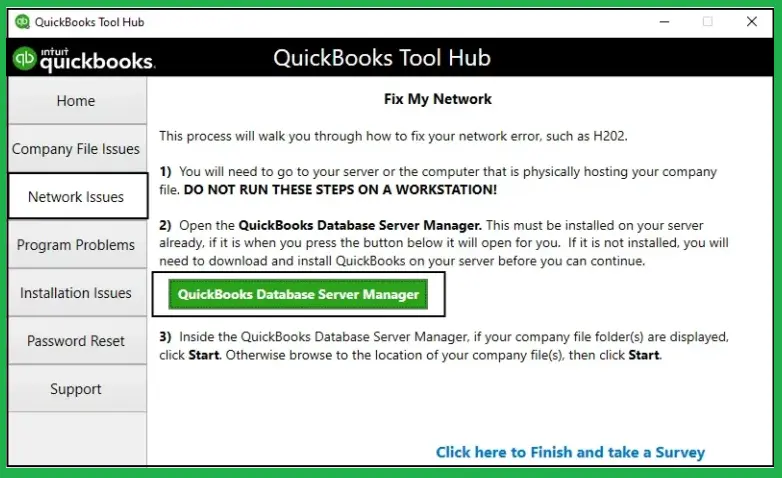
- Select the Network Issues menu from the QuickBooks Tool Hub.
- Click on the QuickBooks Database Server Manager option. If QuickBooks isn’t on your server computer, it will prompt you to install.

- From the QuickBooks Database Server Manager window, click Start Scan if you can see your company file folders. If you don’t, click Browse to locate your company file, then select Start Scan.
- Database server manager automatically repairs your Windows firewall. Once the scan finishes, select Close.
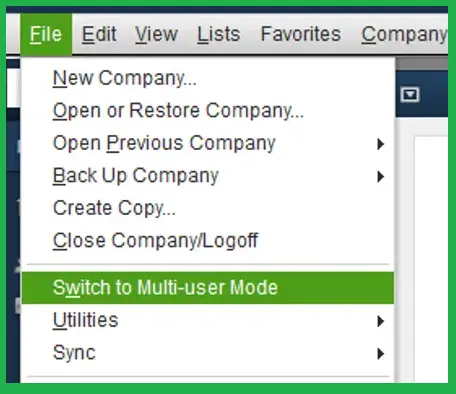
- Now, open QuickBooks Desktop on each workstation where you encounter error H202. Go to the File menu and then select the Switch to multi-user mode option. Also, check your server computer if you use it as a workstation.
If your workstation switched to multi-user mode, you’re good to go. However, if QuickBooks company file error H202 persists, move to the next troubleshooting solution.
Solution 2: Run the QuickBooks File Doctor Utility
QuickBooks File Doctor is a diagnostic tool that automatically fixes the company file and network-related issues. First, you need to download and install the QuickBooks Tool Hub to run this utility. Since you have already installed Tool Hub in the first solution, let’s proceed to run the File Doctor on your computer.
- From the tool hub, select the Company File Issues menu.
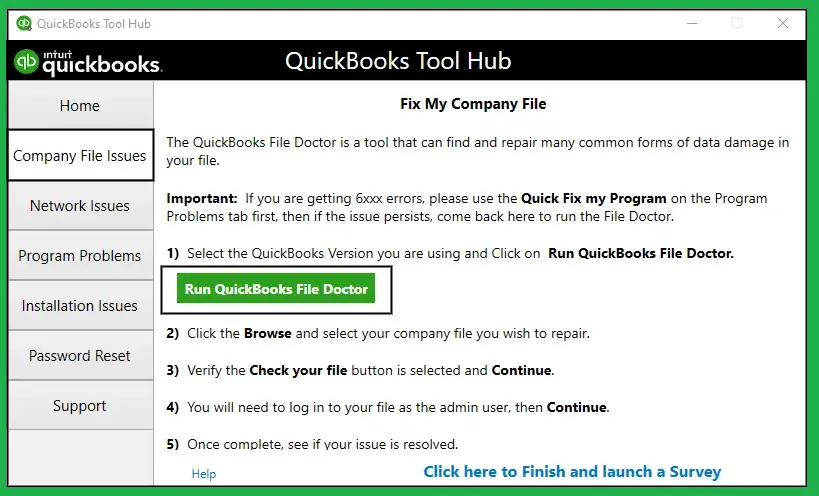
- Select Run QuickBooks File Doctor. The tool might take some time to open; wait until then.
Note: If you are unable to open the File Doctor, search for QuickBooks File Doctor in the Windows Start menu and open it manually.
- In the File Doctor, choose your company file from the dropdown menu. If you didn’t find the file, click Browse to find your company file.
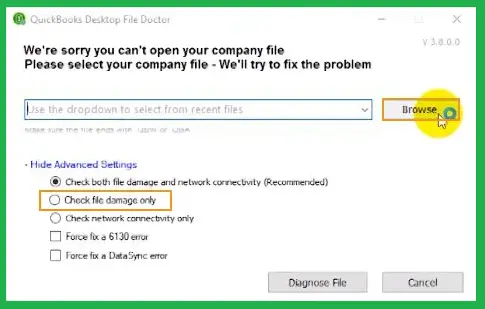
- Choose the Check your file option (middle option only) and then click Continue.
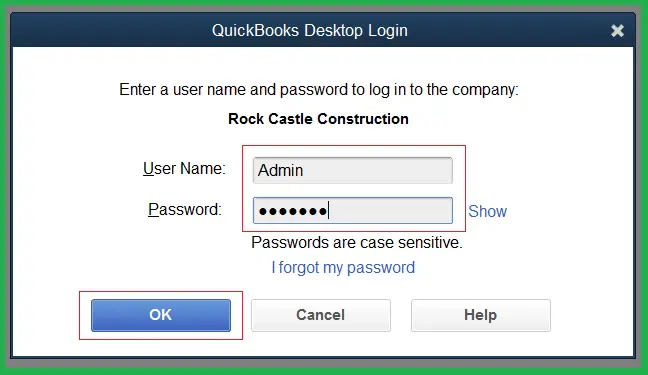
- After entering your QuickBooks admin password, click Next.
- Once done, try again to open your company file in the multi-user network.
If multi-user mode error H202 persists, continue with the next solution.
Solution 3: Verifying the Services on the Server Computer
The QB services must be running on the server computer to access the data file in the multi-user network without any issues.
The following steps are to review the QuickBooksDBXX service status. Then, repeat the same steps for QBCFMonitorService.
Note: If you utilize the full version of QuickBooks on the server computer, ensure the multi-user hosting is turned ON.
- Go to your server computer and press the Windows icon key to open the Windows Start menu.
- In the search field, type Run and press Enter to open it.
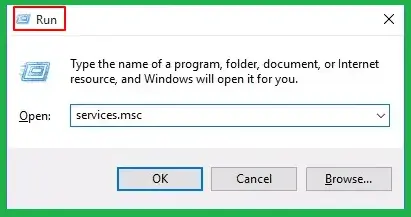
- Type services.msc in the Run prompt and press Enter.
- From the list of services, find QuickBooksDBXX and double-click on it.
Note: XX denotes the version of your QuickBooks Desktop. For example, QuickBooks Desktop 23 will appear as QuickBooksDB33.
- It will prompt you to the QuickBooksDBXX Properties window.
- From the General tab, select the Startup Type as Automatic.
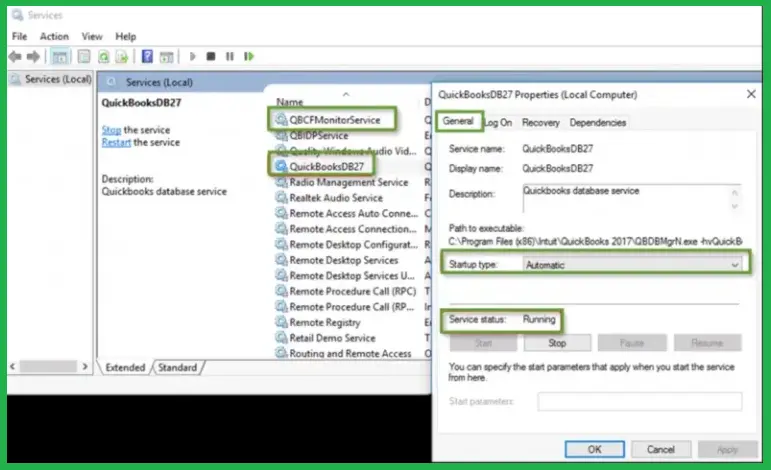
- Now, ensure the service status is either Running or Started. If it’s none of them, click Start.
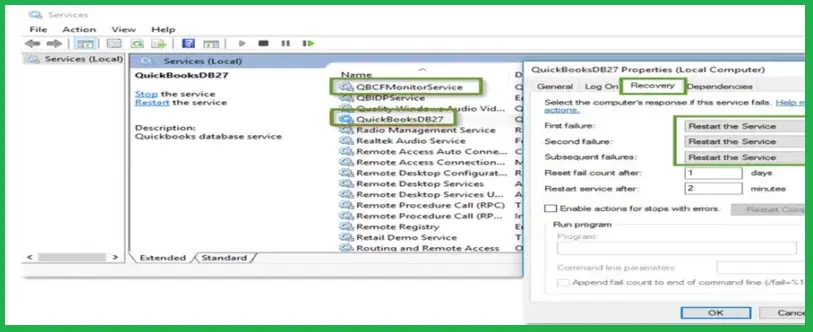
- Move to the Recovery tab and select Restart the Service from these dropdown menus: First Failure, Second Failure, and Subsequent Failures.
- Click Apply and then OK to save these changes.
- Once done, repeat the same steps for QBCFMonitorService.
Finally, open QuickBooks on each workstation, go to the File menu and select Switch to Multi-User Mode. If you switch to multi-user mode without any issues, QuickBooks Desktop Error H202 is fixed. However, if the error persists, continue to the next solution.
Solution 4: Set Up the Permissions for Folders and Windows Access
The QuickBooks folder must have proper Windows permission if you want to open it in multi-user mode. Each QuickBooks version has corresponding components that should be updated on time to let it function smoothly in multi-user mode. Therefore, to share the company file, a suitable configuration is essential for the Windows access permissions and the folders.
Read these Important Steps Before Proceeding Further:
- Ensure that correct permissions are given to the installation directories.
- In case you are employing the MS Windows Home edition, then the Security tab option is not given in the normal mode. So, you have to reboot the computer in Safe Mode in order to complete the steps:
- After rebooting the system, press the F8 key and hold it until the Advanced Boot window is visible.
- Click the Safe Mode option on the Advanced Boot window and press Enter.
- The QBDataServiceUserXX relies on the QB Desktop version you are using. For instance, for QB Desktop 2019: QBDataServiceUser29 and for QB Desktop 2018: QBDataServiceUser28.
- If the multi-user mode is enabled on in one or more workstations, it can inadvertently go into Alternate Hosting mode. Therefore, the workstation will take ownership of the QB company file and show the QuickBooks Desktop Error H202. Due to this, the other user working on the same file cannot open it.
Step 1: Setting up the QB Folder Permissions
First, verify the folder permissions to see if they are set up correctly. However, if you find any issues, you can configure these permissions by following the instructions below.
- Go to the Taskbar of your computer and click on the Windows Start menu.
- In the search field, search for File Explorer and press Enter.
- Look for the folder that has your company file and right-click on it. Then, select Properties.
- Choose the Security tab and click on Advanced.
- In the next window, select QBDataServiceUserXX and then click Edit.
- Allow the following settings:
- Traverse Folder/Execute File
- List Folder/Read Data
- Read Attributes
- Read Extended Attributes
- Create Files/Write Data
- Create Folders/Append Data
- Write Extended Attributes
- Read Permissions
- Write Attributes
In case these settings are not set correctly:
- Right-click on the folder that has your company file and then select Properties.
- Go to the Security tab and click Edit.
- Select the QBDataServiceUserXX service and click Full Control. Then, select Allow.
- Once done, select Apply and then click OK to save these changes.
Modify the Folder Permissions:
To change the folder permissions, open the Windows Start menu by pressing the Windows icon key. Then, search for File Explorer and open it.
- Search and right-click on each folder listed below:
- C:\Program Data\Intuit\Entitlement Client\v8
- C:\Program Data\Intuit\Entitlement Client\v6.0
- C:\Program Data\Intuit\Entitlement Client\v5
- C:\Program Data\Intuit\Entitlement Client\v3
- C:\Program Data\Intuit\Entitlement Client
- C:\Program Data\Intuit\QuickBooks Enterprise Solutions X.0 (X = version) or C:\Program Data\Intuit\QuickBooks 20XX (XX = year)
- C:\Users\Public\Public Documents\Intuit\QuickBooks\FAMXX (XX = year)
- C:\Users\Public\Public Documents\Intuit\QuickBooks\Company Files
- C:\Users\Public\Public Documents\Intuit\QuickBooks\Sample Company Files\QuickBooks Enterprise Solutions X.0 (X = version) or C:\Users\Public\Public Documents\Intuit\QuickBooks\Sample Company Files\QuickBooks 20XX (XX = year)
- C:\Program Data\COMMON FILES\INTUIT
- C:\Program Data\COMMON FILES\INTUIT\QUICKBOOKS
Now, follow the instructions listed below, and also keep in mind that you might not have all of these folders because some of these are specific to certain versions of QuickBooks Desktop.
- After right-clicking the folder, select Properties.
- Go to the Security tab and select Everyone.
Note: If you cannot find Everyone in the Group or User Name checkbox. Then, choose Add and type Everyone, then click OK.
- Finally, choose Full Control and click Apply. Then, select OK.
Step 2: Set Up the Windows Access Permissions to Share the Company File
The QuickBooks program should have precise permissions to share or work on the company file over a network. You might get QuickBooks Desktop error H202 if the company file lacks proper permissions.
For Windows OS 10 Users:
- Click on the Windows icon key on your keyboard to open the Windows Start menu.
- Type File Explorer in the search field and press Enter.
- Go to the folder where your company files are saved and right-click it.
- Choose Properties and then go to the Sharing tab.
- Click on Share Add under the Network File and Folder Sharing section.
- Choose the appropriate QBDataServiceUserXX based on your version.
- Select the permission level for both users to Full Control and then select Share.
Steps for Windows OS Server 2012:
Install the File and Storage Services on your computer before moving to the below steps.
- In the Taskbar of your computer, click on the Windows Start icon.
- Type Run in the search field and press Enter to open the Run Command.
- Enter ServerManager and then click OK.
- Select the File and Storage Services option and then click Shares.
- Go to the Task drop-down and select New Share. It will open a list of File Share Profiles. Click on each profile to read the description and find out how each differs from the others.
- Further, select the SMB – Share Quick option.
Note: SMB – Share Quick is the default profile, and this selection may vary.
- Under the Share location section, select Type a custom path.
- Search for the appropriate folder you want to share and select Select a folder. Then, click Next.
- Once done, try again to open your company file in the multi-user network.
Note: Under the Configure Share settings window, you can leave the default selections and click Next again. If you are still experiencing multi-user issues and are not able to open the company file, continue with the next solution to troubleshoot QuickBooks Multi-User Mode Error H202.
The SBM share selection might vary as it is a default profile.
- Afterward, under the section to Share Location, click the Type a custom path option.
- Now, search for the appropriate folder you want to share.
- Next, click Select a folder, then Next.
Solution 5: Manually Configure the Windows Firewall Settings on Your Server Computer
Incorrect Windows firewall settings can block QuickBooks files from running some crucial operations, like hosting the company file in a multi-user environment. So, you must ensure that QuickBooks is allowed through the Windows firewall.
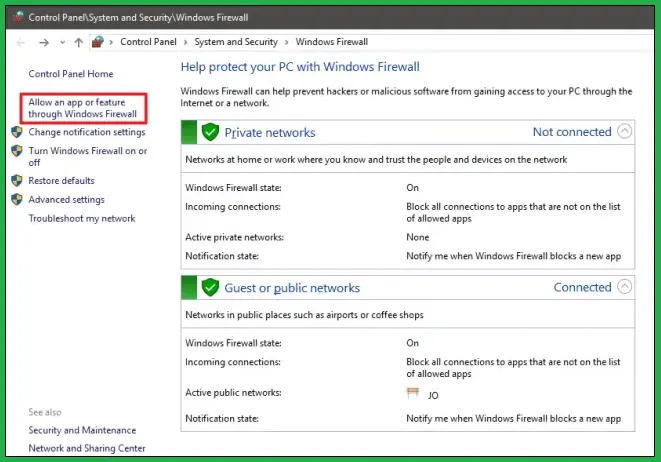
Create Firewall Port Exceptions for QuickBooks
- Launch the Windows Start menu by tapping the Windows icon key on your keyboard.
- Enter Windows Firewall in the search field and then press Enter.
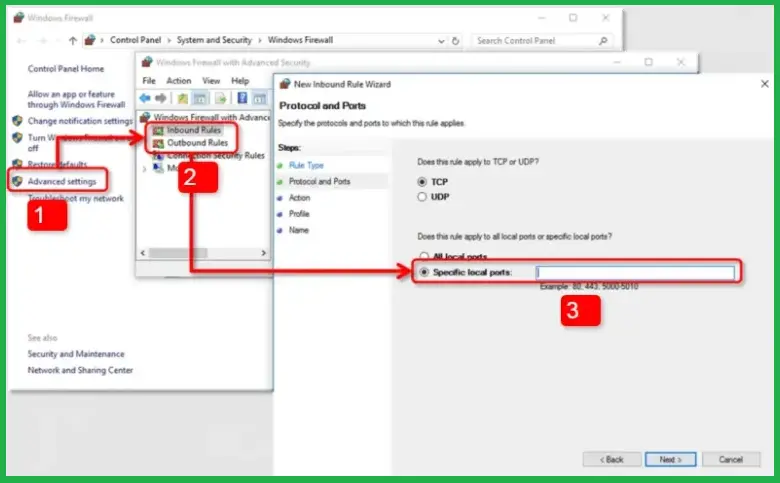
- Go to Advanced Settings and right-click on Inbound Rules. Then, choose New Rule.
- Choose the Port option and then click Next.
- Ensure TCP is selected and go to the Specific local ports section. Now, enter the specific port number for your version of QuickBooks.
- For QB Desktop 202 and later version: 8019, XXXXX.
- For QuickBooks Desktop 2019: 8019, XXXXX.
- For QuickBooks Desktop 2018: 8019, 56728, 55378-55382.
- For QuickBooks Desktop 2017: 8019, 56727, 55373-55377.
Note: The 2019, 2020, and future versions of the QuickBooks Desktop have dynamic ports. These are the specific firewall ports (not a range) assigned at the installation time that ensure QB gets exclusive use of a given port.
Get the Dynamic Port Number
- After entering the port number, click Next.
- Choose Allow the Connection option and then Next.
- Make sure all the profiles are marked in the next window, and then click Next.
- Create this rule by giving it a name like QBPorts(year).
- When done, click Finish
Repeat the same procedure to create outbound rules. To do so, select the Outbound Rules option in place of Inbound Rules.
After changing and correctly configuring the firewall permissions, open QB on workstations. Check if you can switch QuickBooks to multi-user mode and if error H202 is fixed. If the error persists, follow the next step.
Create the Windows Firewall Exception for QuickBooks Program Files
QuickBooks uses executable files (.exe) to run your various crucial operations, such as hosting the company file. So, you need to create a firewall exception for each of these files to fix the multi-user mode issues.
Follow the steps below and create an exception for each executable file given in the table.
- Press the Windows icon key to open the Windows Start menu.
- Search for Windows Firewall and then press Enter.
- Select the Advanced Settings option and right-click on Inbound Rules. Then, choose New Rule.
- Select This program path > Browse and select one of the executable files listed in the table below. Then, click Next.
- Now, Allow the Connection and then click Next.
- Ensure all the profiles are marked on the next window, then click Next.
- Finally, create this rule by giving it a name such as QBFirewallException(name.exe).
- Once done, repeat the same steps to create an Outbound Rules. Make sure to choose the Outbound Rule in step 3.
| Executable files | Location |
| AutoBackupExe.exe | C:\Program Files\Intuit\QUICKBOOKS YEAR |
| Dbmlsync.exe | C:\Program Files\Intuit\QUICKBOOKS YEAR |
| DBManagerExe.exe | C:\Program Files\Intuit\QUICKBOOKS YEAR |
| FileManagement.exe | C:\Program Files\Intuit\QUICKBOOKS YEAR |
| FileMovementExe.exe | C:\Program Files\Intuit\QUICKBOOKS YEAR |
| QuickBooksMessaging.exe | C:\Program Files\Intuit\QUICKBOOKS YEAR |
| QBW32.exe | C:\Program Files\Intuit\QUICKBOOKS YEAR |
| QBDBMgrN.exe | C:\Program Files\Intuit\QUICKBOOKS YEAR |
| QBServerUtilityMgr.exe | C:\Program Files\Common Files\Intuit\QuickBooks |
| QBCFMonitorService.exe | C:\Program Files\Common Files\Intuit\QuickBooks |
| QBLaunch.exe | C:\Program Files\Common Files\Intuit\QuickBooks |
| QBUpdate.exe | C:\Program Files\Common Files\Intuit\QuickBooks\QBUpdate |
| IntuitSyncManager.exe | C:\Program Files\Common Files\Intuit\Sync |
| OnlineBackup.exe | C:\Program Files\QuickBooks Online Backup |
Note: In case you see Program Files (x86), don’t worry, it’s not a different file. (X86) only indicates you are using a 64-bit operating system.
Once you have created an exception for each of these executive files, open QuickBooks Desktop and check if you can access the company file in multi-user mode. If you still see error code H202 in QB Desktop, continue with the next troubleshooting steps.
Review the Antivirus Settings
After configuring the Windows firewall settings for both QuickBooks and its components, let’s review the antivirus settings.
Sometimes, antivirus programs accidentally block the QuickBooks from loading essential files. To fix this issue, you need to check the section of the antivirus programs that shows the blocked files. If you see any of the program files listed above in the blocked section, remove them from there to unblock the files.
If Windows firewall or antivirus settings are not the reason behind QuickBooks error H202, move on to the next troubleshooting solution.
Solution 6: Ping the Server Computer from Your Workstation
Network issues on your workstation or on the server computer can interrupt your connection to the company file and trigger error code H202. Ping your server computer from each workstation where the error arises to check the connectivity for further troubleshooting.
Step 1: Turn on the Network Discovery on the Server Computer
- Open the Windows Start menu of your workstation and server computer by pressing the Windows icon key.
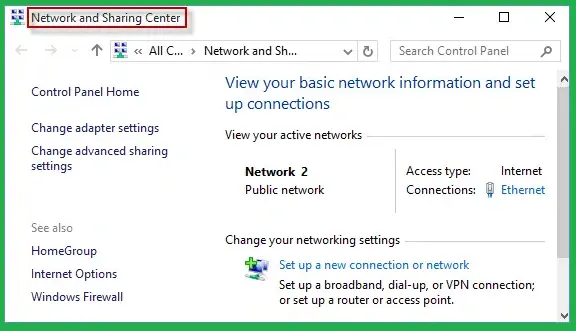
- Type Network in the search field and then press Enter. It will open the Network and Sharing Center.
- Select the Change Advanced Sharing settings option and then move to the Network Discovery and File and Printer Sharing sections and ensure the Turn on Network Discovery option is selected.
Step 2: Get the Name of your Server
- Open the Windows Start menu on your server computer and type Run in the search field. Then, press Enter to launch the Run prompt.
- Enter CMD in the Run window and then press Enter.
- Type ipconfig/all in the CMD window and press the Enter key.
- Go to the Windows IP Configuration section and find the Host Name. The server name will be on the right side.
- Now, note down this hostname and copy it to a Word or Notepad file so that you can easily access it.
Step 3: Verify the Network Connectivity on the Workstation
Note: The steps below are complex to implement for general users. If you also find it difficult to follow these steps, you must connect with the team of experts at +1-(855)-955-1942.
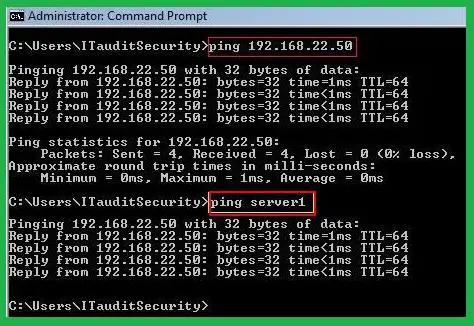
- Press the Windows + R keys to open the Run window on your workstation.
- Type CMD in the search field and press Enter. The Command prompt window will open.

- Type ping [your server name] in the window and then press Enter. Don’t include the brackets when entering the server name in the command prompt window. It should be like C:\Documents and Settings\Administrator>ping servername.
- Repeat the same steps for each workstation where you see QB error code H202.
If you get a response to each ping with no loss, it means your server computer is working fine. To troubleshoot multi-user mode error H202, follow the next solution mentioned below.
Solution 7: Create a New Windows User and Give Admin Rights to it
You need to sign in to Windows as a user with admin rights if you use QuickBooks Desktop in a multi-user mode. It will automatically change the firewall settings and folder permissions. Also, you need to provide administrator privileges to the Database Server Manager. In this solution, we will create a new Windows user account and give it admin-level access to resolve the error.
Step 1: Adding a Windows User with Admin Privileges
To create Windows users and provide administrator rights, follow the instructions mentioned on Microsoft’s website.
For Windows Small Business Server 2011 and 2008 R2
- Click on the Windows icon from the Taskbar.
- Choose All Programs and then select Windows Small Business Owner. Further, select Windows SBS Console.
- Choose the Users and Groups option and then move to the Add a new user account tab.
- Enter the required information and then follow the instructions on the Add a New User Account wizard.
Provide the administrator rights and click Finish once done.
Step 2: Allow QuickBooks Program Admin Access
Giving the QB application the admin right is necessary to let it operate in the multi-user network without any issues. Moreover, the application automatically creates a new Windows OS user while installing the QB Database Server Manager. You just need to provide admin privileges to run it on your network.
Note: These steps are not for you if your system’s Windows server is set up as a domain controller. To add the Database Server Manager user as a Domain Admin, you must contact an IT professional or dial +1-(855)-955-1942 to get help from the experts.
Follow the below steps to give Windows users or programs admin rights.
- Exit QuickBooks and open the Windows Start menu by pressing the Windows icon key on your keyboard.
- Search for the Control Panel and then press Enter.
- Look for the QBDataServiceUserXX user for the version of QuickBooks Desktop you are using. If you are using QuickBooks Desktop 2020, look for QBDataServiceUser30 and QBDataServiceUser29 for the 2019 version. The number for QBDataService goes down for each version.
- Select the Change the Account Type option and then select Administrator. Then, choose Change Account Type.
- To save these changes, click Apply.
- Repeat the same steps for each QuickBooks Database Server Manager you use.
If QuickBooks error H202 isn’t fixed, follow the next troubleshooting solutions.
Solution 8: Stop Hosting the Multi-User Access on Workstations
A server computer is what hosts your company file in the network, and the workstations are other computers that connect to it to access the company file. So, the multi-user hosting mode should only be active on the server computer rather than workstations.
If the hosting mode is active on your workstations, you won’t be able to access the file in the multi-user network. Let’s verify the hosting settings on your workstations and on the server computer.
Note: You must perform these steps before trying to open the company file.
- Launch QuickBooks on the workstation computers where you see error code H202.
- Rather than opening the company file, go to the File menu and select Utilities.
- If you see the Host Multi-User Access option, that means this workstation isn’t causing the issues; move to the next one and follow the same steps.
- Only select the Stop Hosting Multi-User Access option on the workstations as these are the systems hosting the company file.
- Now, repeat the same steps on each workstation where you see error code H202.
After checking the hosting configuration, move to the server computer that hosts your company file in the network.
- Launch QuickBooks on your server computer.
- Go to the menu bar and select the File tab. Then, select Utilities.
- If Host Multi-User Access is an option, select it. However, if Stop Hosting Multi-User Access is an option, don’t select it.
Once done, try to open the company file in the multi-user network. If the company file opens without any issues, you’re good to go. However, if error code H202 persists, continue with the next solution.
Solution 9: Copy Your QuickBooks File to the Desktop
Sometimes, instead of the file being the reason behind multi-user errors, it could be the location where the file is saved. So, in this solution, we will move the company file to a different location and check if this helps resolve the error.
- If you can open the company file in multi-user mode, then the location where you save your company file might be damaged.
- You can also get QB error H202 if your file is saved in multiple folders and exceeds the file system path limitation.
- If you can’t open the company file even after changing the location, it means the company file might be damaged.
Follow the below steps to copy your company file to a different location:
- Go to the folder that has your company file and look for the file with a .QBW extension.
- Right-click on this file and then click Copy. Go to the home screen of your system, right-click anywhere on the screen, then select Paste.
- Press and hold the Ctrl key, then launch QuickBooks. It will open the No Company Open window.
- Select the Open or Restore an existing company option. Now, go to your desktop and try to open the company file you just pasted.
If you still cannot open the file and QB Desktop error H202 appears, follow the solution mentioned below.
11th Method: Renaming the .TLG and .ND Files
The .TLG and .ND files are the configuration files that allow access to your company files in the multi-user network. If these files are damaged, you won’t be able to open the company file and might experience error code H202.
To fix this issue, you need to recreate these files by renaming them; follow the instructions below.
- Go to the folder that contains your company file.
- Look for the files having the same name as your company files but with a .ND and .TLG extension at the end. For example:
- company_file.qbw.nd
- company_file.qbw.tlg
- Right-click each of these files and select Rename.
- Add .OLD at the end of these file names, like company_file.qbw.nd.OLD.
- When it’s done, reopen QuickBooks and try again to open your company file in the multi-user environment.
If QuickBooks error H202 reappears even after renaming the company file, move to the next troubleshooting solution.
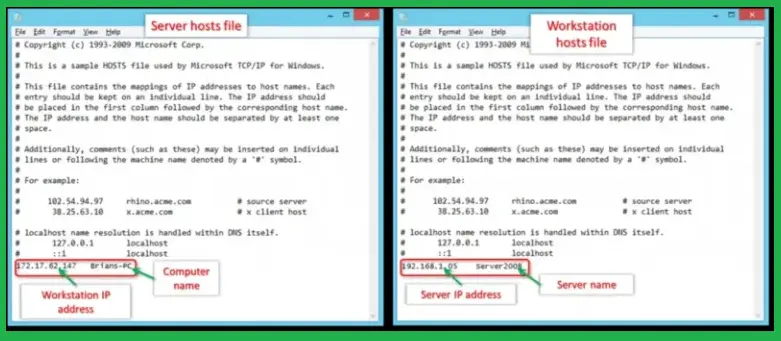
Solution 11: Make the Necessary Changes to the Windows Host File
If any of the above solutions do not work to fix error code H202, then there might be some issues with your Windows host file. Go through the instructions below to edit the Windows host file and fix the multi-user mode issues in QB.
Step 1: Note Down the System’s Name and IP Address
Before moving to the troubleshooting steps, keep a pen and paper handy to note down your system’s name and IP address. Also, ensure you can access server and workstation computers with all the admin rights.
First, implement these steps on your server computer and then move to the workstations.
Note: The server is the computer that hosts your company file, and workstations are the other computers that access the company file on the server.
- Go to your server computer and press the Windows + R keys to open the Run prompt.
- Type in CMD in the Run window and press Enter.
- In the command prompt window, type ipconfig /all (there’s a space between ipconfig and all) and then press Enter.
- Note down the hostname and IP address (or IPv4) on Notepad or paper.
- Perform the same steps on your workstation.
Step 2: Edit the Windows Host File
Perform the following procedure on the server system and workstations.
- Close QuickBooks and open the Windows Start menu on your server computer.
- Type File Explorer in the search field and then press Enter to open it.
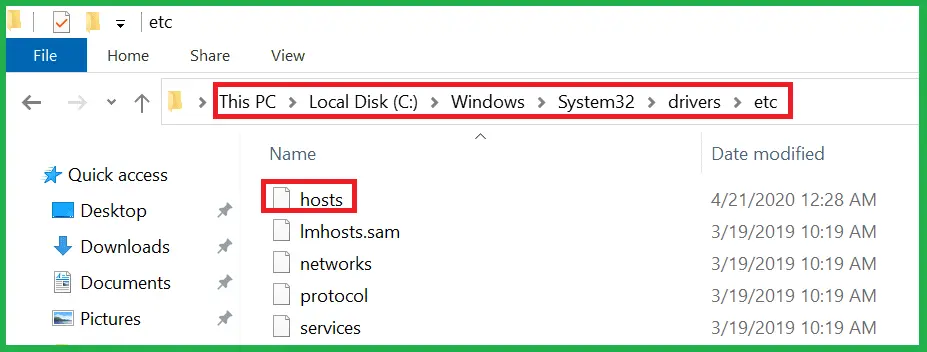
- Now, navigate to the C:\Windows\System32\Drivers\Etc or C:\Windows\Syswow64\Drivers\Etc file path.
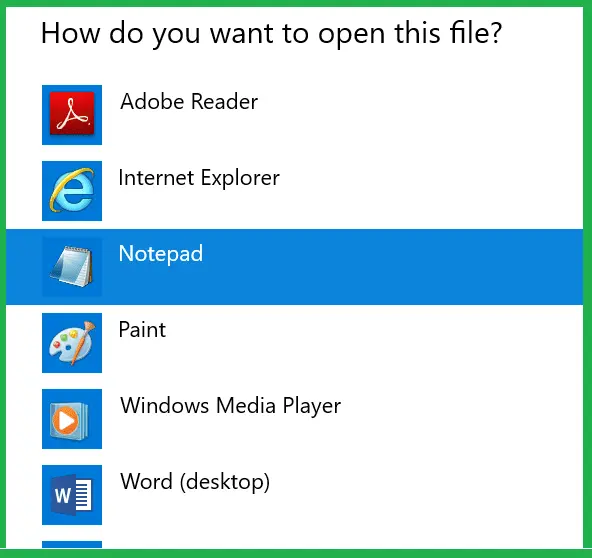
- Double-click on your host file and then select Notepad.
- Type the IP address, then the computer name, and use the Tab key to enter spaces.
- Make sure that the server system has the workstation’s IP and computer name.
- Similarly, all the workstations must have the server system’s IP and computer name.
Step 3: Save these changes to the Host File
Once you have successfully updated the IP Addresses in the Notepad on both server and workstations, you need to save these changes to the host file.
- Select the File menu in Notepad and click Save.
- Give this file a name as “hosts” along with the quotation marks.
- Select the Desktop option and then click Save.
- Right-click on the file you just saved and then select Copy.
- Browse to the location where you saved this file or use this path:
- C:\Windows\System32\Drivers\Etc
- C:\Windows\Syswow64\Drivers\Etc
- Look for the host file and right-click on it. Then, select Rename.
- Now, add .OLD at the end of this file name and then select Continue.
- Press Ctrl + V to paste the file you copied above and click Continue.
- Once done, retry to open the company file in multi-user mode to ensure H202 Error QuickBooks desktop is fixed.
Conclusion!
The solutions provided above are well-tried and tested by experts and have helped multiple users fix QuickBooks Error H202. Therefore, these solutions can also help you fix the error so that you can open the company file on the server without any issues. However, if the error persists or you are seeking some quick, professional help, give us a call at +1-(855)-955-1942 and connect immediately to chat with our support team.
Frequently Asked Questions
A. QuickBooks Error H202 occurs when the company file in multi-user mode cannot connect to the server hosting the file. This is typically caused by network issues, firewall settings blocking QuickBooks, or improper hosting configurations. When QuickBooks cannot communicate with the server, users encounter the H202 error, which prevents them from accessing the company file in multi-user mode. Ensuring proper network setup and firewall permissions can resolve this issue effectively.
A. To check if a firewall is causing H202, first ensure that QuickBooks ports are open for communication. Each QuickBooks version uses specific ports (e.g., 8019, 56728, 55378, etc.). You can temporarily disable your firewall and attempt to connect to the company file. If the error disappears, the firewall is the root cause. Reconfigure your firewall to allow QuickBooks through the necessary ports, and then re-enable security protections.
A. Yes, QuickBooks H202 can often be resolved without IT intervention by following proper troubleshooting steps. These include verifying hosting settings on all computers, running the QuickBooks Database Server Manager, checking network connectivity, and ensuring firewall and antivirus allow QuickBooks communication. For most small businesses, these steps are manageable, but persistent errors may require IT assistance for advanced network configurations.
