
Filing payroll forms on time is considered an essential task. As a matter of fact, the e-file function is undoubtedly the fastest method to accomplish this task and ensure compliance with IRS and state agencies. Form W-2 is one of the payroll forms used to report wages paid to employees and the taxes withheld by the employer. Employers are expected to file this specific form for every employee to whom they pay salary, wages, or other form of compensation.
Being an employer, you can effortlessly E-File W-2s with QuickBooks Desktop, depending on the payroll service you are using. For instance, Intuit may do everything for you on your behalf, or you can electronically file your W-2s through QuickBooks as well. This blog has detailed everything from setting up W-2 e-filing, to creating the W-2 forms to sending them to the IRS and state agencies. Therefore, read the blog till the end and get this essential task finished.
Wondering how to E-File W-2s with QuickBooks Desktop in your payroll version instantly? Just reach out to our experts at +1-(855)-955-1942. With professional guidance, you can fill in the W-2s form in no time.
Ways to File the W2 Form Electronically with Various QuickBooks Payroll Services
Intuit files W-2 forms itself for QuickBooks Desktop Payroll Assisted service users. For QuickBooks Desktop Payroll Basic and Standard service, you need to manually set up W-2 forms and then send them to the concerned authorities. Lastly, you need to set up the E-file and E-pay feature to file W-2s electronically in QuickBooks Desktop Payroll Enhanced. Let’s see the instructions for each payroll service one by one.
Note: The deadline for QB Desktop W2 E File to IRS is 30 January.
1. E-File W-2s with QuickBooks Desktop Payroll Assisted
When it comes to electronic filing in QuickBooks Desktop Payroll Assisted for W2 forms, you needn’t do anything. Intuit will file and mail the W-2 forms via USPS to your employee’s address (for those who opted for a mailed copy), provided ‘Automated taxes and forms’ are on. Alternatively, you can also choose to print copies for your employees yourself once they’re ready. The steps to check these settings are as follows:-
- Go to the Employees menu and select Payroll Center.
- Click on the Fill Forms button.
- Now tap View/Print Forms & W-2s.
- Enter the Payroll PIN and check if the option is set as Intuit Print or Self Print.
Another key point is that an additional fee would be applicable if Intuit mails the W-2s. You must also ensure the default option is selected as Intuit Print Service. It can take up to a week for your employees to receive their W-2 forms. You should ask your employees to check their Workforce regularly.
In case the Self Print option is chosen, you must purchase W-2 paper and print the forms manually. You also need to mail them to your employees.
2. File IRS W-2 with QuickBooks Desktop Payroll Basic or Standard Service
Users are required to manually file IRS W-2 with QuickBooks Desktop Payroll Basic or Standard Service. These forms have to be filled out by the IRS and state agencies, and you can find general instructions to file Form W2 and W3 HERE. Let’s look at the steps to create these tax payment forms that users must follow:-
NOTE: QuickBooks Payroll Enhanced service users can manually file W-2s through this method if they cannot E-file it.
Step 1: Pay and Record All Tax Payment
You need to clear all your tax payments related to which you want to fill the forms or else it will reflect the dues in your books.
Step 2: Prepare and Save the Payroll Tax Form
- Go to the Employees menu, select Payroll Tax Forms and W-2s, then tap Process Payroll Forms.
- Click the W-2 form and tap on Create Form.
- Choose Filing Period from the list and tap OK.
- Fill in the required information for your form. Enter the information that is highlighted in green and cross-check the pre-filled information.
- Tap Next and review all pages of the form.
- Once done, click Check for Errors, and QuickBooks will reflect any errors on the form. You need to fix them before you print and save them.
- Once all the errors are fixed, click Save as PDF or Print for your Records. Click Save and Close if you are required to return to the form.
Step 3- Send the Form to the Concerned Authority
After printing the forms, you must go through the instructions page and send them to the concerned agency. W-2 forms are submitted to IRS and state agencies. A copy of it also goes to your employee.
3. Steps to E-file Your State W2s from QuickBooks Desktop Payroll Enhanced
W-2 forms must be filled with the federal authority and the state agency. The steps to e-file W-2s with QuickBooks Desktop Payroll Enhanced are different for both authorities.
E-File State W-2s to the State Agency Using QuickBooks Desktop Payroll Enhanced
You need to follow different steps to file W-2s using QuickBooks Desktop Payroll Enhanced based on the state you live/work in, as each state has its own rules and regulations.
| Alabama | Hawaii | Massachusetts | Ohio |
| Arizona | Idaho | Michigan | Oregon |
| Arkansas | Kansas | Minnesota | Pennsylvania |
| Colorado | Kentucky | Mississippi | Rhode Island |
| Connecticut | Louisiana | Missouri | South Carolina |
| Delaware | Maine | Nebraska | Vermont |
| District of Columbia | Maryland | New Mexico | West Virginia |
Step 1- Create the W-2s to Send to the State Agency
These steps below help you create the W-2 form that you’ll send to the state agency.
- Go to the Employees menu, tap Payroll Tax Forms & W-2s, and click Create State W-2 E-file.
- Tap Continue twice.
- Choose your state from the dropdown and then click Get QuickBooks Data.
- Select OK to fix errors or add any missing information in the form, if required.
- Go to the Add-Ins tab to find the QuickBooks Payroll State W-2 dropdown, then click Start Interview.
- Tickmark the box “I understand that I must review my data and answer the following questions.” Then, tap on Next.
- Note down the filename and location and tap on Next.
- You need to answer the questions in the interview and cross-check any auto-filled information.
- Hit Next till you reach the End of Interview.
- Select Create W-2 File and tap on OK.
- Click Yes to save the Excel workbooks for your records.
Step 2- Move to the State Agency Website
Run the web browser to search the website of the state tax agency. See the Payroll Tax Compliance Links if you need help finding the state agency website.
NOTE: You need to mail the W-2s to Hawaii if you live there.
Step 3- Upload the State W-2s
Once you open the state agency website, follow the on-screen instructions to upload the file. Another key point is that some states have certain specific file requirements. Therefore, ensure that the W-2 file meets their file requirements.
How to E-File W-2s With QuickBooks Desktop if you live in (Georgia, Illinois, Indiana, Montana, North Carolina, North Dakota, Utah, Virginia, or Wisconsin)
- Run QuickBooks, go to the Employees menu, select Payroll Tax forms & W-2s, then Process Payroll Forms.
- Choose the state worksheet in the File Forms section.
- Cross-check the Select Filing Period year and make changes if required.
- Tap OK.
- Fill out the W-2 worksheet and click Check for errors to ensure all the details are correct before e-filing.
- Finally, click E-file.
- Enter the email address and contact phone number and select Submit.
NOTE 1: If you work in New Jersey, follow the State of New Jersey’s instructions to file the state W-2s.
NOTE 2: If you work in California, Iowa, or New York, you need not file a separate state W-2 for the state as it’s included with the Federal W-2 file.
Note 3: If you are in Alaska, Florida, Nevada, New Hampshire, South Dakota, Tennessee, Texas, Washington, or Wyoming, you need not file any state W-2s as the state doesn’t apply state withholding tax.
E-File Federal W2 Form in QuickBooks Desktop Payroll Enhanced
Here are the steps to e-file Federal W-2s to the SSA.
Step 1: Set up W-2 E-filing
The first step is to set up the W-2 E-filing. Follow the instructions carefully:
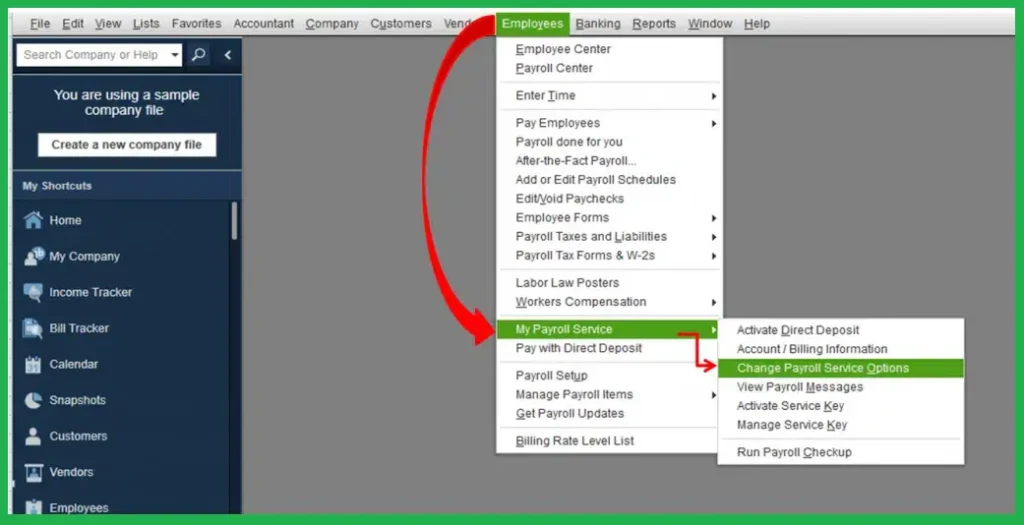
- Open the QuickBooks, go to Employee, and select Payroll Center.
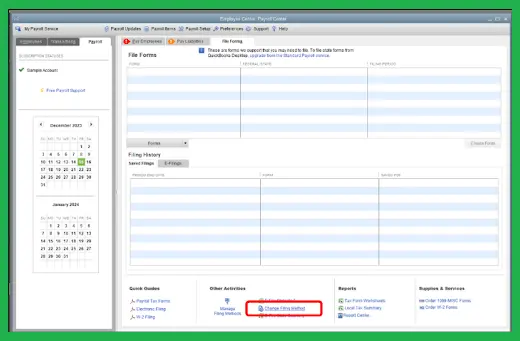
- Open the QuickBooks Desktop Payroll Setup and select the File Forms tab from the Payroll Center.
- Select Change Filing Method from the Other Activities list at the bottom.
- Click on Continue.
- Choose Federal Form W-2/W-3 from the list of forms and tap on Edit.
- Click on the E-file radio button and then tap on Finish. Enrollment instructions will open; you can read and print them out if needed.
- Close the View Enrollments window and select Finish Later.
Step 2: Create the W-2 Forms
The next step is to create your W-2s. Follow the instructions carefully to create the forms:
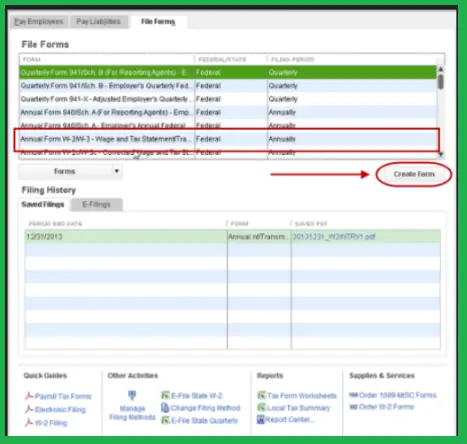
- Go to the Employees tab and select Payroll Tax Forms and W-2s.
- Choose Process Payroll Forms.
- Select Annual Form W-2/W-3- Wage and Tax statement/Transmittal from the File Forms section and tap on Create Form.
Step 3. Send the W-2s
The last step is to send us your W-2s to file electronically. Follow the instructions carefully to send the federal W-2s to Intuit.
- Select All Employees to file by batch from Process W-2s.
- Enter the year of the form from the Select Filing Period section, and hit OK.
- Choose the employees In the Select Employees for Form W-2/W-3 window. If you select Mark All, all the employees visible on the screen will be automatically selected.
- Ensure that the ‘E-File Federal forms’ option is selected.
- Lastly, enter the business phone number and email address and select Submit.
These were the three easy steps through which you can E-File W-2s With QuickBooks Desktop Payroll Enhanced effortlessly.
Call Experts!
So, these were the steps on how you can E-File W-2s with QuickBooks Desktop in different payroll services. Hopefully, you have successfully filed the W-2 form. However, if you are still stuck somewhere, we advise contacting our experts at the QuickBooks Data Service Solutions Helpline Number +1-(855)-955-1942. They will guide you in the best possible manner.
Frequently Asked Questions
Ans: When filing W-2s electronically through QuickBooks, you don’t need to purchase the pre-printed forms.
Ans: The options for printing and sending W-2 forms depend on the payroll subscription. If you use QuickBooks Desktop Payroll Assisted, QuickBooks can send the forms to your employees with fees. However, if you use QuickBooks Desktop Payroll Enhanced, you can print and send the forms manually.
Ans: Intuit handles filing both federal and state if you are using full-service payroll.
Ans: There is no additional charge/fee to filing W3/W2 electronically through QuickBooks Desktop Payroll subscription. This is already a part of the subscription you paid for.
Ans: Intuit files your W-2 forms with the SSA and IRS shortly after January 1. Therefore, you need not do anything.
Ans: There are three crucial things in order to e-file the State W2 form with QuickBooks:-
1. The QuickBooks application you are using is a supported version.
2. A good internet connection.
3. Lastly, you need the latest QuickBooks Desktop payroll update.
