Digging for uncomplicated methods to Connect Bank Account to QuickBooks Online? Read this article as you will get useful approaches for merging your bank account with QuickBooks online. Let’s see it from a business owner’s perspective once you set up the online banking feature in the application. In that case, you can track your company’s finances (expenses and revenues) in one place. You will also be able to supervise your cash flow with real-time data and future forecasting in your hands.
Sometimes, being a QB user, you might feel skeptical while connecting your bank to QB Online for the sake of the safety and privacy of your financial information. But you don’t need to worry, as QuickBooks always shields your business transactions with multiple layers of security so you can be confident while conducting online banking. So, without wasting any time, let’s get started with the steps to add and Connect Bank Account to QuickBooks Online.
If you cannot find essential options between connecting QuickBooks Online to a bank account, do not get distressed as it might be because it is your first time adding a fresh bank or credit card account to the application. Contact us at +1-(855)-955-1942 to help you get these steps right.
How to Connect Bank Account to QuickBooks Online Safely?
It’s quite easy to add and connect bank accounts with QuickBooks Online. Integrating the QB with Online banking is a time saver for every business owner as you do not have to enter new transactions manually. Additionally, once the bank or credit card accounts are attached, all the transactions will be downloaded and categorized.
1st Step: Connecting the Bank and Credit Card Accounts in QuickBooks Online
You have an option to add multiple business and personal bank accounts in QB Online.
- In the beginning, click on the Transactions option under the Bookkeeping tab.
- Then, choose the Bank Transaction option.
- Now, if this is the first time you are connecting the bank account, click on the Connect Account option
- Or, if you already have an account, click on the Link Account option.
- Now, search for your bank by adding its name or the website URL.
- Proceed further by entering the credentials, logging into the bank, and clicking on Continue.
- Then, carefully read all the terms and conditions and click on Agree.
- Additionally, follow the instructions to connect the account further. It may take a few minutes to connect after the security checks are completed.
- Now, click on any of the accounts, for example, your savings, checking, or credit card that you want to connect.
- Then, under the Charts of Account, select the matching account type.
- Then, choose how many old transactions you wish to download. Some banks let you download 90 days old transactions, whereas some let you go back up to 24 months.
- After deciding, lastly, click on Connect.
What if you don’t see the Account Type option from the drop-down?
Click the Add sign to create a new bank or credit card account.
In the case of a new bank account:
- Start by selecting the Cash and Cash equivalents option under the Account Type.
- Now, in the Details Type, click on the Saving or Bank option.
- In the end, choose Save and Close after naming the account.
In the case of a new credit card account:
- Begin by clicking the Credit Card option from the Account Type drop-down.
- Then, assign a name to the new account and choose Save and Close.
2nd Step: Downloading Transactions
You do not have to manually download recent transactions, as QuickBooks will do it for you.
- Initially, refresh the Bank Feed section to start downloading.
- Then, go to the Bookkeeping tab and click on Transactions.
- Now, choose the Bank Transactions option, and lastly, click on Update.
3rd Step: Categorizing Transactions and Re-authorizing the Bank Feed
Ultimately, you must complete the steps successfully by categorizing the downloaded transactions. Match your newly downloaded transactions with previously added transactions to find any link. However, QB will make a new record for the transactions if there is no match. Lastly, you just have to give your approval to it.
Moreover, if you have opted to maintain the connection of your account to open banking, it is mandatory to re-authorize the connection after every 90 days. Sometimes, you might face the issue in the form of an expired connection or failed re-authorization. You must review your transactions, disconnect the bank account, and try to connect the account again to resolve the issue.
Important Note: In some unfortunate circumstances, you might provoke a QuickBooks Banking Error OL-334 in the process of linking your bank account in QB. We recommend you read this blog and learn the advanced methods to rectify this error.
Connecting QuickBooks Online to Bank Account through Charts of Accounts
The following are the steps to integrate your bank account from the charts of accounts section:
- Begin by navigating to the Settings tab and clicking on Charts of Accounts.
- Now, click on View Register from the drop-down list of Action columns.
- Now, click on Connect Bank and type in the URL or the name of the bank in the empty search field.
- Then, click on your bank.
Note: If you cannot find the bank after entering the URL, try manually uploading the transactions.
- Now, type in the login details and password and then choose Continue.
- After that, from the drop-down, choose the account you are going to connect and the date to pull transactions. Then choose Next.
- Proceed by clicking the Account Type drop-down, selecting the Account type, and choosing Next.
Important Note: The account type must match the charts of the account in QB. If you cannot find the correct account, click the Add New option.
To Add a New Bank Account:
- Start by choosing the Bank option from the Account Type drop-down menu.
- Now, in the Details Type, choose the account type: Savings or Checking.
- Lastly, name the account and click on the Save and Close option.
To Add a New Credit Card Account:
- Initially, click on the Credit Card option from the Account Type drop-down.
- Then, name the account and choose Save and Close.
- Now, in the Existing Accounts drop-down list, map the bank account. Then, click on Next.
- Then, click on Connect and choose Done.
What are the Steps to Manually Connect Bank Account to QuickBooks Online?
In case the bank or credit card accounts are not able to connect to QuickBooks or you want to enter older transactions in QB, then use the option of uploading the transactions manually. The following are the steps to how to link QuickBooks to Bank account and manually Import Transactions into QuickBooks.
1st Step: Selecting a Date
It is always advisable to note down or remember the date for the oldest transaction still active in the account so you won’t again enter a duplicate transaction.
- Start by clicking the Accounting tab and choose the Chart of Accounts option.
- Now, search and select the right bank or credit card account you want the transactions to be uploaded.
- Then, click on View Register.
- Lastly, note down the oldest transaction date, usually your opening balance in QuickBooks.
2nd Step: Download all the Transactions from the Bank
- Begin by logging into the bank or credit card website.
- Then, follow the procedure correctly for downloading the transactions from CVS files.
- You must know that every bank has different steps. So, below are the steps for downloading the files for Wells Fargo, Chase, and Bank of America.
- Verify the date range to start the downloading. It will be at least one day prior to the oldest transaction date.
- After downloading all the necessary transactions, save the file to access it easily anytime.
Step 3: Reviewing the Format and Size of the File
After saving the file on the system, review it correctly before you upload it. The maximum size for the file is 350 KB. In case the file is above the prescribed limit
cut short the date range and again download the transactions in small batches.
4th Step: Manually Uploading the Transactions
This is for accounts connected to online banking
- As you choose the Bookkeeping tab, click on the option for Bank Transactions under the Transactions section.
- Then click on the blue tile for the account to which you want to upload the transactions.
- Then, choose Link Account from the drop-down and Upload from File.
- Proceed and choose the files you have previously downloaded from the bank and click Continue.
- Now, choose the account from the QB Online account drop-down list to which you will upload the transactions. Then, click on Continue.
- Further, carefully match the columns on the file with the right fields in QB by following the steps appearing on the screen. Click on Continue.
- Then, choose Yes, and lastly, choose Done.
This is for accounts not connected to online banking
If you are not willing to connect your account or in case the bank is not able to connect to QB, follow these steps:
- First, from the Bookkeeping tab, click on Transactions, and after that, click on Bank Transactions.
- Now, choose the Upload Transactions option.
- Then, as you select the files previously downloaded from the bank, choose Continue.
- Now, from the drop-down of QB Account, choose the specific account you want to upload the transactions to and choose Continue.
Note: If you are a new user, click on the Add option from the drop-down of QB Account, as you may not have an account to upload the transactions.
- Proceed and match the columns on the file with the fields in QB by following the instructions. Click on Continue.
- Afterward, choose the transactions to import and again click on Continue.
- Lastly, select Yes and then choose Done as you accept the transactions.
5th Step: Categorize and Reconcile the Transactions
As you have completed the above steps and all the transactions are imported in QB, it’s time to categorize them. These transactions will go into the account after a thorough review.
QuickBooks will suggest categories for downloaded transactions after you Add and Connect Bank Account with QuickBooks Online. These categories will be based on how you previously categorized the transactions in two sections: Income and Expenses. Through this process, you can identify future tax deductions and let you be aware of the business income and expenditure.
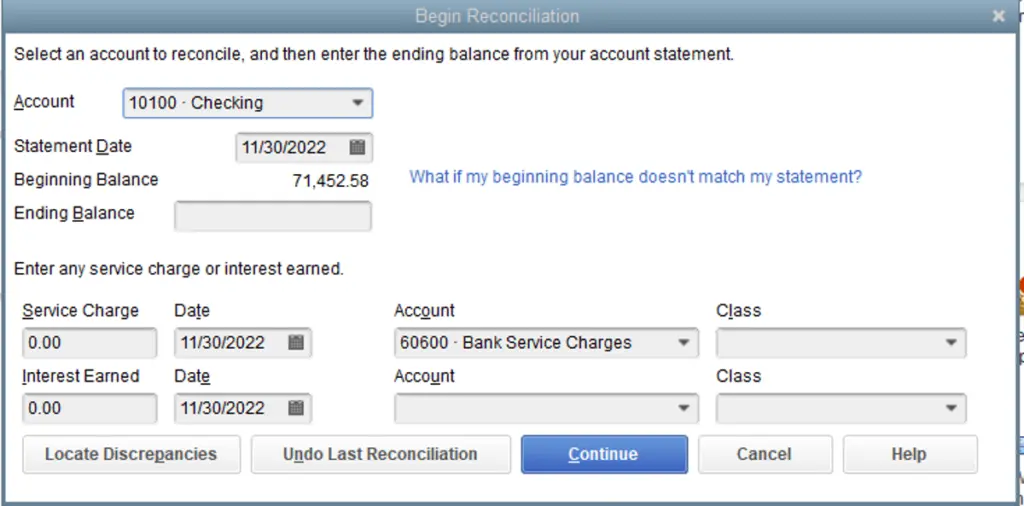
The final step is to reconcile all the transactions. It would be best to reconcile the older transactions and the opening balance. The online banking tells the QB when you want to begin tracking the transactions in an account. This process will assist you in summarizing the older transactions up to that point. Afterward, you can also add transactions that are older than your online banking. Additionally, if you want to enter more transactions to the automatically downloaded ones, then connect the online bank accounts. Therefore, you must adjust your opening balance and ensure the books are accurate. It eliminated the possibility of any duplicate transactions.
Also See: How to Undo Bank Reconciliation In QuickBooks Online
How to Set up a Foreign Currency Account in QuickBooks Online?
If you connect bank accounts to QuickBooks Online using the multicurrency feature, the bank and credit card accounts can be easily assigned currency. But note that income and expense accounts utilize the home currency.
Step 1: Adding a Foreign Currency
- For starters, click the Settings tab and choose the Charts of Accounts option.
- Now, click on New.
- Then, click on the Account and Detail Type in the Account dialog.
- Proceed by typing a name for the new account and an optional description.
- Further, under the Currency drop-down list, click on the currency you want to assign to the respective account.
- Lastly, choose the Save and Close option.
Note: The feature of multicurrency and foreign currencies can only be found in QuickBooks Online Essentials, Advanced, and Plus. Also, double-check if the multicurrency is turned on if you going to add an exchange rate. So, you will find the multicurrency feature in the Advanced settings.
Step 2: Tracking Account Currencies
If you want to look for the currency assigned to your bank account, click on the Currency column. You can find the Currency column under the Charts of Accounts. At the same time, you can see the account balance under the account’s assigned currency option. However, if there is no currency mentioned in the currency column, it means the account is in the home currency.
Recommended To Read – Guide to Create Banking Rules in QuickBooks
Conclusion
In the end, we just want to stress that you must follow the steps laid out above, as mentioned at the time you Connect Bank Account to QuickBooks Online. It is extremely important because you might end up with duplicate transactions or messed up transactions in the bank feed. Moreover, you can even add several bank accounts, whether a personal or business account, and get accurate financial insights. But at any time you feel the need for a professional touch as linking the bank to QB online becomes a hassle for you, call us at +1-(855)-955-1942. Talk to our technical team anytime.
Frequently Asked Questions
A. To connect your bank account, log in to QuickBooks Online, then navigate to Banking → Link account. Search for your bank, enter your online banking credentials, and authorize QuickBooks to sync. Once connected, QuickBooks automatically imports recent transactions, saving you time from manual data entry. Always double-check imported transactions to ensure accuracy before categorizing them into accounts.
A. Connecting your bank account to QuickBooks Online ensures that transactions are updated automatically, reducing the risk of errors. It also helps you monitor cash flow in real time, reconcile accounts faster, and simplify tax preparation. Instead of manually uploading statements, QuickBooks automatically fetches data, allowing you to focus more on business decisions and less on bookkeeping tasks.
A. If your bank doesn’t appear in QuickBooks Online, first ensure you entered the correct bank name. Some banks use different names for online banking services. If it still doesn’t appear, you can manually upload transactions by downloading them in CSV, QBO, or OFX format from your bank’s website. QuickBooks also allows you to request support for unlisted banks to improve compatibility over time.
A. Yes, QuickBooks Online lets you connect multiple checking, savings, and credit card accounts. Each account will show up separately in your Banking dashboard. You can categorize transactions individually, which makes it easier to manage finances across different accounts. This feature is especially helpful for businesses that use dedicated accounts for payroll, expenses, or client deposits.