
In QuickBooks, reviewing your accounts and ensuring they match your bank and credit card statements is important. This process is called reconciliation. Reconciling a bank account in QuickBooks is a crucial step in maintaining accurate financial records for your business. By reconciling, you can identify any discrepancies, such as missing or duplicate transactions, errors, or unauthorized charges, which might otherwise go unnoticed. It also helps detect any accounting errors and keeps your accounts up-to-date. That is why we have come up with this blog to help you know how to Reconcile Bank Account in QuickBooks Desktop and Online.
Are you tired of spending precious time manually reconciling your bank account in QuickBooks? Then, give a call to our experts at +1-(855)-955-1942 and let our team take control of your financial data by providing you with verified solutions!
Why Is It Necessary to Do Bank Account Reconciliation in QuickBooks?
If the chart of accounts is the foundation of accounting, the bank reconciliation is the monthly culmination of your financial data’s life. Reports are important, but bank reconciliation is essential for a successful business. The file is 98 percent healthy if your bank reconciliation is current and all of the balances match. You’re suggested to match your savings, credit & bank account statements with your QB every month to keep your books clean.
QuickBooks corresponds to your spending and earnings as per your bank and credit card company. You should match your previous month’s ending balance to the next month’s beginning balance and the balance in your QuickBooks register at the end of the previous month should match the balance on your bank statement. Your accountant will most likely be the one to do your QuickBooks Online bank reconciliations.
Steps to Reconcile Bank Account in QuickBooks Online
Go through this 3-step process to Reconcile a Bank account in QuickBooks online that includes checking your opening balance, initiating the reconciliation process, and matching the Bank statement with QuickBooks entries.
Step 1- Check your Opening Balance
Review the opening balance if you’re reconciling an account for the first time. It must match the balance in your real-life bank account on the day you decide to start tracking transactions in QuickBooks.
Notice- QuickBooks downloads transactions and enters the opening balance for you when you connect your bank and credit cards to online banking. You don’t have to be concerned about the initial balance.
Step 2- Initiate your Reconciliation
You can begin reconciling once you have your monthly bank or credit card statement. If you’re reconciling multiple months, start with the oldest statement one by one:
- Match and categorize all the transactions you downloaded from the account that is linked to online banking.
- Select Settings and then Reconcile in QuickBooks Online. To continue, select Get Started if you’re reconciling for the first time.
- Select the account you want to reconcile from the Account dropdown menu. Check to see if it’s the same as the one on your statement.
- Examine the Beginning balance. Make sure your QuickBooks beginning balance matches the one on your statement. If they don’t match, here’s what you should do.
- On your statement, fill in the Ending balance and Ending date. The ending balance is sometimes referred to as a “new balance” or a “closing balance” by some banks.
- Examine the Last Statement Ending Date if you see it. This is the last time you have reconcile your account. The following day, your current bank statement should begin.
- Press on Start Reconciliation.
Step 3- Make a Comparison between your Statement and QuickBooks
The final step is to compare your transactions appearing on QuickBooks with the bank statements. Look through them and ensure that all the transactions have the right dates and values for transactions is correct.
Follow the given steps for the type of account you are reconciling in QuickBooks:
Reconcile Bank Account That Is Connected to Online Banking
When you connect your bank account with QuickBooks, all your transaction information comes directly from your bank, so reconciling is an easy task. Most of the time, your accounts are already balanced. You can clearly see the transactions that come directly from your bank feeds and the transactions that you had manually added in QB.
- Start with the first transaction on the statement.
- Then, find the same transaction in the Reconciliation window in QuickBooks.
- Now, compare the two transactions. If they match, you need to put a tickmark next to it in QB. This will make it reconciled.
- If any transaction does not appear on your statement but is there in QuickBooks, do not put a tickmark.
- This way, compare all the transactions in your statement with what is there in QuickBooks.
- If you find any transaction that is not quite right, like the payee, then you can select the transaction and expand the view. Now, you will get the Edit button to make the edits as required.
- When you reach the end, the difference between your statement and QuickBooks should be 0. If it is, then you can hit the Finish Now button.
Reconcile Bank Accounts That Are Not Connected to Online Banking
If you are not connected to online banking, then no issues; here is what you need to do:
- Start with the first transaction on your bank statement.
- Then, find the same transaction in the Reconciliation window in QuickBooks.
- Compare the two, and if they match, put a tick mark next to it in QB. It is now reconciled.
- However, if any transaction is not present in the statement and you see it in QB, then do not put any tick mark.
- Compare all the transactions in the statement with QuickBooks.
- If you find something that matches QB and statement but has some small changes, like the payee, then click on it to expand the view. Now, click Edit and make the required changes.
- Once you reach the end, the difference between your statement and QuickBooks should be $0.00. If so, then hit the Finish Now button.
If the difference isn’t $0.00, or you cannot find a transaction that should be in QuickBooks, then you need to review and fix common issues at the end of a reconciliation in QuickBooks Online. Don’t worry; you can connect with our experts to get a quick resolution for this.
Bonus Step: Review Your Past Reconciliation
To check your work, run a reconciliation report:
- Select Accounting Menu and Press on Reconcile.
- Click History by account.
- Select the account and date range from the dropdown menus. If you need to share your reconciliation reports, you can print or export them.
Steps to Reconcile Bank Account in QuickBooks Desktop
Reconciling in QuickBooks desktop differs from doing so in QuickBooks online. To reconcile your accounts in QuickBooks desktop, follow these steps:
Step 1- Analyse your Opening Balance
You have to backup your company files before you start the reconciliation process. Review the Opening balance In case you are reconciling for the first time. Choose a day to initiate your tracking transaction. Enter the actual balance of your account on that day. It would act as a starting point.
Step 2- Make Arrangements for the Reconciliation
Ensure that you have entered all transactions for the bank statement period you intend to reconcile. Wait to enter transactions that haven’t cleared your bank and aren’t showing up on your account.
Step 3- Initiate the Reconciliation
Start reconciling after receiving your bank statement. Start with your oldest bank statement if you’re reconciling multiple months. Make a separate reconciliation for each month’s statements, one at a time.
Tip- You’ll see a sign-in window if you’re reconciling a Merchant or Payments account and QuickBooks Desktop detects that you aren’t signed in. This ensures that your account is linked to a legitimate company ID.
- Click on Reconcile under the Banking menu.
- Select the bank or credit card account you want to reconcile in the Account field.
- Statement Date is filled automatically. It’s a swing between 30 or 31 days after the previous reconciliation’s statement date. Make changes as per your bank statement needs.
- The Beginning Balance is also automatically entered by QuickBooks. This number is calculated using the ending balance from your previous reconciliation.
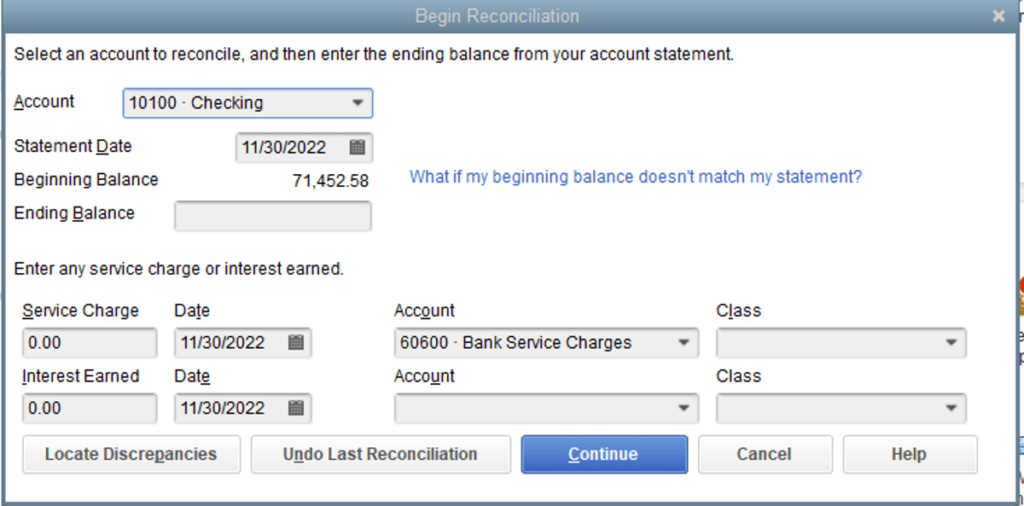
- Based on your bank statement, enter the Ending Balance.
- Enter the Service Charge and Interest Earned. Charges that have already been entered in QuickBooks should not be duplicated.
- Examine the fields. Select Continue or OK if the information is correct.
NOTE: Don’t worry if your starting balance differs from your statement. It can be fixed using a few clicks-
- Select Locate Discrepancies if the numbers don’t match. This generates reports that you can use to look for discrepancies and other issues with reconciliation.
- You can choose Undo Last Reconciliation if you need to start over from the beginning.
Important: Your beginning balance will go back to the last reconciliation’s beginning balance when you undo a previous reconciliation.
Step 4- Make a Comparison between Bank Statement and QuickBooks
First, compare the list of transactions on your bank statement to what is in QuickBooks to reconcile. Check that your dates and transactions are correct. You’ll know everything made it into QuickBooks once you’ve finished reviewing your statement.
Although there are a few things you should know before beginning reconciliation-
- Select Hide transactions after the statement’s end date if you only want to see transactions for the statement period you’re working on.
- Charges and Cash Advances and Payments and Credits are the sections to look at when reconciling a credit card account. Concentrate on a single section at a time.
- Select Matched if you’re reconciling an account for online banking. Then, from your bank statement, enter the Statement Ending Date. This selects and matches transactions that QuickBooks has downloaded and matched automatically.
Tip: A lightning bolt appears next to a matched transaction in the register. After you reconcile it, a checkmark replaces the lightning bolt.
- Select the header or title of a column if you want to sort the list.
If the number of transactions in QuickBooks exceeds the number of transactions on your bank statement, look through the list. So let’s go back to the steps you need to follow-
Match the Transactions
- Start with the first transaction on your bank statement when you’re ready.
- In QuickBooks, look for the same one in the Reconciliation window.
- Check out two transactions. Select and place a checkmark in the checkmark column if the transactions match. This completes the transaction’s reconciliation.
- Compare your bank statement to QuickBooks for each transaction. The Cleared Balance amount decreases as you clear or add transactions to the reconciliation. Deposits will increase if you can clear or add deposits. Do not mark a transaction as reconciled if it does not appear on your statement. Follow these steps to easily analyze it-
- Look for the Items you’ve marked in the cleared section to see the total number and amount of transactions you’ve added to the reconciliation. On bank statements, many banks provide the same transaction summary. To see if anything is missing, compare the total number of transactions.
- Select the transaction you want to edit or get more information about, then Go To or double-click it.
- Select Modify if you need to go back and change the information you entered in “Step 3: Begin your Reconciliation.” In the section next to it, you’ll find information on service charges, interest, and the final balance.
- The difference between your bank statement and QuickBooks should be $0.00 when you get to the end. If that’s the case, click Reconcile now.
Step 5- Review the Reconciliation
After you’ve reconciled, you can view or print the Reconciliation report by selecting Display. You need to go back over a reconciliation report later, do so as follows:
- Select Reports Center from the Reports menu.
- Open a Previous Reconciliation report by searching for it.
- Choose between Detail, Summary, or Both for the account you reconciled.
Experts Help on QuickBooks Online Bank Reconciliation!
So these are a few procedures to help you reconcile your bank account in QuickBooks. If you’re still having problems, we recommend contacting our professionals by giving us a call on QuickBooks Data Service Solutions Helpline Number +1-(855)-955-1942.
Frequently Asked Questions
A. Reconciling your bank account in QuickBooks ensures that your company’s records match the bank’s statements. This process helps catch errors, fraud, or missed entries. Key reasons to reconcile include:
1. Detect unauthorized transactions
2. Spot double entries or missing payments
3. Accurately manage cash flow
4. Simplify tax filing and reporting
Always reconcile monthly for accurate financials and audit preparedness.
A. To reconcile in QuickBooks:
1. Go to Banking > Reconcile
2. Choose the account and statement date
3. Enter the ending balance from your bank statement
4. Match transactions and mark cleared
5. Resolve discrepancies, if any
6. Click Finish Now to complete
If differences remain, investigate unmatched entries or fees. Save a copy for your records.
