Updating QuickBooks payroll can often become very difficult for users. One of the frequently occurring issues that you might face is QuickBooks error 15270 which may sometimes also manifest when updating the software. Here’s the message that is likely to turn up on your system’s screen:
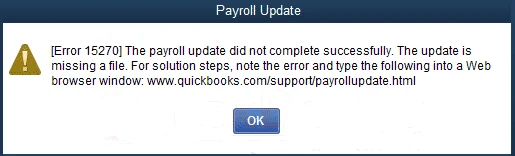
| “Error 15270: The (payroll) update did not complete successfully. The update is missing a file.” |
This problem is actually a part of the 15XXX error code series. The failure to update payroll can have adverse consequences for your business as you won’t be able to efficiently manage your employees’ salaries & taxes. Therefore, it is essential that you resolve this error code as quickly as possible.
Fortunately, there are various resolutions that you can implement for this issue. Let’s navigate through the article to learn the major factors behind this error and discover how we can troubleshoot it seamlessly.
If you want instant help to fix QuickBooks error 15270, dial +1-(855)-955-1942 to contact a QB professional.
Why Do You Get 15270 Error When Updating QB Payroll?
Several reasons that contribute to the occurrence of QuickBooks payroll update error 15270 include invalid EIN or wrong security key. The other reasons for error 15270 are as follows:
- Interruption in the internet connectivity during the update process.
- The updates that you are downloading or installing are not compatible with the Windows version you have.
- If your system has been infected with a virus or infection, you may face the QuickBooks Error Code 15270.
- If the update for the QuickBooks Desktop application is not completely installed on the system, then also error code 15270 may appear.
- Having expired payroll subscriptions can also lead to QuickBooks update errors like 15270.
- If you enter the wrong [EIN] Employer Identification Number or Service Key, then this error may get triggered.
- You have set the incorrect automatic update configuration, that might be leading to this error.
- UAC settings on the system might be interrupting the download process of the payroll update files.
- Windows Firewall might be restricting the QB from completing the update process.
- The files required to run the QuickBooks application might not be available or have been damaged or corrupted.
- Sometimes, corrupted Windows programs can also lead to Error 15270 QuickBooks Update.
- Having an Intuit product running during the Windows start-up process or at the time of installing the Windows OS can lead to error 15270.
Now that you are well aware of the main causes of this glitch, let’s scroll down to the following section to learn how to eliminate it.
9 Things You Can Do to Resolve QuickBooks Error 15270
Since you face the payroll update error while you try to update the QB payroll automatically. To fix the issue, you may first switch to the manual method to update the QuickBooks Payroll. And then, if the error persists, you can opt for other methods that are given in the blog.
1. Restart Your System & Manually Update QB Payroll
The first troubleshooting method to resolve the error code 15270 is to restart your system and then update the QuickBooks Payroll manually. Follow the given directions to complete this task:
- You are first required to restart your system followed by Restarting the QuickBooks application.
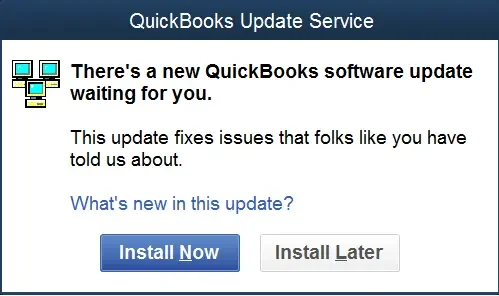
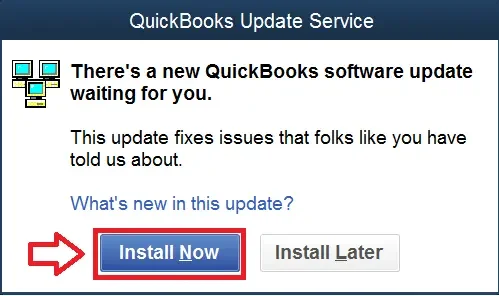
- Then in the QuickBooks Update Service window, hit on the Install Later button.
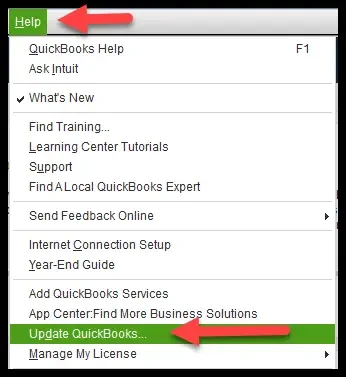
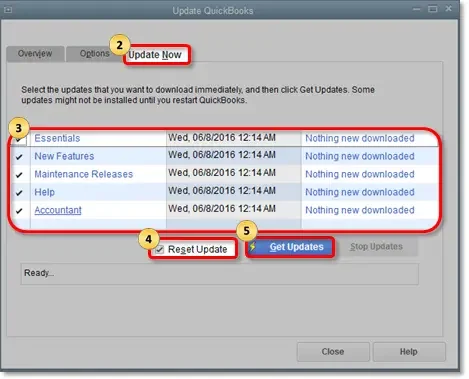
- Now, you have to head to the Help button and opt for the Update QuickBooks option.
- After that, in the Update QuickBooks tab, you have to hit on the Update Now option.
- Then, you need to click OK to confirm the reset update.
- Now, after the completion of the update, the Get Updates button will get activated.
- Subsequently, a similar pop-up message window will appear saying Update Complete. You have to follow it up by Restarting QuickBooks.
- Now, if the QuickBooks Update Service appears again, this time, choose the Install Now option.
- Now search and choose the Employees tab, followed by hitting on the Get Payroll Updates option.
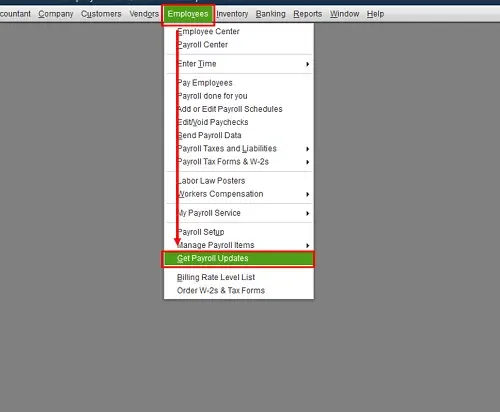
- Then, you have to Install Payroll updates again and choose the Download entire payroll update option.
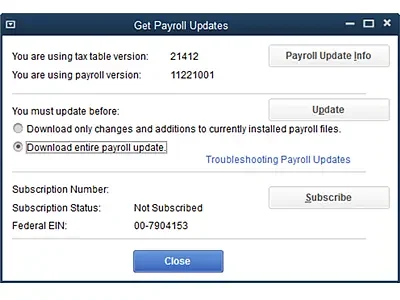
- At last, you have to choose the Update option.
If the above method is not able to resolve the QuickBooks Essentials Update Error 15270 for you, you can follow the next troubleshooting methods given below.
Read Also- Solve QuickBooks Maintenance Release Error 15215
2. Run the Reboot.bat File
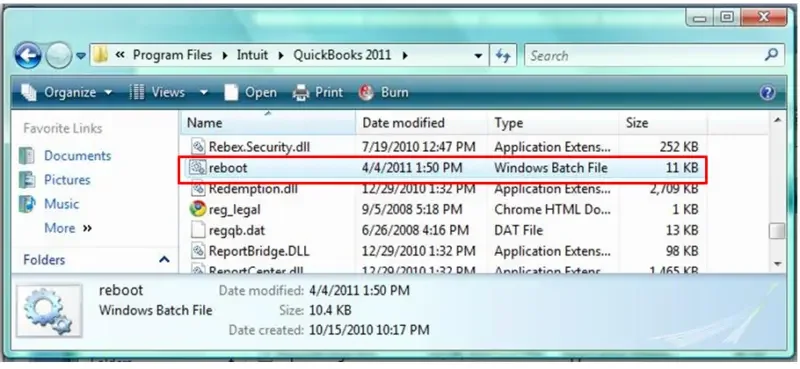
Running the reboot.bat files will re-register the QuickBooks related ‘.DLL‘ and ‘.OCX‘ files in Microsoft Windows. This may help you solve any error related to the corrupted files, so follow the steps below:
- To start the process, you have to turn off QuickBooks Desktop.
- Then, open the folder which has your Reboot.bat file.
- After that, click right on the QuickBooks icon and choose its Properties option.
- Next, you need to choose the Open File Location option.
- Now, click right on the Reboot.bat file and then select the option to Run as administrator.
- Now, a window will appear on the screen with the file names. This window will automatically close after the completion of the process.
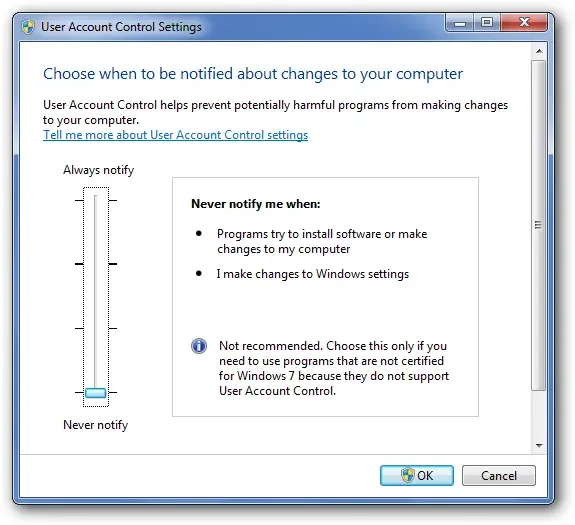
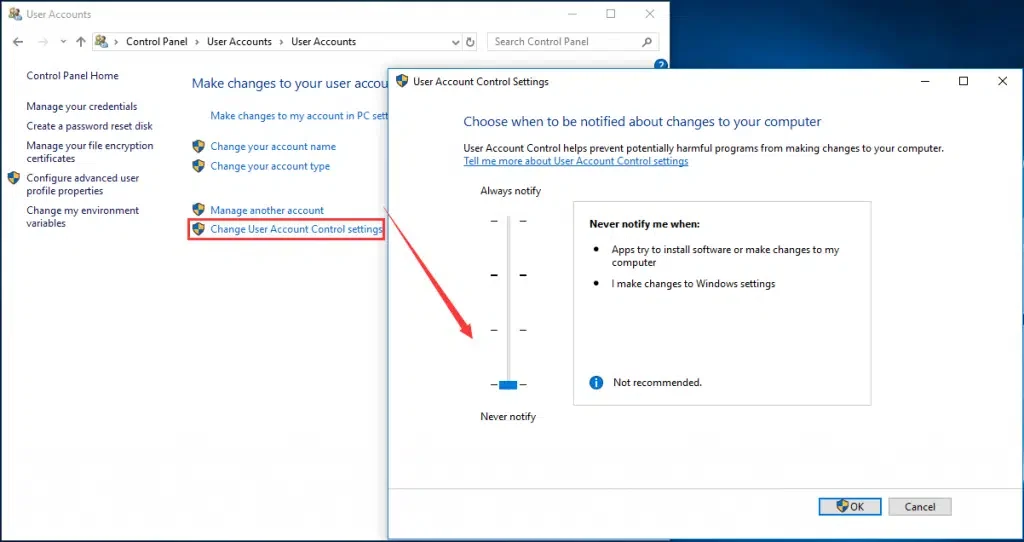
3. Turn off the User Account Control (UAC) Feature
There is a slight difference in the steps to turn off the UAC in Windows 7, 8 OS, and Windows Vista. The steps are given below:
![Turn off the UAC [User Account Control]](https://dataservicesolutions.com/wp-content/uploads/2023/04/Turn-off-the-UAC-User-Account-Control.webp)
Steps For Windows 7,8 Operating System Users:
- You have to first click on the Windows Start Menu button and choose the option for the Control Panel tab.
- Now, click on the View tab from the drop-down arrow keys and choose its icon.
- Next, click on the User Accounts option to proceed further.
- Now, you have to click on the option to change the User Account Settings in the given window.
- After this, you have to move the slider to Never Notify such that it does not give any notification and then click on OK.
Steps For Windows Vista Operating System Users:
- You have first to give a single click on the Windows Start button and go to the Control Panel option.
- If it fails to detect the click and does not select it, then click once on the classic view, which is located on the left side of the Windows screen.
- Now, click twice on the Users Accounts option.
- After that, click the user account control option and turn it ON or OFF.
- Then, finally, clear the Use User Account Control option and click OK. This helps to protect your system as well as your software.
- Lastly, restart your PC and your QuickBooks Software as well. After this, reopen your company file.
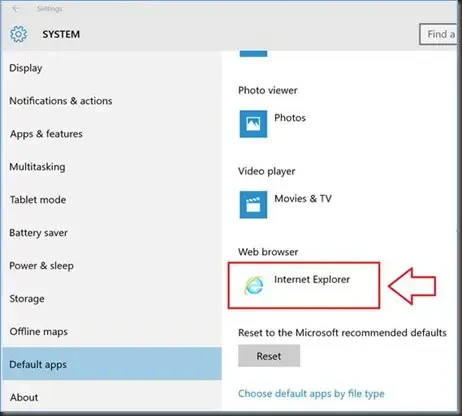
4. Set Internet Explorer As the Default Browser
It is recommended to use Internet Explorer as a default browser to perform the online functions for QuickBooks. If it is not set as the default browser, then you may face several technical issues, including QuickBooks Essentials Error 15270. So, the steps to set IE as a default browser are as follows:
Steps For Windows 11, 10, and 8 Users:
- In the search bar of Windows, search for App Defaults.
- Find the Web Browser option and choose Internet Explorer as the Default app.
Steps For Windows 7 Users:
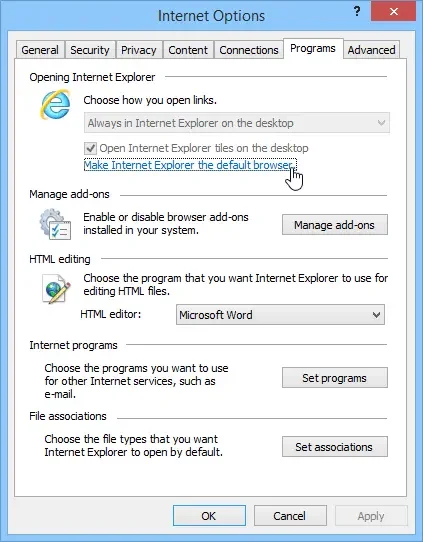
- First, open the Internet Options menu on the system,
- Then, go to the Programs tab.
- Now, under the Default Web Browser option, click on the Make Internet Explorer as the Default Browser button.
5. Verify Your QB Payroll Subscription
- If you have Basic, Standard, or Enhanced Payroll, then go to the Employees tab and click on the My Payroll Service option. Now, you have to hit the Account/Billing Information or Account Info/Preferences option. Then, you can sign in to your Intuit Account using your login credentials and check if the subscription is active on the QuickBooks payroll account maintenance page.
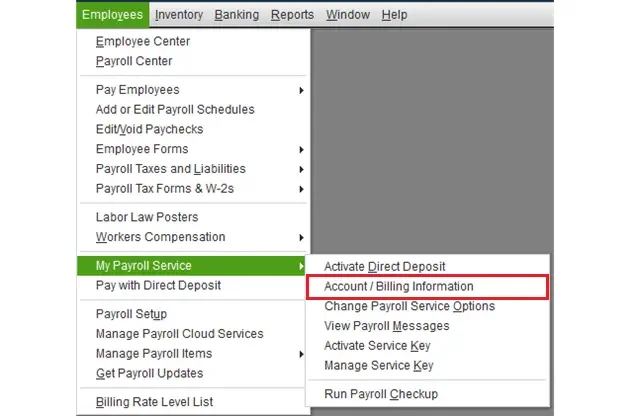
- If you have the Assisted Payroll, then go to the Employees tab and tap a hit on the My Payroll Service option. Then follow the process by clicking on the Account Billing Information or Account Info/Preferences option. After that, when the QuickBooks payroll account maintenance window opens, close it and check the update immediately. Also, reverify the payroll service.
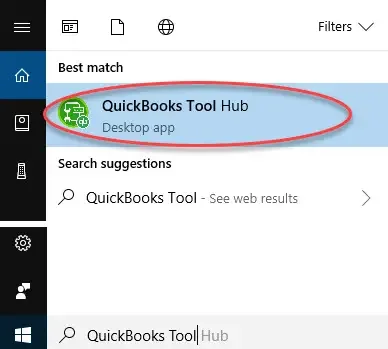
6. Use the Quick Fix My Program Tool
For this, you need to do some simple steps to download the QB Tool Hub.
Steps to Download QB Tool Hub:
- Start the process by downloading the QuickBooks Tool Hub application and then hit the Ctrl + J keys to head to the downloads option.
- Then, click twice on the QuickBooksToolsHub.exe from the downloads.
- After that, carry out the instructions given on the screen to install the application.
- Once done with it, open the QuickBooks tools hub from the desktop.
Steps to Use Quick Fix My Program From Tool Hub:
- Now, you have to move to the Programs Problems tab in the application and choose the option saying Quick Fix my Program.
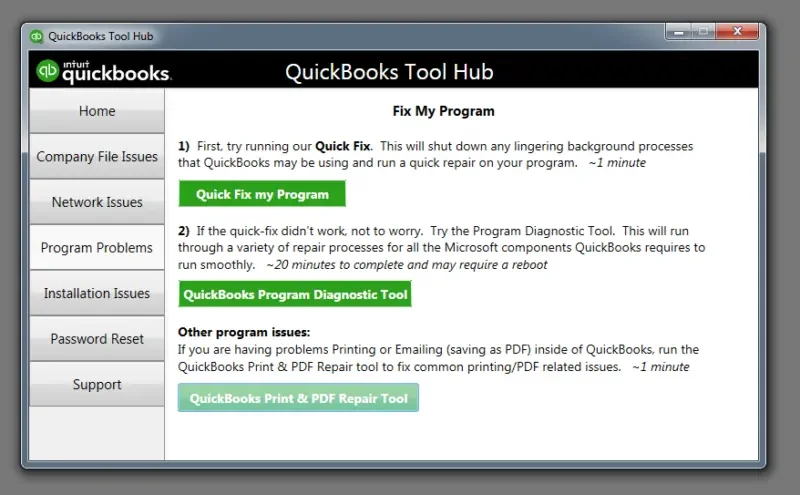
- This process may take a few minutes to complete; wait till it concludes.
- After the process, Restart your QuickBooks desktop software.
- Now, also check if the QuickBooks update services message, then click on the Install Now button.
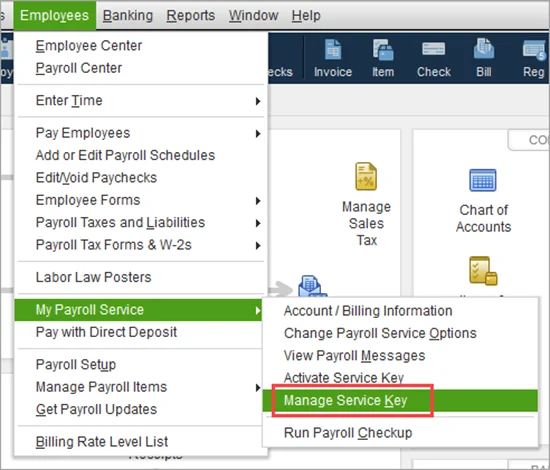
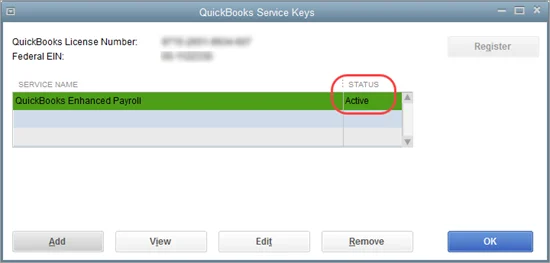
7. Check the QB Payroll Service Key
- For this method, open your QuickBooks application and go under the Employees tab.
- Here, you have to browse to the My Payroll Service option and hit the Manage Service Key button.
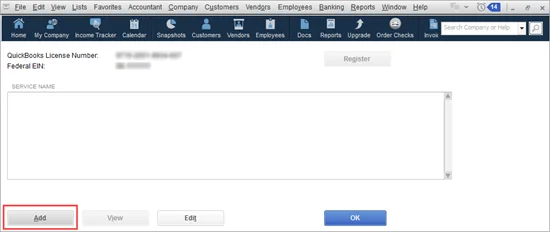
- Next, under the Service Key window, click on the Edit button to see your payroll service list. If no payroll service is listed there, then click Add.
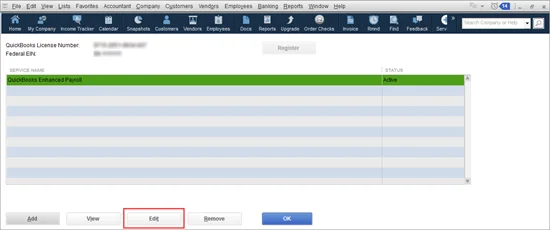
- Now, click Edit, note down your Service Key, and then click the Remove button.
- Next, on the confirmation window, hit Yes.
- Then, remove the Service key and hit Add again.
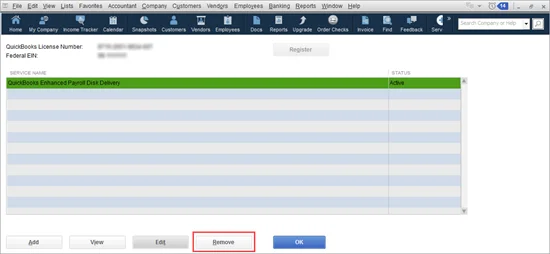
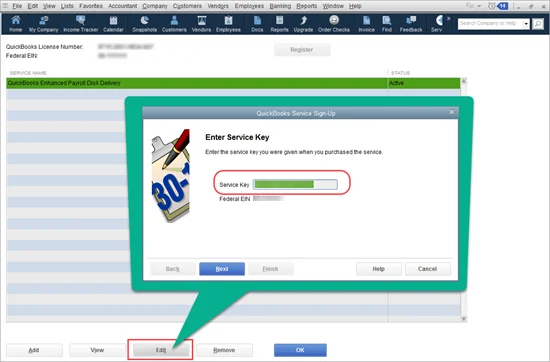
- Now, you have to enter your Service Key followed by Employer Identification Number and hit Next and Finish, respectively.
- Lastly, click OK on the Payroll Update window and check if your payroll subscription shows an Active Status.
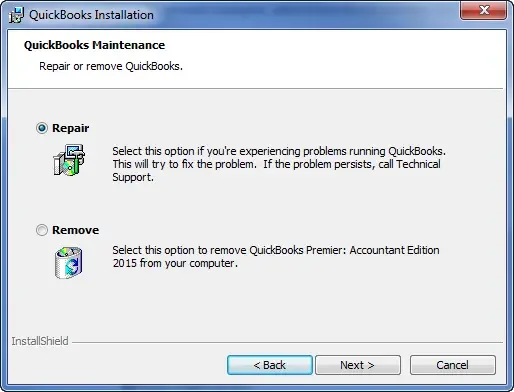
8. Reinstall QuickBooks Desktop in Selective Startup Mode
You can first opt for the Repair QuickBooks Desktop option. Then, move ahead with the Selective Startup mode to proceed with the clean installation process.
- For this, open the Run window from the Start menu or by pressing the Windows
+ R keys simultaneously. - Now, type the word msconfig in the Run box.
- Next, when the System Configuration window displayed on the screen, opt for the Selective Startup button and hit Apply.
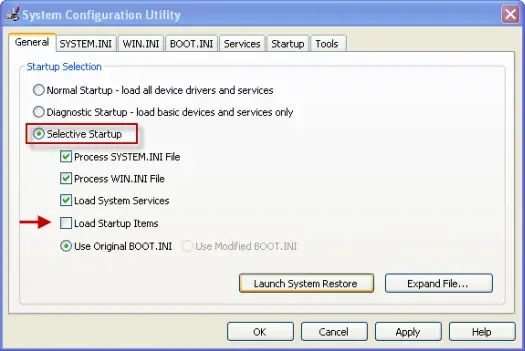
- Then, restart the system and access the Advanced Boot Options.
- Additionally, you can also restart your system and keep pressing the F8 key continuously to do the same process. This will also take you to the Boot options directly.
- Now, within the Boot screen, opt for the Safe mode with the Networking option.
- Here, when the desktop screen gets up, Restart your QuickBooks.
- Now, in the QuickBooks Update Service, tap a hit on the Install Later option.
- Then, in the Help menu, proceed ahead to the Update QuickBooks Desktop.
9. Reconfigure Windows Firewall Settings
To fix the QuickBooks File Doctor Error 15270, you can also configure the firewall settings by adding the Firewall port exceptions for QB. You can also follow the given steps if you have multiple versions of QuickBooks on the same desktop, you just need to perform the steps for all the versions:
- Open the Start Menu of Windows.
- Then, enter the word Windows Firewall in the search bar and then open the Windows Firewall.
- After that, choose the Advanced Settings option.
- Then, you need to right-click on Inbound Rules and choose New Rule. After that, you need to do the same steps for the Outbound Rules also.
- After that, you need to select the Port and hit Next.
- Here, make sure to select the TCP.
- Now, in the Specific local ports field, you need to enter the specific ports that you need for your QuickBooks year version. The list for different versions is given below:
- QuickBooks Desktop 2020 and later: 8019, XXXXX.
- QuickBooks Desktop 2019: 8019, XXXXX.
- QuickBooks Desktop 2018: 8019, 56728, 55378-55382
- QuickBooks Desktop 2017: 8019, 56727, 55373-55377
Important Note: Remember that the 2019, 2020, and future versions of QuickBooks Desktop use dynamic ports. These are the specific firewall ports (and not a range) that are assigned during installation. This makes sure that the QuickBooks Desktop gets an exclusive use of a given port. You can use the QuickBooks Database Server Manager to get the port numbers for your version of QB.
- Now, once you enter the port number, hit Next.
- After that, click on Allow the Connection button and hit Next.
- Now, if it prompts you, check that all the profiles are marked and then hit Next.
- Then, click on the Create a rule option and give it a name as QBPorts(year).
- When you are done doing all these steps, hit the Finish button.
Tips You Can Utilize to Prevent QB Payroll Update Issues
You can really prevent QB payroll update errors by implementing the essential measures listed below:
- Deactivate Third-Party Programs: Don’t permit third-party apps to function on your system when you are updating QB payroll.
- Turn Off All Security Applications: You can disable the Windows Firewall & the antivirus software to avoid unnecessary interference during the payroll update process.
- Review System Hardware Components: Ensure that all the system hardware components are running smoothly.
- Update Your Operating System & QB Desktop: Make sure that you always use an updated operating system & QB Desktop with the latest patches & fixes.
- Check Your Internet Connection Settings: Regularly check your Internet connection & ensure that it is stable.
- Backup Your Company File: Always initiate the update process after backing up your company data.
Winding Up
In this comprehensive guide, we showed you how you can eliminate QuickBooks error 15270 using different methods. Hopefully, you can now seamlessly install the latest QB and payroll updates. If, however, you continue to experience tremendous challenges or have a query, you can contact a QB professional for real-time guidance.
Frequently Asked Questions
Here are the factors that might provoke QuickBooks error 15270 on your system:
1. Restrictive Security Application Settings: Various security apps, such as Windows Firewall, might cause internal problems.
2. Installation Issues in QB Desktop: Any defect in the QB installation setup can trigger multiple issues.
3. Corrupted System Hardware: Using a defective computer hardware configuration will cause various challenges when running QB Desktop.
4. Faulty Internet Connection: An unstable or inaccurate Internet connection settings can disrupt the QB payroll update process.
5. Inactive QB Payroll Subscription: The update process will fail if the payroll subscription is inactive.
You can tackle QuickBooks error 15270 using various methods described below:
1. Reconfigure the Windows Firewall Settings: You must create exclusions for QB programs in Windows Firewall settings.
2. Install a New Digital Signature Certificate: Download & install an updated digital signature certificate for your QB application.
3. Run QB Install Diagnostic Tool: Utilize the QB Install Diagnostic Tool to scan & repair your QB Desktop application.
4. Use Quick Fix my Program: Repair the QB program setup using the Quick Fix my Program tool.
5. Verify System Date & Time Settings: Always ensure that your computer has valid date & time settings.
6. Run QB With Admin Privileges: Ensure that you use QB with admin privileges to get access to various features & tools.
Yes, your antivirus software might perceive the QB payroll update process as a security threat and, as a result, block it. The only way to overcome this issue is to switch off your antivirus software during the payroll update process.
