
QuickBooks stores all your financial data in the form of a company file that is stored in the database. You can access this file from anywhere around the globe without any hassle. However, sometimes you may face issues while connecting to the database. You may come across QuickBooks error 6129 0. This error code can occur when the verification of the database connection fails and can make you unable to access the company file. However, you can take this blog as a guide to fix QuickBooks error code 6129 0.
Meaning and Error Message for Quick fix QuickBooks error 6129?
QuickBooks error 6129 is a 6000 series of errors in QuickBooks and is related to the issues in the company file. It is also known as the Database Connection Verification Failure issue. It appears on the screen if QuickBooks can not verify the connection with the database. This can hamper your productivity while performing any function with the QB company file, may it be accessing the file or creating a new company file. It can occur in single-user as well as multi-user modes. However, whenever you get stuck with this error, an error message will pop up, which will also have some common troubleshooting steps included in it.
Error Message for error code 6129:
The error message for this error code says that
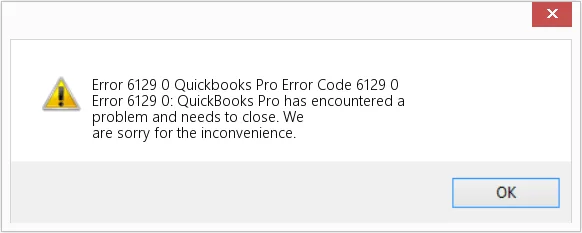
QuickBooks Error Code 6129: Database connection verification failure.
Error 6129 0: QuickBooks has encountered a problem and needs to close. We are sorry for the inconvenience.
Causes of QuickBooks error 6129 0:
As the name Database Connection Verification Failure for QB error 6129 suggests, the main reason for its occurrence is the connection issue with the database. There are other reasons also that can trigger it in your system. A few of the reasons for QuickBooks error 6129 0 are as follows:
- All the computers connected in the multi-user configuration are not using the latest version of QuickBooks.
- The data file on the system has a corrupted network.
- There is a mismatch between the client and the server domain.
- You might have upgraded a company file on a newer version of QB Desktop while using a non-Windows Administrator profile.
- There might be some network problem in the system because of which the computer or the server can not find the file it holds can also result in QuickBooks error code 6129.
- There might be a possibility that the network data file (.ND file) is damaged.
- Some third-party anti-virus or malware application on your device is interrupting the QB background process.
- Maybe you are trying to access the company file on a different domain on the network.
- You have not set adequate permissions to the QB Database Server Manager, and thus it is giving the error 6129 0 in QuickBooks.
- If the Windows Registry has some invalid entries related to QuickBooks.
- A sudden power cut may have shut down your system suddenly, which resulted in some data not getting saved.
Indications to identify QuickBooks error 6129 0:
As obvious, the most common indication for any error code is its error message popping up on your screen. However, multiple indications can indicate the presence of some error or issue in the application. Some common indications of the error code 6129 0 are listed below:
- Your computer screen displays an error message saying error code 6129 when you open the QB Desktop application.
- The active windows program crashes suddenly.
- Your system gives sluggish responses to the input of devices like a keyboard or mouse.
- The system gets frozen at regular intervals.
Points to Consider Before You Fix QuickBooks Error Code 6129 0
Before proceeding forward with the fixing steps, it is important to take care of some important steps like updating the software, creating a backup file, etc. These steps can save you from bearing any data loss if you get stuck while troubleshooting the error. For error code 6129, we recommend you perform the following steps before fixing it.
First Step: Open and Update the Company File
- First, to find out the problem, open the sample of the company file. If the error occurs in all the company files, then you have to try other methods to solve it.
- You might also need to log in as the Windows administrator and then carry out the other solutions.
Second Step: Create a New Company File
- If you face an issue while creating a new company file, then you first need to leave or exit the page.
- You should also save the file and then choose the Yes option to continue further.
- Last, you need to rename the company file and save it by clicking on the Save option.
Changing the company name might also help you with this; however, if it does not, try to change your company file’s location.
- Begin by going to the location where you have saved your company file.
- Next, click on the Company file and then choose the option to Copy.
- After that, paste the company file to some other location.
- Now, open the QuickBooks software and then hit on the option Open or restore an existing company.
- Thereafter, choose the Open a company file option and then hit the Next button.
- Then, you need to locate the company file to the location where you had copied it last time.
- Lastly, highlight it and then click right on the Open button.
You can also Backup QuickBooks to Flash Drive, know how.
Resolve the QuickBooks Error Code 6129 0 with 5 Easy Solutions
You can perform various methods to fix the QuickBooks Error Code 6129 0. Some of these methods include: Renaming the network description file, disabling any third-party applications, etc. Read further to know the detailed solutions:
Solution 1: Renaming the Network Description File to fix QuickBooks Error Code 6129 0
Follow the given steps to rename the Network Description file of QuickBooks.
- First, look into all your QuickBooks files and search for the Network Description File (with the .ND extension).
- Now, click right on it and then select the Rename option out of all the other options.
- Then, add the word .OLD at the end of the network description file name.
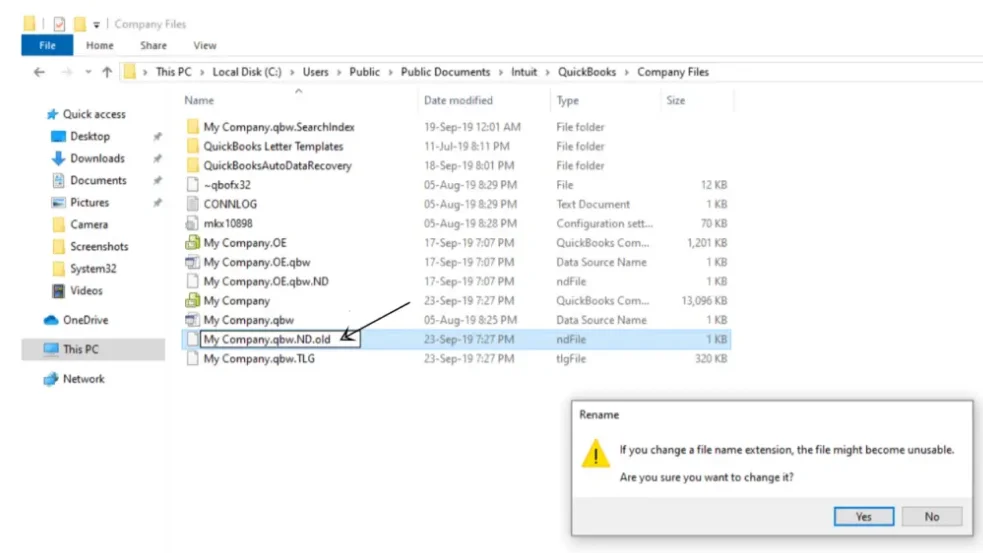
Once you have renamed the .ND file, open the company file if you are using a single system. But, if you need to access the same company file on multiple systems, follow the steps mentioned below:
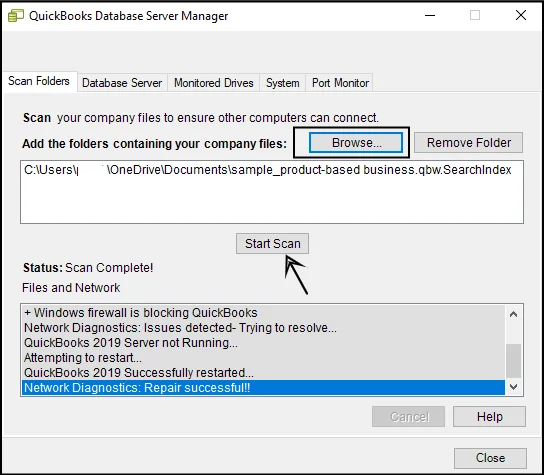
- First, go to the Start buttons and then hit on the Programs tab and there select QuickBooks.
- Next, you have to select and open the QuickBooks Database Server Manager option, followed by clicking the Scan folder button.
- If you do not see any folder with your company file, click on the Add Folder option to manually add it there.
- Moving ahead, you need to click on the Scan option. And once the process gets completed, close the tab.
- In the last, open the company file and verify if QuickBooks is working fine or not.
If not, move on to the next resolution to fix the QuickBooks error 6129.
Still Confused? Talk to Our Professionals.
Give us a call at +1-(855)-955-1942
Solution 2: Disable the Anti-Virus App using Safe Mode
QuickBooks error 6129 occurs if any antivirus interferes with the QB’s background processes and hinders the creation of a new company file. Then turning the antivirus off under the safe mode is the best solution in this case. For this, execute the following steps:
Follow the following steps to reboot the system in safe mode:
- Restart your system, and when it displays the boot screen, continuously press the F8 key on your keyboard.
- In case it does not display the Advanced Boot Options window, restart your system again and then press and hold the F8 key.
- Once it gives you the Advances Boot option window, then press the down arrow key to move your cursor down.
- And choose the Safe Mode with the Networking option and then hit the Enter key.
- After that. You need to log in using the admin account and try opening the company file.
Once you reboot your system in safe mode, undertake the following steps.
- When the system displays the desktop screen, you need to choose the option to disable your antivirus software.
- After that, create a company file when the system is in normal working mode.
- Next, reboot the system again and open the QuickBooks application along with the company file.
- If you still face the QuickBooks error 6129, then utilize the QuickBooks Tool hub to fix it.
Is your Database Manager not working? Then you might be facing QuickBooks Error 100, know more about this error and how to solve QuickBooks Error 100.
Solution 3: Utilize Various Tools Hub Features
The QuickBooks tools hub is an excellent application integrated with various features to help you diagnose and resolve various QB errors automatically. Some of its unique features include Quick Fix My Program, QuickBooks Install Diagnostic Tool, QB File Doctor, etc.
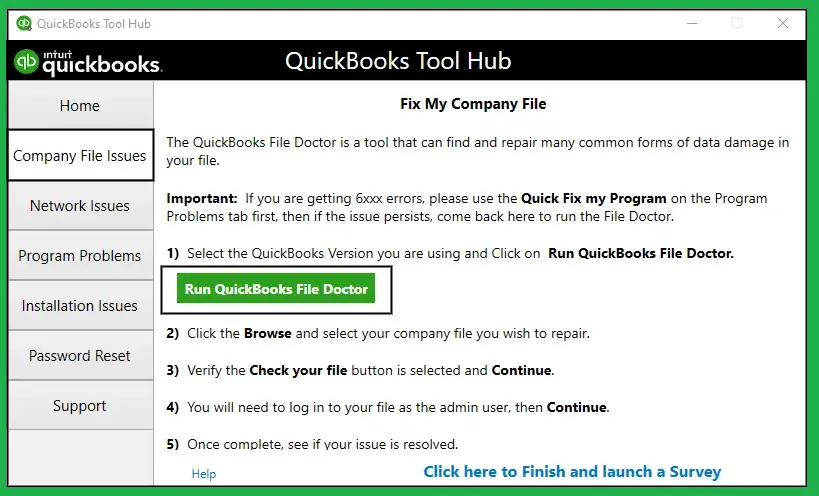
So, to rectify this error 6129 in QuickBooks, you can use some of the following features.
But before that, you need to download and complete the QB Tools Hub installation procedure from an authorized source and run the application.
- Use the Clean Install Tool.
The Clean Install Tool rectifies the issues related to improper or incomplete installation. So, execute the process by opening the Tool Hub and then going to the Installation Issues tab. After that, click on the Clean Installation option and then let the tool do its magic.
- QuickBooks Database Server Manager
To rectify database server management issues, open the QB Tool Hub and go to the Network Issues section. Here you will find the QuickBooks Database Server Manager option. Then, let the scanning and resolving process finish, and after that, reboot the system. This process helps to improve the communication between the server and the software. And also eases network-related issues, if any.

Solution 4: Ensure that all your connected systems are working on a single Domain.
If the computer that has the company file is working on a different network, then you can face the QB error 6129, 0. In that case, you need to contact Network Administrator or IT Professional to check if your computers are on the same network. Contact our team by dialing +1-(855)-955-1942.

Solution 5: Move the company file to a different location on your system.
- First, you need to copy the company file from the QuickBooks installation folder.
- Then, create a new folder on your desktop.
- After that, paste the company file to the new folder you have created.
- Then, open the QuickBooks Desktop and open a company file from the new folder.
- If it fixes the QuickBooks error 6129 0, it means the folder that had the company file was damaged. So, now you need to repair the folder containing the company file to get the issue fixed permanently.
- If error 6129 is still persisting, then you need to follow the next troubleshooting steps.
The above step is easy if you use the company file on a single computer. However, if you are using the same company file on multiple computers, then you must follow the following steps:
- Firstly, click on the Windows icon on your PC, then go to the Programs tab.
- Then, navigate to QuickBooks, followed by QuickBooks Database Server Manager.
- Then, go to the Scan Folders option there.
- If you do not find any folder there, then select the option to Add a new Folder.
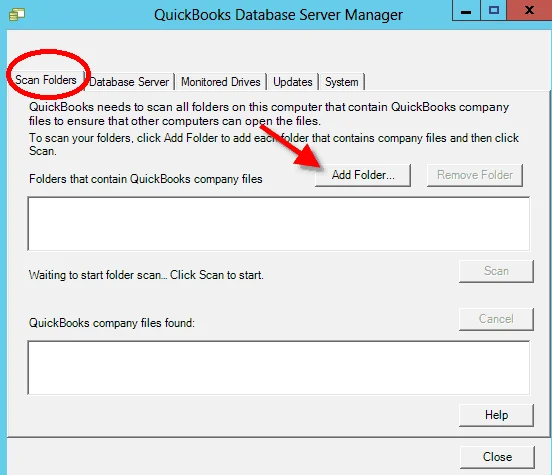
- After that, you need to hit on the Scan button.
- Once the scanning completes, close the file.
- Lastly, open the company file and check if the issue is resolved.
Solution 6: Log in as an Administrator on Windows.
You may also face QuickBooks Error 6129 if you have not logged in as an administrator on Windows. Then you need to follow the given steps to fix the issue.
- Open the Windows Menu by pressing the Windows Start button.
- Then, go to the All Programs option from the list.
- After that, you need to go to the Windows Small Business Server and then hit the Windows SBS Console.
- Then, choose the Users and Groups option followed by the Add a new user account.
- Then, follow the instructions on Add a New User Account wizard and fill out the required user information.
- Lastly, provide the new user administrator rights and hit the Finish button when you are done.
Solution 7: Performing the Solution at the time of the Easy Step Interview to fix the QuickBooks error 6129.
In case non of the above options work for you, you can try to perform the following steps to quickly fix error 6129.
- You need to first click on the Leave option when you are in the Easy Step Interview.
- Then, hit Yes, when the message saying Save the file pops up on the screen.
- Lastly, enter the name of the file and then click on the Save option.
Wrapping Up!
We have tried to cover up the most updated solutions for you to fix the QuickBooks error 6129. Follow the steps carefully to fix them. Additionally, you should also update the Windows and QuickBooks Desktop on your system. The outdated versions can sometimes not support some features and can cause you to face errors. So, to update the QB software, just go to the Help menu and click on the Update QuickBooks Desktop button, followed by Update Now.
Frequently Asked Questions
You are facing the QuickBooks error code 6129 0 because you have an outdated version of Windows OS, have been given inadequate permissions for applications, or maybe your network data file.
Yes, you can turn on hosting in QuickBooks. To turn on hosting in QB, first, go to the application and tap on the Files option. Then select the Utility bar and choose the Host Multi-user Access option. After that, add the number of users and disable the multi-user mode by pressing Cancel.