Different problems can disrupt your workflow when you are running QuickBooks Desktop. Sometimes, however, you may not even be able to open the application and a message stating that QuickBooks has stopped working acan ppear.
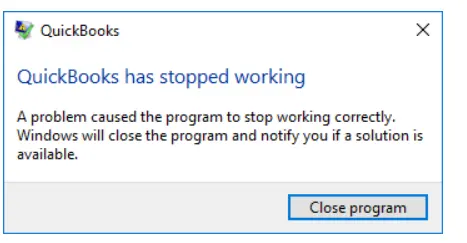
Here’s what you might see on your system’s screen:
| “QuickBooks has stopped working. A problem has caused QuickBooks to stop working correctly. Windows will close the program & notify you if a solution is available” |
It is possible that you receive no error message on the screen and the QB Desktop application remains frozen. Consequently, you won’t be able to resume working on your project. Your overall efficiency & productivity will decline.
The comforting fact is that there are multiple tactics that you can implement to resolve this problem. Alright, then, let’s navigate through the guide to learn about the main causes behind this issue and discover how we can eliminate it.
If you need immediate assistance to fix the QuickBooks has stopped working error, you should dial +1-(855)-955-1942 to contact an experienced QB professional.
Why Has QB Desktop Stopped Working On Your System?
You might encounter the QuickBooks has stopped working error due to the following reasons:
- The name of your company file may be too long, causing the application to lag and preventing QuickBooks from opening.
- Your QuickBooks Desktop installation or program files might be damaged, which is why QuickBooks is not working.
- The system hard drive where QuickBooks is saved might be damaged or corrupted or has bad sectors in it.
- If you find your QuickBooks is not responding, then it could be a result of a damaged Windows OS.
- There might be severe data damage or corruption in the company file.
- Any damage in the QBWUSER.INI or EntitlementDataStore.ecml files can trigger this problem.
- Your system may not have the minimum hardware and software configuration to run QuickBooks Desktop.
- A third-party application integrated with QB can prevent the software from running smoothly on the system.
So, there were all those reasons why your QB application might have stopped operating. Let’s jump to the following section to discover how to fix this issue.
12 Powerful Ways to Fix QuickBooks Has Stopped Working Error
You can easily resolve the QuickBooks has stopped working error by implementing the following methods. Ensure that you utilize these fixes in the order they are described.
1. Restart Your Computer
The first question that comes to your mind is what to do if QuickBooks is frozen. The answer, sometimes, lies in a very simple step i.e., restarting the system. You must reboot the system if you encounter the ‘QuickBooks not responding’ issue. Start by closing all the running applications, rebooting the system, and lastly, trying to open the QuickBooks software.
If restarting the system doesn’t help you remove the QuickBooks Not Working message, try the next solution to update the application to the latest release.
2. Install the Latest QuickBooks Updates
If you have been running an outdated QB Desktop version, it might not function appropriately due to obsolete features & tools. Therefore, you should install QuickBooks updates to ensure that you can run the software smoothly for your projects.
You can try the next solution if updating the application doesn’t help you with the ‘QuickBooks quits unexpectedly’ issue.
3. Disable the Third-Party Add-Ons
If QuickBooks does not respond when opening, it might be because of third-party integrations and add-ons with the QB application. Moreover, the anti-virus application on the Windows OS can also be the reason behind QB’s unresponsiveness. Therefore, temporarily deactivating any add-ons, integrations, and anti-virus applications may help you resolve the error message. If not, try the next resolution and run the Quick Fix My Program tool.
4. Use the Quick Fix My Program Tool
At first, the QuickFix My Program tool shuts down any running background processes and then runs a quick repair on the QB program. Therefore, follow the steps below to resolve the ‘QuickBooks has stopped working’ error. However, before you run the Quick Fix My Program tool, you must know that you can utilize this tool on the condition that QB Tool Hub is installed on the system. So, this specific troubleshooting section is divided into two steps. In the first step, we’ll learn how to install Tool Hub on the system. In the second step, we’ll learn how to run the Quick Fix My Program tool using Tool Hub. Here’s what you need to follow:
Step I: Download and Install the QuickBooks Tool Hub
To easily install QB Tool Hub on your computer, you need to do the following:
- Firstly, close the QuickBooks application and download QuickBooks Tool Hub. Save the file in an easily accessible location (like your Downloads folder or Windows desktop).
Note: If Tool Hub is already installed on the system, let us know which version you have. Go to the Home tab; the version will be displayed at the bottom right. Else, click on About to see the current version.
- Open the downloaded file (QuickBooksToolHub.exe) and install it by following the instructions on your screen. Proceed further and agree to the terms and conditions.
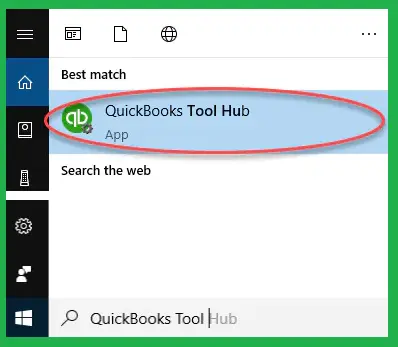
- When the installation is completed, an icon will display on your Windows desktop. Double-click to open the tool hub. (If you don’t find the Tool Hub icon, you can open the program by searching in the Windows search bar.)
Now, proceed to the following step to learn how to use the Quick Fix my Program tool.
Step II: Run the Quick Fix My Program Utility
As discussed above, the Quick Fix My Program tool will shut down any open background processes that QuickBooks may be using. Further, to resolve the ‘QuickBooks not working after login’ issue, it will run a quick repair on QuickBooks to help fix program problems. Follow the steps detailed below to use the tool:
- Open QuickBooks Tool Hub and select Program Problems.
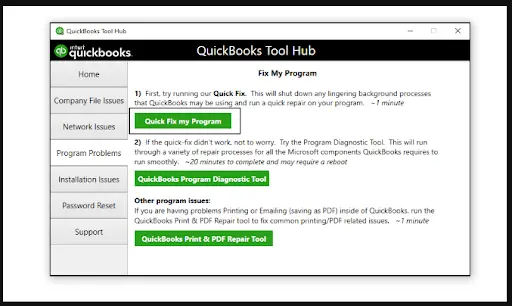
- Select Quick Fix My Program from there and wait for the scan to complete.
- Once done, open the QuickBooks Desktop and start working on your projects.
Do you still notice the QuickBooks has stopped working error message? If so, consider implementing the following solution.
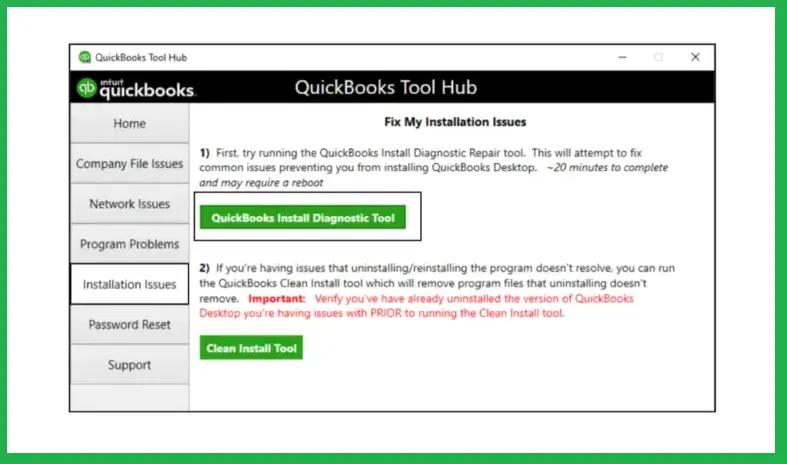
5. Run the QuickBooks Install Diagnostic Tool
The QuickBooks Install Diagnostic Tool automatically diagnoses and fixes issues with Microsoft components that the QB program uses. Therefore, running this essential utility may help remove the ‘QuickBooks Not Working’ message.
If running the QB Install Diagnostic tool doesn’t help you resolve the ‘QuickBooks not responding’ issue, try the next solution.
6. End the QuickBooks Processes Running in the Background
If QuickBooks is not responding to your commands, try manually ending the processes running in the background and reopening QuickBooks. Here’s how to do so:
- Firstly, you should hold the Ctrl + Shift + Esc keys together to launch the Task Manager.
- After closing the QB program, right-click the taskbar and choose the Task Manager option.
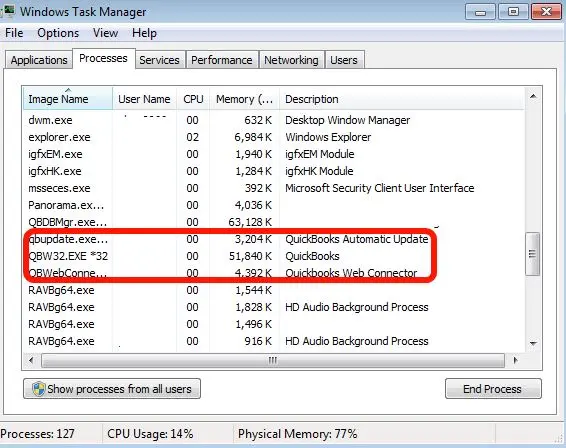
- Then, proceed to choose the Details tab.
- Now you should find the QB background processes:
- QBW32.exe or QBW.exe
- QBCFMonitorService.exe
- qbupdate.exe
- QBDBMgr.exe or QBDBMgrN.exe
- QBMapi32.exe
- Afterward, finding these processes, right-click on each and choose the option to End Process.
- Further, right-click the QB shortcut to choose Run as Administrator.
Do you continue to encounter the QuickBooks has stopped working error? If so, consider repairing various files as discussed below.
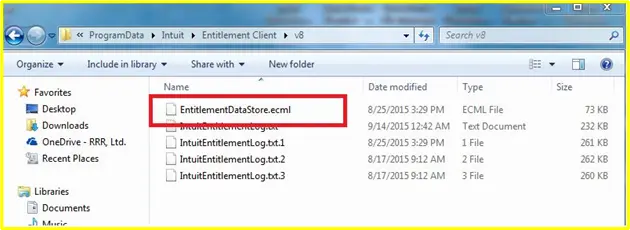
7. Rename the QBWUSER.ini and EntitlementDataStore.ecmlIf Files
If QuickBooks is Not Responding After Login, it might be due to a damaged or missing QBWUSER.ini or entitlementdatastore. ecml file. Therefore, changing the name of one or both files might resolve this issue. Here’s what you need to do:
Note: Once you rename the QBWUSER.INI file, it erases all the company files you opened earlier. Thus, you would have to open it manually again.
- Firstly, click on the Windows icon.
- Then, simultaneously press the Windows + E key to open Windows File Manager.
- Then, go to the QuickBooks folder in the C drive: Users[Your user name]AppDataLocalIntuitQuickBooks [year].
- Now, search and right-click on the QBWUSER.ini file and click on the Rename option.
- Further, type .OLD at the end of the file name and save it.
- Now, select the folder containing the EntitlementDataStore.ecml file.
- Further, follow this path to locate the EntitlementDataStore.ecml file, ‘C:\ProgramData\Intuit\Entitlement Client\v8.‘
- Lastly, follow the same steps for modifying the name as performed for the QBWUSER.ini file and recheck if the issue is resolved.
If your QuickBooks are not responding even after renaming these crucial files, follow the next troubleshooting solution.
8. Copy the Original Company File to Another Location
After performing the troubleshooting solution above, you must try to launch the sample company file to check if that also triggers the QuickBooks Not Responding After Login error. For this, press and hold the Control key, run QuickBooks, and select any sample company file on the No Company Open window.
However, if you can open the sample file but not the original company file, then change the location or folder of the file. Follow the steps below to quickly move your company file to a new location.
- Start by going to the folder where the company file is saved.
- Right-click the file with the .QBW extension.
- Then, under the drop-down list, click the option to Copy.
- Furthermore, create a new folder in the C: Drive or the desktop.
- Name the folder QBTest and open it in the next step.
- After opening the folder, right-click and choose the option to Paste the original company file.
- Now, press and hold the Control key and launch the QB program.
- The above action will open the No Company Open window on the screen.
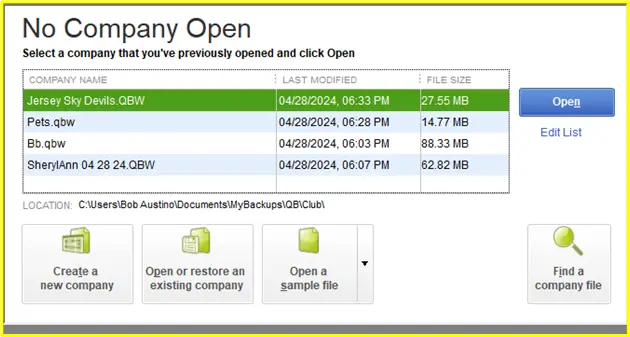
- Afterward, click Open or restore an existing company option.
- Lastly, browse and select the company file from the QBTest folder and see if this fixes the issue due to QuickBooks not responding.
With these instructions, if you could get rid of the issue, then the company file is not the issue and indicates that the folder where the file was initially saved is damaged, and you will need to use the new folder to keep the company file.
If you find that your QuickBooks quits unexpectedly even after moving the company file to a different location, follow the next troubleshooting solution.
9. Create & Utilize a New WindowsOS User
As already discussed, incorrect folder permissions might interfere with the QB operations on the system. In that case, you must create a new user and give it admin privileges to run the QB application. Here’s what you should do:
Step I: Creating a New Windows User with Admin Rights
You can follow the points detailed below to create a fresh Windows admin user account:
- Initially, choose the Windows Start menu.
- Then, click the Setting icon in the Control Panel.
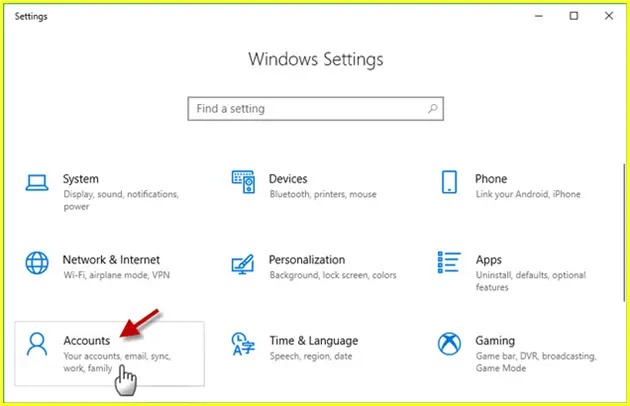
- Now, choose the Accounts option and click Family & Other Users.
Note: You may see the Other Users option in some Windows OS versions.
- Further, click the Add Accounts option next to Add Other users.
- Proceed to click on the option saying- I don’t have this person’s sign-in information.
- When the next window appears, click the option to Add a user without a Microsoft account.
- Finally, enter a new username and password and a password hint. You can also select a security question. Then select Next.
Now, implement the next step to provide admin privileges to QB Desktop.
Step II: Grant Admin Rights to QB Software
Here’s how you can grant admin privileges to your QB application:
- First, go back to the Control Panel in the Start menu.
- Then, navigate to the User Accounts option.
- Proceed to look for the QBDataServiceUserXX service for your QB Desktop version. For instance, in QB Desktop 2020, search for QBDataServiceUser30. This number drops for every version.
- Then, further choose Change the Account Type and click the Administrator option.
- Afterward, choose Apply.
If you find your QuickBooks suddenly stops working after having the required admin rights, follow the next troubleshooting solution.
10. Rectify Data Damage with the Verify and Rebuild Data Tool
Data damage in the QB company file may provoke an error message. To fix it, you must run the Verify and Rebuild utility. Both utilities are integrated with QuickBooks and fix the data damage in minutes. The Verify tool finds the damage in the company file, and then the Rebuild tool repairs it. Here’s what you should do:
Step I: Verifying the Company Data
- Firstly, move to Window and click Close All.
- Then, proceed to the File tab and select Utilities.
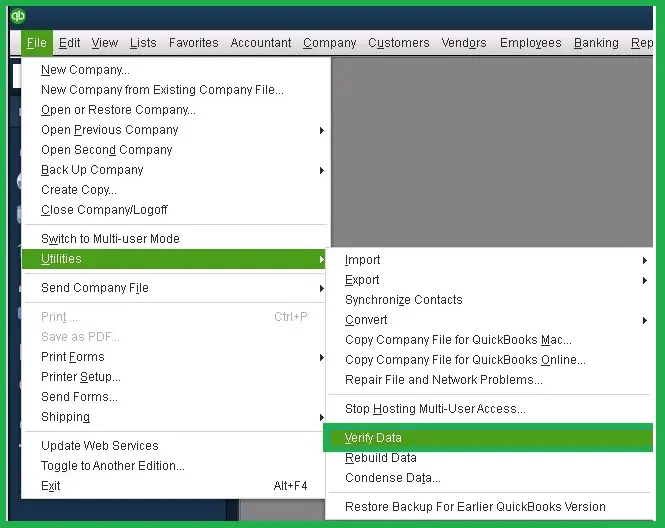
- Further, choose Verify Data and let the Verify Data utility diagnose the company file for any data damage. After that, you will see any of the options mentioned below:
- ‘QuickBooks detected no problems with your data—,’ means the data is not corrupted or damaged; thus, you do not need to do anything.
- ‘The data has lost integrity‘ means the damage is found in the data file. Therefore, you must run the Rebuild tool to repair the damage in the QuickBooks company file.
Now, move to the following step to learn how to repair your company data.
Step II: Rebuilding the Company Data
Here are the steps that you must follow to rebuild your data file:
- First, begin by clicking on the File tab in QB.
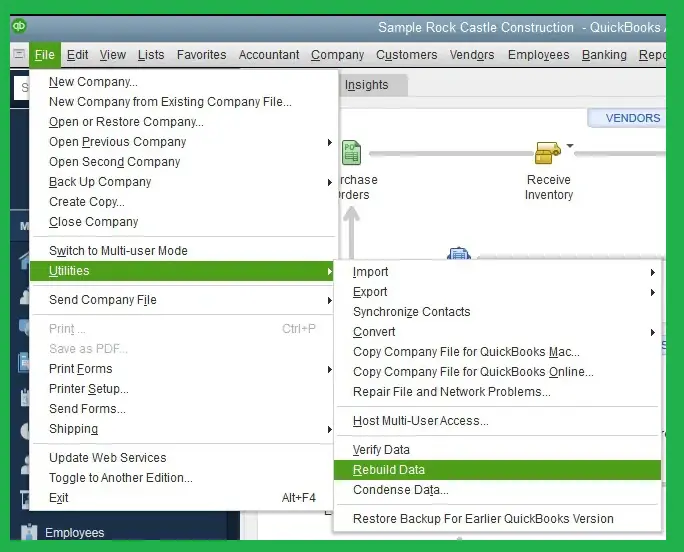
- Now, choose the Utilities option under the File tab and proceed to select Rebuild Data.
- Remember that QB will ask you to create a backup of the data before using the Rebuild tool.
- Click OK to confirm backup, as it is necessary before rebuilding the damaged company file.
- Further, click OK once you choose the location to save the backup. All things considered, ensure you don’t replace the existing company file backup with the new one. Therefore, while creating the new company file backup, consider entering a new name in the File name and hit Save.
- Further, start the Rebuild tool, and once the process is over, choose the OK option.
- Once again, choose the File tab and click the Utilities option.
- Then, run the Verify data tool again to double-check the company file for additional damages.
- At this point, if the Verify tool finds more damage, you must fix it manually. You can search for errors (s) on our website and find ways to rectify them.
- The error you are searching for cannot be found. Proceed to restore the recent backup. Choose the Open or Restore Company option in the File tab to restore the backup.
Note: Do not replace the existing company file with the restored one. Since the backup was created, you’ll need to enter information into your company file again.
If the Verify and Rebuild utility doesn’t help you fix the ‘QuickBooks Desktop has stopped working’ issue, try the next solution below.
11. Scan and Repair Bad Sectors On Hard-Disk
Another reason QuickBooks is not responding is the corrupt or badly fragmented hard disk on which QB is installed. To fix this root cause, try scanning and repairing the bad sectors on Hard-Disk. Here’s what you need to do:
- Simultaneously press the Windows + E keys to open Windows File Manager.
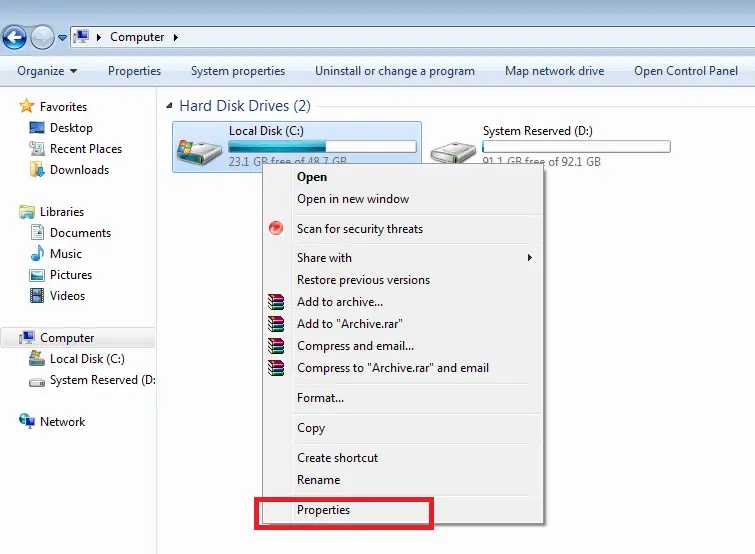
- Right-click the C drive and select Properties.
- Go to the Tools menu and click on Check Now.
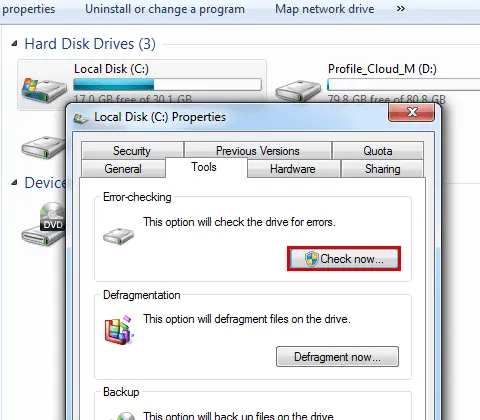
- Make sure to mark the Automatically fixed file system errors and Scan for and attempt recovery of lousy sector options.
- Click on Start and wait until Windows completes the scan and repair process.
If repairing the hard drive does not help fix your QuickBooks program, follow the next solution.
12. Reinstall QuickBooks Desktop On Your Computer
When you reinstall QuickBooks on your computer, you ensure that different files & components are registered once again. This helps you fix many error codes. Here’s what you need to do:
- First & foremost, you need to tap the Start menu and click the Control Panel icon.
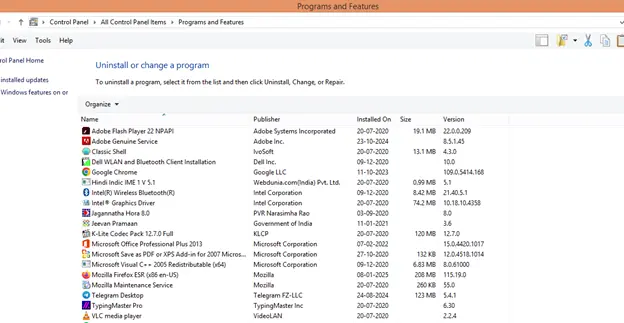
- You need to select Programs and Features in the Control Panel and click Uninstall a Program.
- View the list of installed programs and choose the QuickBooks version that you need to remove.
- Tap Uninstall/Change, and after that, you have to tap the Remove option.
- You must click Next and wait until the uninstallation process of QB is finished.
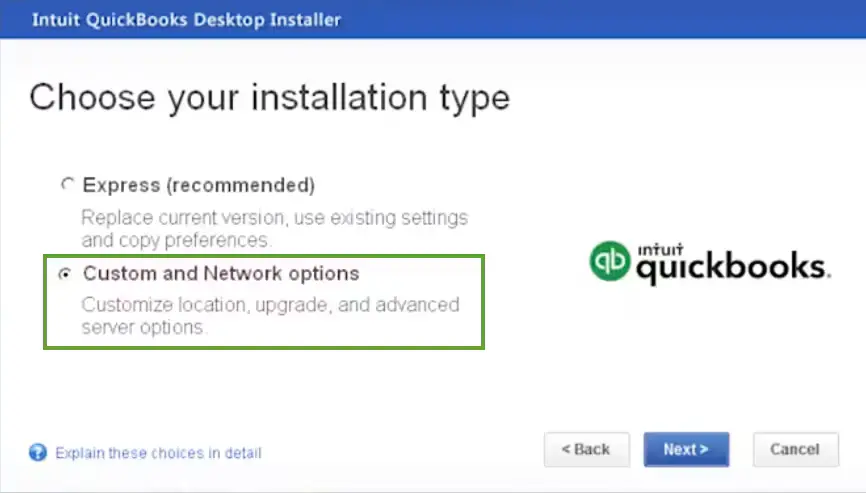
- At this point, you should download the newest QuickBooks version on your computer.
- Access the download file (QuickBooks.exe), and you must choose the Express Install option.
- Click Next and follow all the on-screen instructions. You should type the product and license numbers for your QuickBooks version.
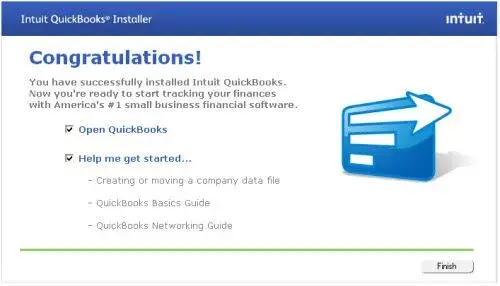
- Tap Install and wait until you have completed the QuickBooks Desktop installation.
Finally, you should open QuickBooks Desktop and commence working on different projects. If, however, you continue to face problems, consider implementing the additional resolutions discussed below.
Additional Solutions to Try When QuickBooks Fails to Open
If none of the solutions above helped get your QuickBooks running back smoothly, you can try the troubleshooting hacks detailed below:
- If you find that other than QuickBooks other programs have also stopped working, you must immediately replace your hard drive as this indicates corruption in it.
- You can also try running the System File Checker utility on Windows to detect and repair any possible corruption in the operating system.
- If you have set QuickBooks to open all previously open windows on start, this could lead it to crash. In this situation try suppressing QuickBooks by launching it while holding down the Ctrl key.
Top Tips to Optimize QuickBooks Performance
Here are the key steps that you can implement to ensure QuickBooks continues to run smoothly on your system:
- Install regular QB updates: Ensure that you always have the latest QuickBooks updates installed on your computer.
- Company file maintenance: Use different tools, such as QuickBooks File Doctor, to regularly repair your company file.
- Perform system checks: Verify your system hardware and other functionalities to ensure that QB Desktop can run smoothly.
- Remove unnecessary files & folders: Remove junk files & folders from your computer to free up the disk space.
- Update your security apps: Ensure that you install the latest updates of your security apps, such as Windows Firewall & antivirus software, on the system.
Winding Up
In this extensive article, we have discussed several troubleshooting methods that you can implement whenever you find that QuickBooks has stopped working. Hopefully, you can now effortlessly open & utilize QB Desktop for your projects. If, however, you still encounter various challenges or have a query, you can contact a QB professional for real-time guidance.
Frequently Asked Questions
A. This message usually pops up when QuickBooks faces a corrupted company file, damaged Windows components, or compatibility issues. It could also be caused by a broken QBWUSER.INI file or outdated system drivers. To fix this –
a. Rename the QBWUSER.INI file to reset program settings.
b. Use the QuickBooks Tool Hub and run Quick Fix my Program.
c. Try opening the company file from a different location.
d. Restart your PC in Selective Startup mode and test again.
For personalized guidance, call support at +1-(855)-955-1942.
A. If QuickBooks crashes after you double-click it, you might be facing installation corruption or incompatible Windows updates. Here’s how to troubleshoot:
a. Run QuickBooks Install Diagnostic Tool via the Tool Hub.
b. Ensure that .NET Framework and MSXML components are properly installed.
c. Disable any third-party antivirus temporarily.
d. Perform a clean install of QuickBooks if the above steps fail.
Need more help? Don’t stress—call us now at +1-(855)-955-1942 for expert QuickBooks repair support.