
Imagine a situation wherein you have to enter a whole lot of transactions into QuickBooks. No doubt, it is a time-consuming taking and labor-intensive process. Apart from this, manual data entry is highly prone to errors as well. So, the best way to transfer your existing financial information into the software seamlessly is to Import Excel File into QuickBooks Desktop. This way, you can map and match your Excel columns to the appropriate fields within it and effortlessly Upload Data From Excel to QuickBooks Easily. There are different ways of doing it. To make the import process easier for you, look at the listed steps in this blog ahead.
Not sure if you can Import Transactions into QuickBooks Desktop from Excel on your own? Then do not worry; call us at the toll-free number +1-(855)-955-1942 and get instant guidance from our QuickBooks experts. Call Now!!
Different Ways To Import Data From Excel To QuickBooks
You can import Customer, Vendor, Items, and Chart of Accounts Data into QuickBooks through an Excel spreadsheet. You have got three options to do so, and we have discussed all three ways to import Excel files into QuickBooks desktop in the next part, so keep reading this.
- Standard Import
- Advanced Import
- Add/Edit Multiple Lists
1: Standard Import
QuickBooks launches a structured Excel spreadsheet into which you may enter your data. You can check the findings and view your data in QuickBooks after you save and close the file. To import customers, vendors, and the products you sell, do the following:
- Tap on the File menu, and select Utilities> Import> Excel File.
- Click NO, if you get the Add/Edit Multiple List Entries windows.
- Further, you may follow the wizard in importing files:
- Firstly, select the type of data.
- QuickBooks will then open a structured Excel spreadsheet. You need to enter your information in it and save and close the file.
- Further, an option to Add My Data Now will appear on your screen.
- Go through the results and view Data in QuickBooks.
- Once done, click on Close.
NOTE: You can always go back to this window in case you want to import additional customer, vendor or item data from excel using this option.
After you have imported the Excel file into QuickBooks desktop, you can also import charts of accounts.
Steps To import Chart of Accounts
NOTE: Create a Backup of your company file you import data to QuickBooks from Excel.
- Select Chart of Accounts from the Lists Menu.
- Click on the Account drop-down, then choose Import from Excel.
- To select the Excel file that you want to import, Click on Browse.
- Further, select the file and click Open.
- Then, choose the Excel Sheet where the information you want to import is stored.
- Now, Map your accounts as it tells QuickBooks how to import the data from your Excel sheet. The column headings in QuickBooks aren’t similar to Excel, so you have to match them.
- Enter the mapping name and then choose Account as Import type.
- Go through the info under QuickBooks with the column headings in your Excel sheet.
- Click on Save.
- Lastly, click on Import.
NOTE: If you are trying to import an Excel file into QuickBooks desktop for the first time, click on Yes to confirm the process.
2: Advanced Import
If you do not have an Excel or CSV file yet but still want to import your data, then you must proceed with the below-given steps:
Step 1: Inventory Preferences must be ON
- Firstly, sign in to your company file as Admin, and you must be in Single-user mode.
NOTE: An option to switch to multi-user mode appears when you go to the File menu. If it isn’t, then you must switch to single-user mode.
- From the QuickBooks Edit menu, Click on Preferences, followed by the Items & Inventory option.
- Further, Tap on the Company Preferences tab.
- Lastly, make sure to mark the Inventory and Purchase Orders checkbox, then, click OK.
Also See: Unable To Export To Excel From QuickBooks Issue
Step 2: Set Up Accounts in Your Data File
- Go to Chart of Accounts from the Lists Menu.
- Right-click anywhere in the Chart of Accounts and select New.
- Further, Choose the Account Type. For this, you have to create 3 account types:
- Income Account to track sales.
- Cost Of Goods Sold (COGS) Account.*
- Inventory Asset Account.*
Step 3: Create Your Data with the Following For Each Item:
- Item Name: Name you want on your item list
- If you want to import Sub-Items, then the Parent item must already exist in the Item List or should be present above the Sub-item in the list order on the spreadsheet you are importing.
- Also, if you are importing Sub-Items, then the Item Name must be formatted in a proper manner with the Parent separated from the Sub-Item by a colon. For example,
- Widgets
- Widgets:Widget001
- Widgets:Widget002
- Item Type: Include the type of item, i.e. inventory part, service, etc. Item name must be spelled out just as you see it in QuickBooks.
- Description of the Item: Written description of the item that will appear in the Item List, Sales Orders, Sales Receipts, and Invoices.
- Income Account: Name of the Income Account in which sales of the item will be recorded.
- Inventory Asset Account: Name of the Asset Account in which the inventory value will be recorded.
- Name of the COGS Account: Name of the COGS Account in which purchases of the item will be recorded.
- On Hand Quantity: The Quantity On Hand of the Item (Inventory Items only).
- Cost of Item: The Cost of the Item.
- Sales Price: Sales Price of the Item.
- Total Value: The Total Value of the Item (New Inventory Items only).
- As Of Date: When the Item was last purchased (New Inventory Items only).
- Is Passed Thru: Be sure that you put a Y in this column so you can track both the cost and price of the item.
IMPORTANT: Use the same name, spelling, and capitalization as it appears in the Chart of Accounts.
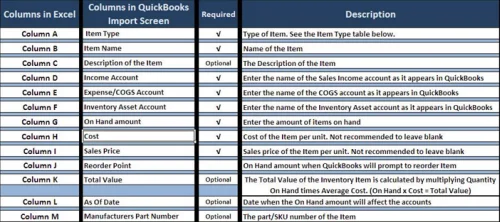
Step 4: Make a Spreadsheet
Try following the tables attached below for creating the spreadsheet:


Step 5: Prepare to Import
You must be aware of the location of the Excel spreadsheet file, as QuickBooks syncs with the spreadsheet while you upload transactions or Import Transactions into QuickBooks Desktop From Excel:
- Open the QuickBooks application and then your company file.
- Make sure to back up the QuickBooks company file (Don’t overwrite any previous backup).
Step 6: Import the Spreadsheet
- Tap on the File menu, and select Utilities> Import> Excel Files.
- Then, select No on the Add/Edit Multiple List Entries.
- Further, select the Advanced Import option and setup a mapping by following the below-given steps:
- Click on Browse to choose the Excel file.
- Then, select the correct sheet in the Excel workbook.
- Make sure to mark This data file has a header rows checkbox to identify the available headers from your file.
- Select Add New from the Choose a mapping dropdown.
- Then, follow the below-given steps on the Mapping window:
- Type a name On the mapping name field to easily identify the mapping (such as Customer, Vendors, etc…).
- From the Import type dropdown, you need to select the data that you want to import.
- Match the QuickBooks and Import Data columns, then Save.
- To verify the mapping, click on Preview.
- Lastly, click on Import to complete the import process.
NOTE: The QuickBooks column shows which customer fields are available in QuickBooks, whereas the Import Data column shows which row headers are available in your Excel file. If you don’t have any data from your file that will match the fields in QuickBooks, you must leave it blank.
- The following options will appear on your screen if you come across the Duplicate Record Found error:
- Try to keep the existing data and discard the import data.
- Further, make sure to replace the existing data with import data by ignoring blank fields.
- Replace the existing data with import data, including blank fields.
Note: You can import data into QuickBooks using the CSV file in the same manner as mentioned above.
3: Add/Modify Multiple Lists
You can easily add and edit multiple customers, vendors, and items. However, you can use it for list information (name, description, etc.), but not for import transactions (invoices, bills, etc.).
- Tap on Add/Edit Multiple List Entries, From the Lists menu.
- Then, click on the List dropdown and choose the list that you want to work with.
- Moreover, if you want to see a specific record, then you can filter the list.
- This is an optional step, but you can select the Customize Columns button to choose the columns you want to see in the Add/Edit Multiple List Entries window. It will make it easy for you to work on the columns you need. You can also choose to return to the preset columns for the list by clicking on the Default button.
- To add the columns from the left pane, select a column and then hit Add.
- To remove the columns from the right pane, select a column and hit Remove.
- To rearrange the column order from the right pane, select the column and hit Move Up or Move Down.
- After that, hit OK.
Note: You can not remove the columns like customer or vendor name, but you can change their order as required.
- Further, you may add or edit the entries by clicking on the appropriate fields. You can copy (Ctrl + C) data from Excel and paste (Ctrl + V) it into this window. Moreover, you can also Copy down and Duplicate rows.
- At last, click on Save.
Once you have saved the changes, you will get a prompt displaying the number of records saved. Along with that, QuickBooks will also display the errors that need to be fixed.
Instant Assistance to Upload Transactions to QuickBooks Desktop!
We hope the steps mentioned in this blog have helped you import an excel file into QuickBooks desktop. However, if you need any further assistance, we would suggest you get in touch with our experts by giving us a call at QuickBooks Data Service Solutions Helpline Number +1-(855)-955-1942.
Frequently Asked Questions
A. To import an Excel file into QuickBooks Desktop smoothly, ensure your spreadsheet is clean and 1 properly formatted. QuickBooks only accepts certain templates. Here’s how to do it right:
1. Open QuickBooks Desktop and go to File > Utilities > Import > Excel Files
2. Choose the correct import type: customers, vendors, items, etc.
3. Use the sample template if unsure – it helps match column headers.
4. Map fields carefully to avoid data mismatches.
5. Save the Excel file in .xls format (not .xlsx) for best results.
Always back up your QuickBooks company file before importing anything.
A. If QuickBooks Desktop doesn’t recognize your Excel file, it’s likely due to format issues or system compatibility problems. Try the following:
1. Make sure Microsoft Excel is properly installed and activated on your system.
2. Avoid .xlsx or macro-enabled files—save as .xls (97-2003 format).
3. Double-check column names to match QuickBooks’ required headers.
4. Do not use merged cells, blank rows, or formulas in the sheet.
5. Run QuickBooks as an administrator for full permissions.
If the issue persists, try importing using an IIF file instead.
