
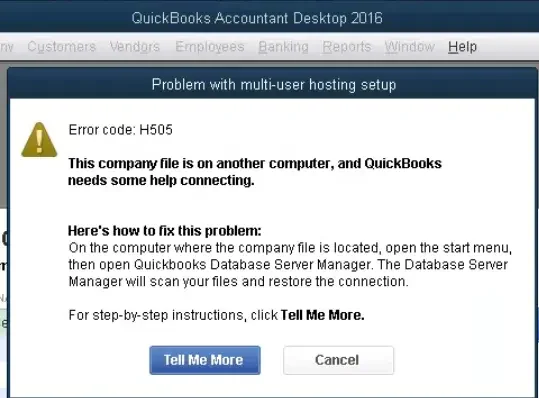
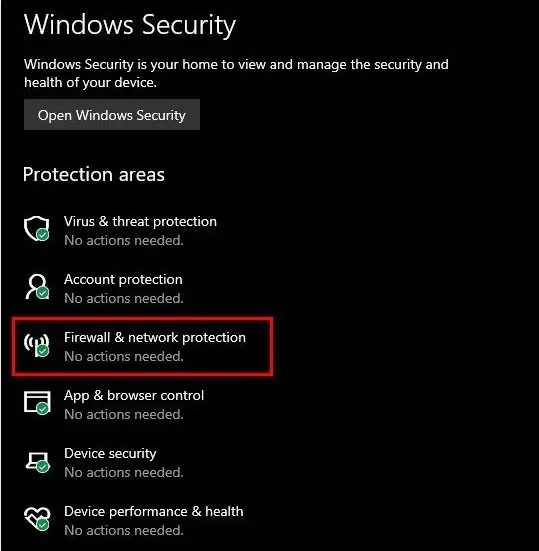
Users attempting to access their company files in QuickBooks Desktop’s multi-user environment may encounter problems. QuickBooks error H505 is a common occurrence, preventing workstations from connecting to the server and accessing the company data. Here’s the message that you are likely to see on the system’s screen:
| “Error Code: H505 This company file is on another computer, and QuickBooks needs some help connecting.” |
Here’s what might happen on your system once this glitch manifests:
- Your QuickBooks program starts to crash frequently.
- The Windows operating system can become unresponsive and it may freeze periodically.
- Your computer might shut down suddenly, causing a loss of unsaved data.
The comforting thing is that you can seamlessly troubleshoot this problem using various methods. Alright, then, let’s navigate through the guide to understand why we experience this issue and how we can fix it quickly.
If you want immediate assistance to fix QuickBooks error H505, dial +1-(855)-955-1942 to contact a QB professional.
Why Do You Encounter H505 Error in QuickBooks Desktop?
The QuickBooks Error Message H505 appears on the screen because one or more of the user’s computers are configured to serve as the QuickBooks server. Normally a user’s computer can only function in the multi-user mode, While the computer that hosts the company file can only function as the server computer or can act as the host. So if this condition does not follow, you may face the QuickBooks Error code H505. The other reasons for the error H505 are as follows:
- The QB server is unreachable or down:
When the server you want to establish a connection with in order to access a company is unreachable or down, In such a scenario, you should check the server and ensure it is up and running before connecting again.
- If the multiple workstations are hosting multi-user connections:
When the multiple workstations in the network act as the server, the QuickBooks error code H505 can appear on the screen. This can happen when the Host Multi-User Access option is enabled on the other computers instead of the server one. To fix this, you will have to disable the option of hosting multi-user access on every workstation other than the server.
- When the Windows Defender Firewall blocks the connection:
When the Windows Firewall application on your device does not allow you to establish a connection with the server, the error H505 may appear on your screen. If you are stuck in the same case, then you have to allow QuickBooks to pass through the firewall manually. You can also set up a new rule to configure Windows Firewall such that it allows the use of specific ports for QuickBooks.
- If the QuickBooks services are not running on the server:
The QB application uses some specific servers to facilitate the connections between itself and other workstations on the network. So if the services are not running smoothly in the background while you try to access the company file on the server, it can trigger the Error Code h505 in QuickBooks. Therefore, you should ensure that the services run smoothly in the background before proceeding ahead.
- If the QuickBooks Database server is not able to scan the QuickBooks files/folders:
The database server scans the QB file before connecting any workstation in the multi-user mode. So, if there is some issue and the QB database server is not able to scan the files, it will show the error code H505.
If your QuickBooks Database Manager is not working then you may see QuickBooks Error 100, know how to solve QuickBooks Error 100.
- If you have a damaged or missed Network data file.
The Network data file (with .ND extension) allows the Qb Desktop to access the company file in a network or the multi-user environment. Any corruption or damage in this .nd file can also lead to QuickBooks error code H505.
- If QuickBooks can not trace the IP address of the computers, it can reflect the QB error H505.
- If the DNS settings on your system are not configured accordingly, you can face the QB error code H505.
Check Also- How to Resolve QuickBooks Error OL-301
Now that you know about the major causes of this problem, let’s jump to the following section to learn the initial steps to resolve it.
Things to Do Before Troubleshooting QB Error H505
There can be a scenario in which the QB installed on your device is creating the issue, and thus you are facing the QuickBooks h505 error. Thus check the below-given point once:
- Check if the QB Desktop application is installed on your system correctly.
- Also, check if the issue is that you have a full QuickBooks desktop version with database or license manager hosting only.
- It is also important to install the QB application on the server as, without it, you will not be able to use multi-user mode.
Once you have taken care of the above-mentioned points, you must ensure the below-given steps also. This will ensure that when you perform further steps to rectify the errors, you do not have to deal with any data damage or loss. These steps include:
- Making sure to back up your company file.
- Updating the latest version of QuickBooks Desktop.
- Initiating the QB Database Server Manager.
- Utilize the QuickBooks File Doctor tool.
- Configuring the firewall settings such that it does not obstruct the process.
You are now ready to troubleshoot this error code using various methods. Let’s scroll down to the subsequent section to learn how to do that.
Use 4 Proven Tricks to Overcome QuickBooks Error H505
To troubleshoot the QuickBooks Enterprise Error h505, you need to verify and check your hosting services. The misconfigured hosting services generally cause you to face this issue. So, let’s look at the solutions that you can perform to fix the error H505 in QuickBooks permanently.
1. Move the Company File to a New Folder & Access It
Sometimes, the folder having the company file may cause you to face the error H505. In such cases, you can shift its location to another folder and fix the issue.
- To start with, go to the company file folder on your system that is hosting the company file.
- Then copy the company file from that folder.
- Now, you need to create a new folder and paste the company file into it.
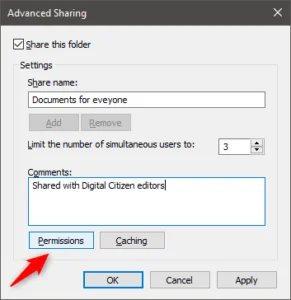
- After that, click right on the new folder and go to its Properties.
- Then, look for the Advanced Sharing option under the Share tab.
- There, you need to mark the Share This Folder checkbox and click on the Permissions button.
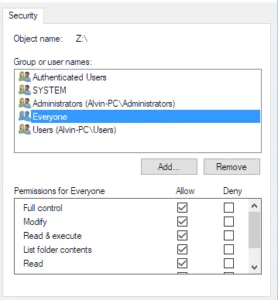
- Now, you need to give access to the folder by clicking on the Full Control checkbox for Everyone in the Group option.
- After that, you need to click Apply and OK.
- Once again, click Apply, followed by Ok, and then try to open the company file from the workstation.
2. Verify Hosting Settings & Enable QB Services
Step I: Verify the Hosting Settings
- Firstly, restart your QuickBooks desktop application on both servers.
- Then reopen the QB application on both the systems that are configured via multi-user mode.
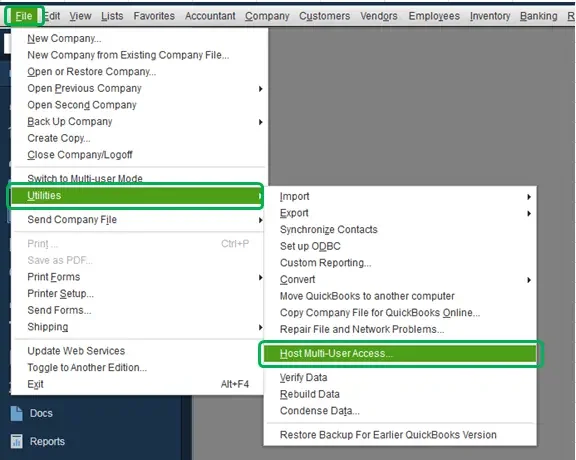
- After that, hit the File menu option and then opt for the Utilities option.
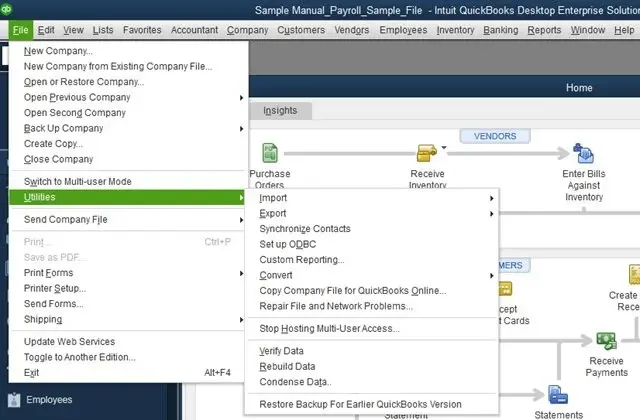
- Then click on the Discontinue or Stop hosting multi-user access configuration.
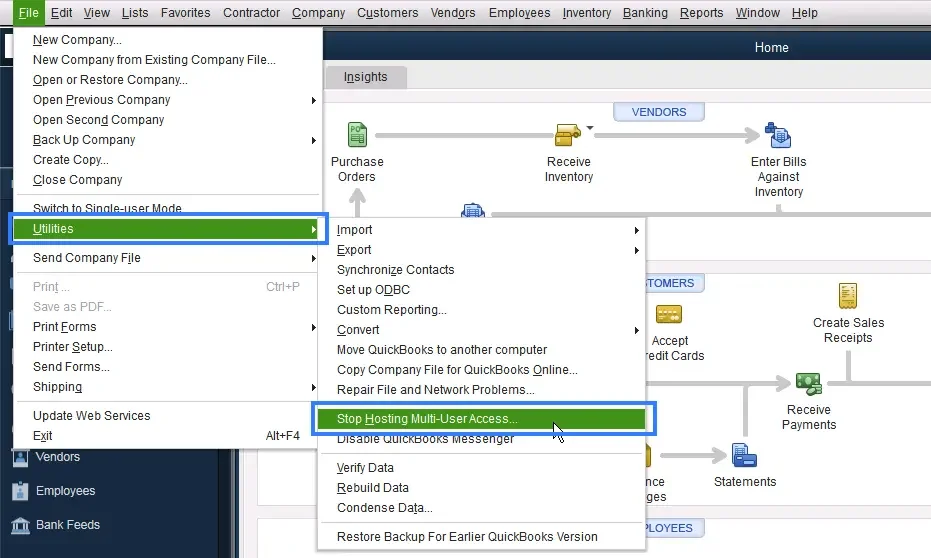
- Subsequently, go to the Utilities tab on the other computer and then click on the Host multi-user access or turn on hosting.
Step II: Enable QuickBooks Services
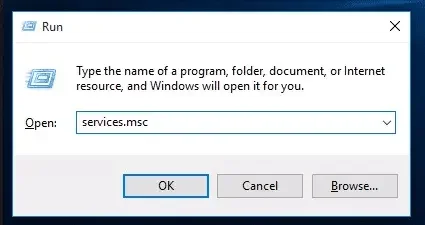
- Firstly, access the Run box by pressing the Win+ R keys.
- Then, type in the input Services.msc in the Windows search bar.
- Next, you need to scroll down and look for the QuickBooksDBXX service option in the services window.
- After that, you need to click twice on the QuickBooksDBXX service and make sure that the startup is set to Automatic.
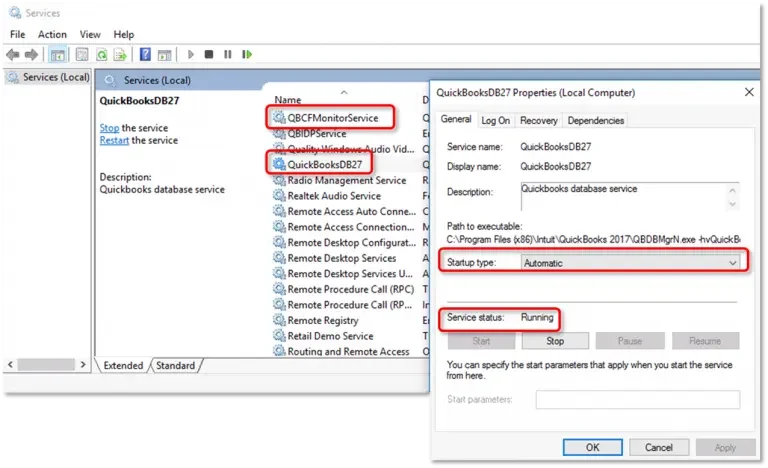
- After that, you need to hit on the Recovery tab.
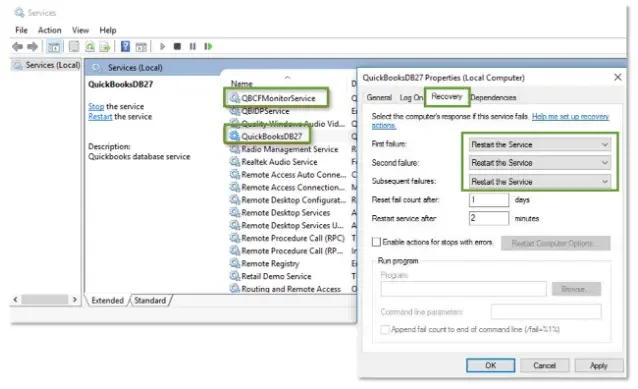
- Then, manually Restart your QuickBooksDBxx service. And in case it fails, repeat the same step.
- Then hit OK and save the changes.
- Now repeat the same process as mentioned above for the QBCFMonitorService also.
- Then proceed ahead and access QuickBooks in the multi-user mode on all of the affected systems.
- The last step involves you looking for the QuickBooksDBXX service. This service is a member of the administrator cluster and needs acceptable permissions.
- After the implementation of all the steps mentioned in the solution, relaunch the QuickBooks software.
3. Modify the Host File
This method involves a two-step procedure- first, finding the IP address of both the server and workstation and then editing the host file.
Step I: Find the IP address and Computer Name of the Server and Workstation
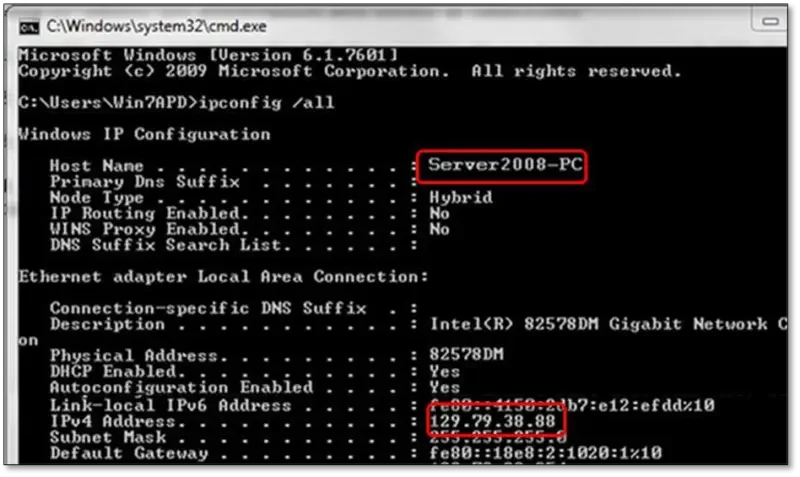
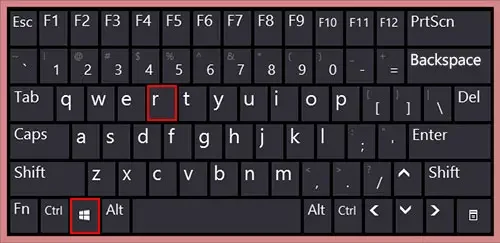
- In the beginning, press the Win + R keys in order to open the Run box.
- Then type in the Cmd and subsequently press on the Enter key to access the Command Prompt window.
- After that, type in the input ipconfig/all and hit Enter to run the command.
- Now, you need to search for the Host Name in the Windows IP Configuration section. You will find your server name on the right.
- Then, in the Next step, note down the Hostname and IP address somewhere. And repeat the same process for all the systems that have a multi-user setup.
Now, you need to head back to your workstation to test the server.
Note: These steps may be a bit technical for you, so we recommend you consult an expert for the same. Call +1-(855)-955-1942 to connect with a QuickBooks expert.
- So first, navigate to the Start menu of Windows from the workstation.
- Then, type in Run in the search and open the Run command by hitting the Enter key.
- Next, you have to type Ping [your server name] and hit the Enter key. (Do not include the brackets when you write your server name.)

- This step will send some data packets to the server, and if the server receives them all and there is no packet loss, this indicates there are no issues in the connection between the server and the workstation.
- Next, you need to follow the same procedure for all the workstations that are giving you the error code H505.
Step II: Edit the Windows Host File
- First, shut down the QuickBooks application and then move to the Start menu.
- Then move to this PC option and then navigate to the address: C:\Windows\Systems32\Drivers\Etc or C:\Windows\Syswow64\Drivers\Etc.
- If you are not able to find the Windows folder in the system. Then you can follow the steps to see the hidden files and folders.
- After that, click right to the View tab and hit on the Open with option, and open the same with notepad.
- Then you have to simultaneously fill in the IP Address and system name. (Make sure to hit the Tab key instead of the Space bar to put the spaces between the characters.)
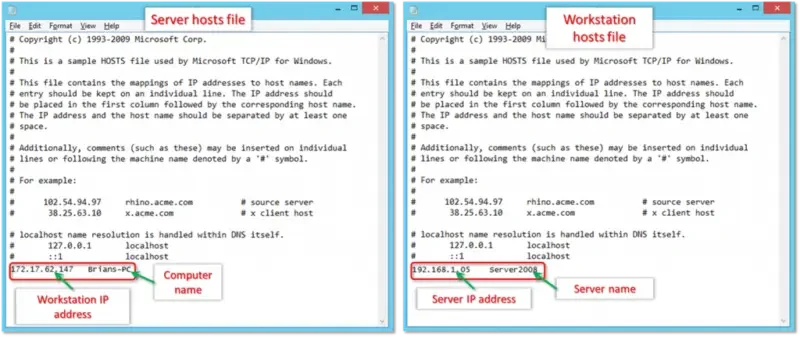
- Now the last step involves you to Save the changes and then Reopen the QuickBooks software in multi-user mode.
4. Reconfigure Windows Firewall Settings
The error H505 can be fixed by configuring the firewall and security settings for the QuickBooks desktop.
- First, start by opening the Run dialog box with the help of the Win + R keys on the keyboard.
- Once the Run command prompts up on the screen, use it to access the Control panel. For this, you just need to type the word Command in the Run box and hit Enter key.
- Then, in the control panel, you have to choose the System and Security option.
- After that, open the Windows Firewall and Network Protection.
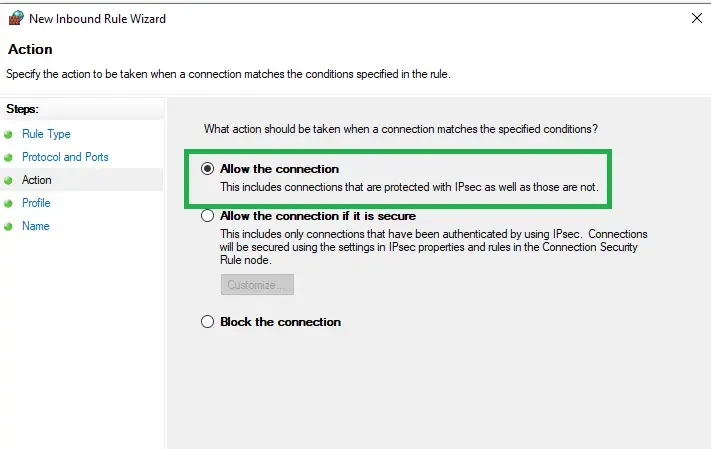
- Then, you need to hit the Advanced Settings option, then choose the Inbound rule. Afterward, create a new rule by hitting the New Rule option.
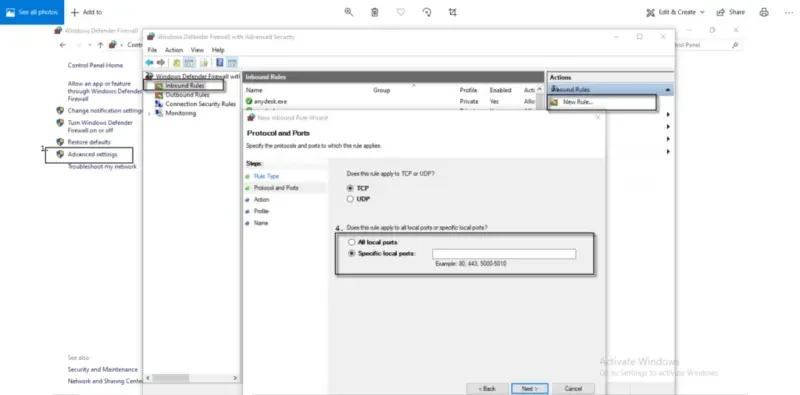
- Here, choose a port and then hit the Next button.
- After that, you need to double-check if you have chosen the Correct TCP Option.
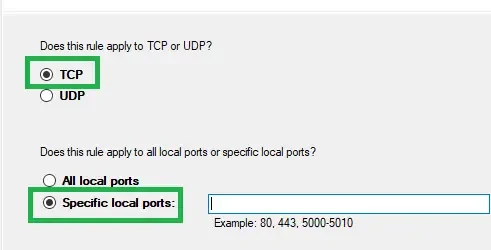
- Then, enter the Port belonging to your QB Desktop’s year version.

- Once you have entered the year code in the respective field, hit on Next and restart QuickBooks Desktop to culminate the process.
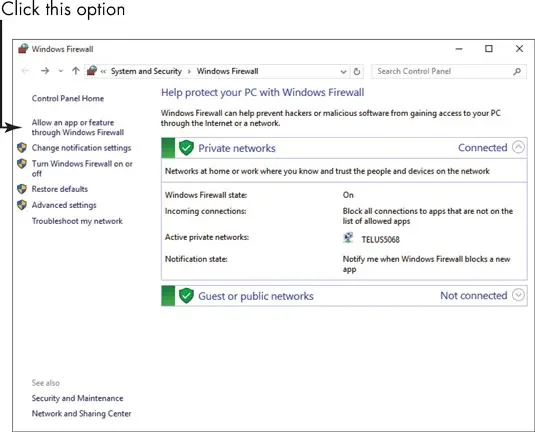
- Begin with the Windows key to head towards the Control panel.
- Then, click twice on the Control panel option and choose the Firewall settings.
- For the next step, opt for the Allow a program via the system’s firewall option.
- After you do that, select the Add program option, and include the QuickBooks 20xx to the exception list.
- Then, reboot the system and Save the changes.
Remember, the ports you need to add are according to the version of your QuickBooks software. These ports include
- QuickBooks Desktop 2015: 8019, 56725, 55363,55367
- QuickBooks Desktop 2016: 8019, 56726, 55368, 55372
- QuickBooks Desktop 2017: 8019, 56727, 55373, 55377
- QuickBooks Desktop 2018: 8019, 56728, 55378, 55382
- QuickBooks Desktop 2019: 8091, XXXX
- QuickBooks Desktop 2020: 8091, XXXX
Follow These Preventive Steps For Multi-User Errors in QB
To prevent multi-user mode errors in QB Desktop, you should do the following:
- Update Your QB Application: Ensure that you are running an updated version of QuickBooks on all systems connected to the network.
- Review User Access Permissions: Always check user access permissions to the company data saved on the server.
- Ensure Network Stability: Review your network bandwidth settings to ensure seamless connection between different computers.
- Regularly Backup Your Data: Ensure that you create & save backup company files on the server.
- Monitor System Hardware Configuration: Always review the computer hardware setup on your network.
- Update Your Security Apps: Consistently install updates of your security programs such as Windows Firewall & antivirus software.
Winding Up
In this comprehensive guide, we showed you how to eliminate QuickBooks error H505 using various methods. Hopefully, you can now effortlessly access your company files using multi-user mode. If, however, you continue to face difficulties or have a query, you should contact an experienced QB professional for real-time assistance.
Frequently Asked Questions
A. QuickBooks Error H505 appears when a user tries to access a company file on another computer, but QuickBooks can’t reach the server hosting the file. This usually means your multi-user setup is misconfigured, the hosting computer’s settings are blocking the connection, or necessary QuickBooks services aren’t running.
A. To fix Error H505, follow these steps:
a. Enable hosting only on the server (not on workstations).
b. Add the server IP and QuickBooks ports (8019, 56728, etc.) to the firewall exceptions.
c. Use the QuickBooks Database Server Manager to re-scan the company file folder.
d. Ensure QuickBooksDBXX and QBCFMonitorService are running on the server.
A. No, Error H505 doesn’t damage your data. It only blocks access to the company file from remote systems. However, prolonged connectivity issues may lead to productivity loss. Resolving it early ensures your workflow stays intact.
