When you connect bank account to QuickBooks Online, you can ensure efficient financial management in your business. This integration simplifies transactions, provides real-time insights, and ensures accurate bookkeeping. In this exhaustive guide, we will walk you through a step-by-step process to seamlessly add a bank account to QB Online (QBO).
Once you have linked your bank account (or credit card account) to QBO, you can seamlessly download & categorize transactions. The proper categorization of transactions is possible because you also need to connect the bank account to the Chart of Accounts. Moreover, you can easily add more bank (or credit card) accounts from the same financial institution. All of this is discussed in greater detail in the article.
Alright, then, let’s explore the blog to learn how to effortlessly add bank and credit card accounts to QuickBooks Online.
If you need immediate help to connect bank account to QuickBooks Online, you can dial +1-(855)-955-1942 to contact a QB professional.
Use These Steps to Connect Bank Account to QuickBooks Online
Here are the steps that you can implement when you want to connect bank account to QuickBooks Online. Ensure that you utilize these steps in the exact order as discussed below.
Step I: Connect Your Bank or Credit Card Account to QB Online
You can connect a fresh bank or credit card account to QBO & you can also add another account if your bank is already connected. Depending on your requirement, you can follow the processes detailed below.
Case A: Adding a Fresh Bank or Credit Card Account to QBO
Here are the points that explain how you can connect a new bank or credit card account to QB Online. Follow these points in the exact sequence shown below.
Note: The process to connect an American Express Business account to QBO is slightly different. You will find the required process later in this section.
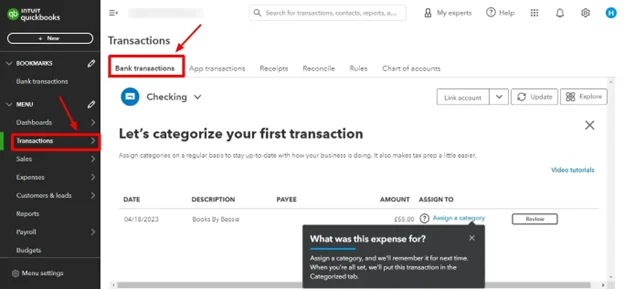
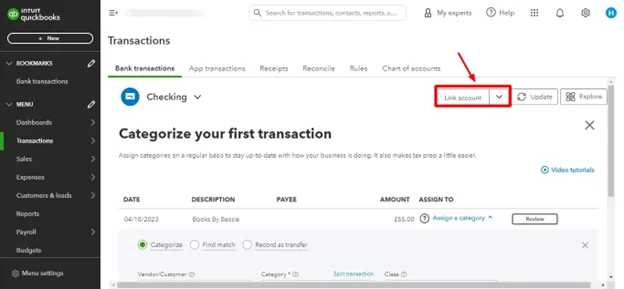
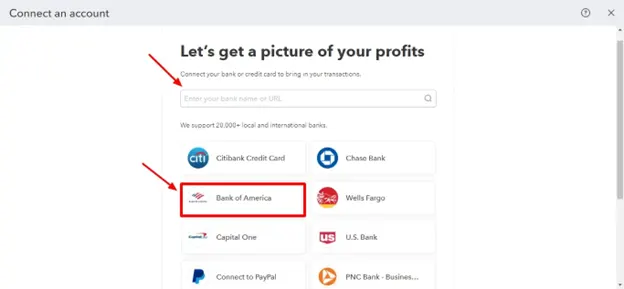
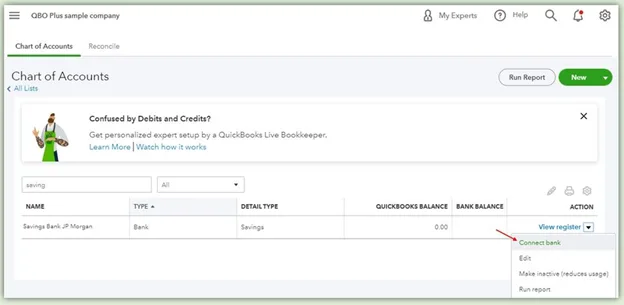
- Open your QBO account, and go to Transactions & select Bank Transactions.
- Click Link Account to begin. After that, in the Search field, enter your bank’s URL or name and select it from the list.
Note: If your bank isn’t listed, you can manually upload transactions.
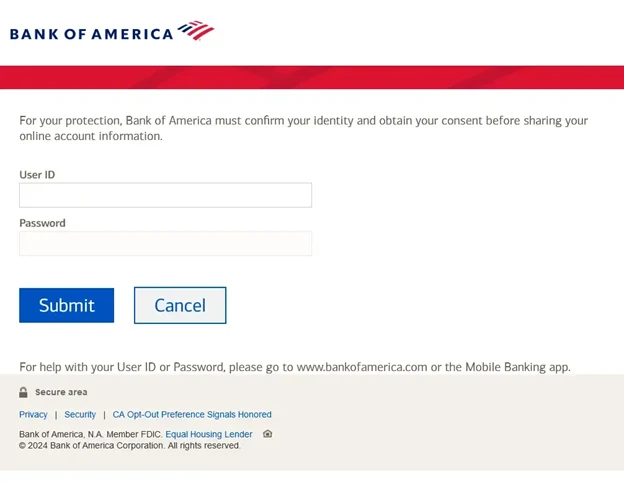
- Enter your username and password, then click Continue.
- Select the bank account you want to link.
- Choose the date range for transactions from the dropdown menu, then click Next.
Note: Some banks provide up to 90 days of transactions, while others offer data for up to 24 months.
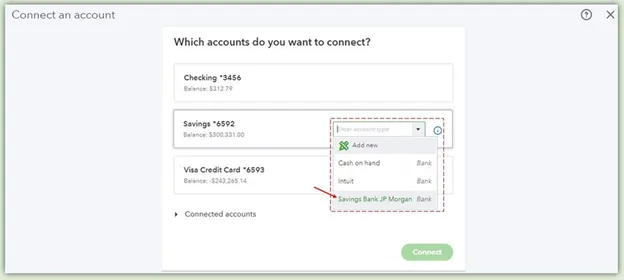
- From the Account type dropdown, choose the type that aligns with your Chart of Accounts in QuickBooks.
- If the correct account type isn’t available, select +Add new.
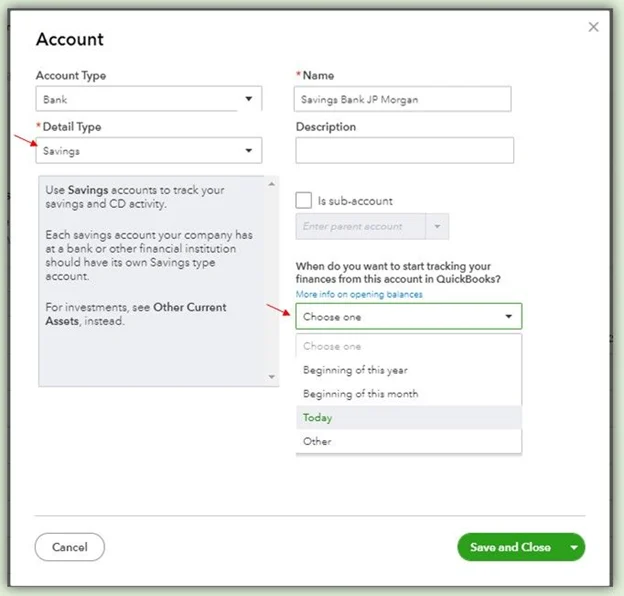
- For fresh bank accounts:
- From the Account Type ▼ dropdown, choose Bank.
- Under Detail Type, select either Savings or Checking.
- Enter a name for the account, then click Save and Close.
- For fresh credit card accounts:
- From the Account Type ▼ dropdown, choose Credit Card.
- Enter a name for the account, then click Save and Close.
- From the Existing Accounts ▼ dropdown, select the bank account to map, then click Next.
- Click Connect, then select Done.
Note: You can update the account name in the New account name field now or modify it later.
If you use an American Express Business account to manage your transactions, you can also connect it to QB Online. Let’s learn how to do that according to the process detailed below.
How to Connect Your American Express Business Account to QB Online
Here’s how you can seamlessly link your American Express Business account to QBO:
Step I: Create & Save an American Express Business Account in QBO
To create an American Express Business account in QBO, follow these points:
- Navigate to Settings ⚙️ and select Chart of Accounts
- Click New to add a new account.
- From the Account Type ▼ or Save account under ▼ dropdown, choose Credit Card or Deposit Account.
- Enter the name of the account. Once done, click Save and Close.
Step II: Link Your American Express Business Card to QBO
Here’s how you can successfully connect an American Express Business account to QBO:
- Go to Transactions, then select Bank Transactions.
- If this is your first time connecting to a bank account, click Connect on the landing page. Otherwise, select Link account if you’ve previously linked online banking accounts.
- In the search bar, enter the appropriate account based on your American Express user type:
- Primary account holder: Search for and select American Express Business Credit Card & Checking (US).
- Delegate user: Search for and select American Express (Delegate).
- Click Continue. After that, In the pop-up window, sign in using your American Express user ID and password. If additional security verification is required, follow the on-screen instructions.
- Choose the accounts you want to connect to QuickBooks.
- For each account, select the appropriate account type from the dropdown—this should match the account you created in your Chart of Accounts in Step I.
- Choose the date range for the transaction download.
- Click Connect to complete the setup.
It is also possible to add more bank or credit card accounts from the same financial institution to QBO if you have already linked your bank account. Let’s discover how to do that in detail below.
Case B: Linking Another Account If Your Bank is Already Connected
You can connect another account from the same financial institution to QBO if you have already linked your bank account according to the process detailed below:
- Navigate to Transactions, then select Bank Transactions.
- From the Link account ▼ dropdown, choose Manage Connections.
- Toggle on the switch for any additional accounts you want to connect.
Note: Manage connections display all accounts ever linked via bank feeds, and they cannot be removed.
- If the account isn’t listed, return to Transactions and select Link Account.
- Follow the steps to connect to a new bank or credit card account.
- For fresh bank accounts:
- From the Account Type ▼ dropdown, choose Bank.
- Under Detail Type, select either Savings or Checking.
- Enter a name for the account, then click Save and Close.
- For fresh credit card accounts:
- From the Account Type ▼ dropdown, choose Credit Card.
- Enter a name for the account, then click Save and Close.
- In the Existing Accounts ▼ dropdown, select the bank account to map, then click Next.
- Click Connect, then select Done.
Note: You can update the account name in the New account name field now or modify it later.
Now that you know about the procedure to connect your bank account to QBO, let’s discover how to download recent banking data as mentioned below.
Step II: Download Recent Banking Transactions in QBO
Here’s how you can automatically download banking data in QBO by refreshing your banking feed:
- Open your QB Online account & navigate to Transactions, then click Bank Transactions.
- Select Update & wait until all the banking data is successfully downloaded.
Once you have downloaded recent banking data, you might need to review & categorize it. This is essential if you want to ensure better management of your banking transactions. Let’s learn about that in the following step.
Also Read: How to Reconcile Bank Account in QBO & Desktop
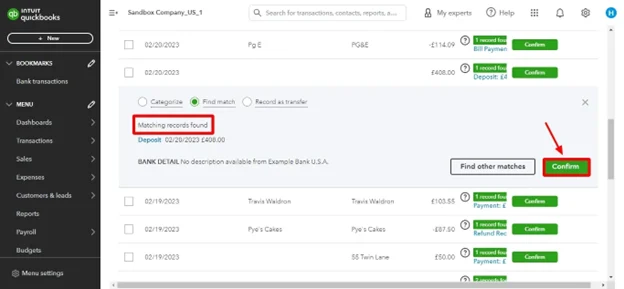
Step III: Review & Categorize Your Banking Data
The following points explain how you can check & categorize your banking data in QBO:
- Navigate to Transactions, then select Bank Transactions.

- Choose the account you want to review.
- Click on the For Review tab.
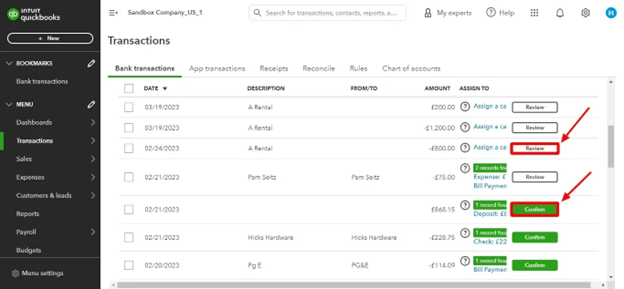
Note: QuickBooks automatically sends downloaded transactions to this tab and suggests categories for each one.
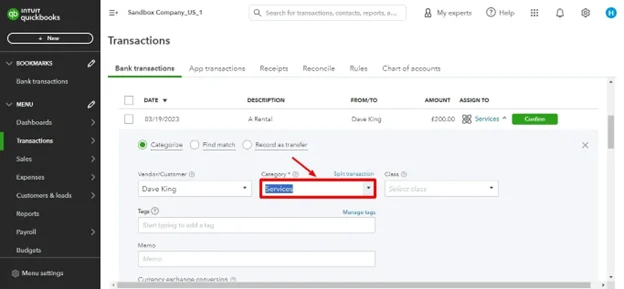
- Review each transaction individually.
- For transactions labeled “Add”:
- Click Add if the suggested category is correct.
- To change the category, select one from the dropdown or create a new one.
- For transactions labeled “Add”:
- For transactions labeled “Review”:
- Click Review, then choose a category or create a new one.
- Select Confirm to finalize.
Note: You can categorize income & expenses according to the tables depicted below:
(i) Income Categories
| Sales | Customer Payments | Refunds |
| Bank Loans Received | Money Invested | Fixed Assets Sold |
(ii) Expense Categories
| Office Supplies | Payroll | Meals |
| Fixed Assets | Taxes | Equity Transaction |
Finally, you can utilize banking transactions in QB Online for different projects easily & effectively.
Use These Essential Tips When Connecting Bank Account to QBO
- Here are some really helpful measures that you need to follow whenever you link your bank account to QB Online:
- Ensure Online Banking Access: Confirm that your bank allows connections to QuickBooks and that your login credentials are correct.
- Select the Correct Date Range: Some banks allow downloads of the last 90 days, while others provide up to 24 months of transactions.
- Review Account Mapping: Ensure that the connected bank account is properly mapped to an existing account in QuickBooks. You can delete the bank account & reconnect it, if required.
- Manually Upload Transactions: If your bank isn’t listed, you can manually import transactions using a CSV file.
- Check for Duplicate Transactions : If transactions are duplicated, review and undo bank data reconciliation.
- Use the Correct Bank Name: Search for your bank using its exact name or URL to avoid connection issues.
Wrapping Up
In this detailed article, we have discussed how you can connect bank account to QuickBooks Online. Hopefully, you can now easily connect, download, & utilize banking data in QBO. If, however, you want further guidance or have a query, you can contact a QB professional.
Frequently Asked Questions
A. To connect your bank account to QuickBooks Online, go to the Banking tab and click Link account. Search for your bank, enter your login credentials, and authorize the connection. QuickBooks will securely sync your recent transactions. For added safety:
a. Use multi-factor authentication if available.
b. Always log in via a secure network.
c. Avoid public Wi-Fi during setup.
Once connected, QuickBooks auto-imports transactions, saving time and reducing manual entry errors.
A. If your bank isn’t connecting to QuickBooks Online, try these steps:
a. Check bank website access: Make sure you can log in manually.
b. Verify credentials: Ensure your login info is correct.
c. Clear cache and cookies: Browser data may interrupt the connection.
d. Update browser or try a different one.
e. Wait and retry later: Some banks restrict access during updates.
If the issue persists, contact your bank or call QuickBooks Support at +1-(855)-955-1942 for real-time help.