
You may sometimes find that QuickBooks shipping manager not working or running into problems. It could be due to an outdated or corrupt version of QB, or when a firewall or antivirus program interferes with the task. Some users might see the following message on their screen:
| “Error: The Shipping Manager database is newer than the Shipping Manager on this PC.” |
| “DBISAM Engine Error # 11949 SQL parsing error” |
| Sometimes, when users try to ship via UPS within QB, they get this message: |
| “Error: [250002] Invalid Authentication Information.” |
Fortunately, there are proven methods to troubleshoot this error with the QuickBooks shipping manager. To know the solutions, continue reading this article. Troubleshooting this issue can be time-consuming and stressful. Try the solutions mentioned to resolve them. Talk to a QB Expert by dialing TFN if you have difficulty understanding the steps.
Problems You Might Face with QuickBooks Shipping Manager
You may face some issues when using Shipping Manager in QuickBooks Desktop Enterprise or other editions. For instance, you might find that the shipping manager would not send digital commercial invoices to UPS for international shipments after switching to UPS. This might still stay the case after you have enabled the option for “Account has Paperless Invoice Enabled”. The problem would force you to send commercial invoices by email after a day of shipping the international packages.
Similarly, when selecting “Ship/Send” on a customer invoice and choosing UPS or FedEx for international shipments in the drop-down to select “Ship FedEx Package”, the Shipping Manager may fail to open the shipping label. Rather, the Ship Rush dialog box (Shipping Label) is flashed in the taskbar. Some users have also faced difficulties with this issue and have to manually bring the shipping label to the front of the screen.
Why is QuickBooks Shipping Manager Not Working?
There can be many reasons why QuickBooks Shipping Manager is not working correctly. For instance, here are some potential factors that may lead to errors.
- QuickBooks Desktop is unable to locate the recent database.
- Trying to access the Shipping Manager from the POS client workstation.
- The program’s installation files or modules may be damaged.
- QuickBooks software is outdated.
- The firewall may block QuickBooks.
- The database may have been corrupted.
Possible Methods to Resolve QuickBooks Shipping Manager Not Working
When facing issues with the QuickBooks Shipping Manager not functioning, the following methods are provided to help resolve them and ensure smooth operation.
Step 1: Update the QB Desktop
When facing this problem, the first vital step is to update the QB application. Furthermore, update QuickBooks Desktop and restart the system once it’s done.
If you still face the same issue after you have completed this method, then move on to the next step.
Step 2: Launch Quick Fix My Program
Open the QB Desktop and launch Quick Fix My Program to proceed to the next step. To run Quick Fix my Program, you must download and install QuickBooks Tool Hub on your system.
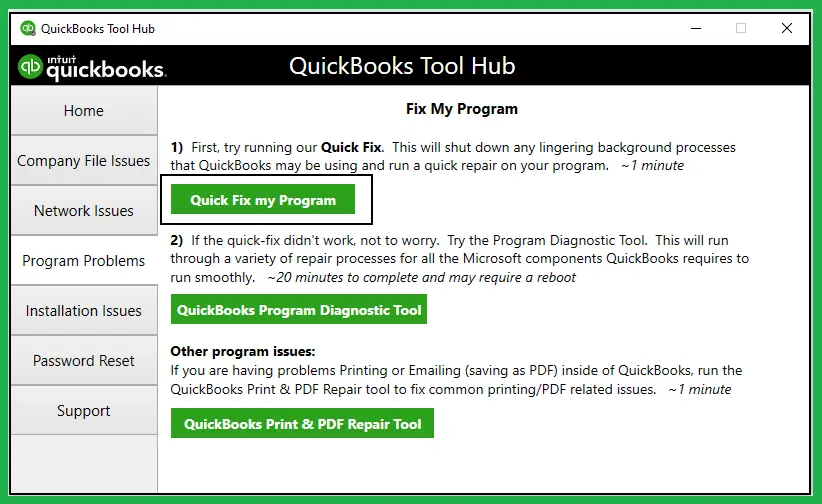
- First, head to the Program Problems section in the QB Tool Hub tab.
- Click on ‘Quick Fix My Program’.
- Lastly, run the QuickBooks Desktop and sign in to the company file.
If running QB File Doctor didn’t fix your problem, then proceed with the next step.
Step 3: Repair the QuickBooks Installation
This problem can also arise if the issue is with installing the QuickBooks Desktop. Here are the steps to resolve this issue.
- First, run the QB Tool Hub and head to the Installation Issues tab.
- Choose QuickBooks Install Diagnostic Tool. The tool will run for 20 minutes.
- Then, restart the system after the tool is done processing.
- Lastly, rerun the QB and access the company file.
This step should resolve the installation problem. If the issue still remains the same, then proceed with the next step.
Step 4: Register the ShipRush OCX File
For instance, registering the ShipRush OCX file can help resolve the problems associated with this error. Here are the steps to register.
- Initially, launch the Windows Start menu and head over to All Programs.
- Then, choose Run as Administrator after right-clicking on the Command Prompt.
- Type CD c:\Windows\syswow64 in the command prompt.
- Now to register the file, search for regsvr32.exe “c:\Program Files (x86)\Common Files\Intuit\ShippingManager\ZRush_ShipRush9_QB.ocx”.
- Hit OK.
Once completed, restart the system and set up the Shipping Manager.
Step 5: Rename the Shipping Manager Folders
Shipping Manager Folders can be renamed to fix this error. Here are the steps to do so.
- Launch the File Explorer by hitting Windows + E on the keyboard.
- Locate the following locations:
- C:\Program Files (x86)\CommonFiles\Intuit\ShippingManager
- C:\Users[WindowsUserName]\AppData\Roaming\Intuit\ShippingManager
- Right-click on the folder and include the .old extension in the new name to rename the folder.
- Restart the system.
After doing the steps, restart the shipping manager.
Step 6: Recreate Shipping Manager Account
When the account is damaged, the Shipping Manager database is not working because of the Shipping Manager. Here are the steps to resolve this issue.
- Tap on the File menu and select Shipping.
- Then go to Shipping Options > Settings.
- Choose Delete Account.
Once the account is deleted, create a new account.
- First, launch the QB Desktop and sign in to the company file.
- Select the File menu.
- Head over to Shipping and choose Ship UPS Package.
- Input the account information.
- Then check the End User License Agreement and choose I Agree to the terms and conditions.
- Click on Next.
- Check and verify the printer settings.
- Lastly, click on Next and then Finish.
Step 7: Check and Rebuild Data File
The QuickBooks Shipping Manager Not Working issue can arise when the company file is damaged, so let’s check and rebuild it.
- Head over to the File menu.
- Click on Utilities.
- Select Verify Data.
Now, to rebuild the company.
- Head over to the File menu.
- Click on Utilities.
- Select Rebuild Data.
Lastly, verify the company file again to check if it has any additional damage.
- Head over to the File menu.
- Click on Utilities.
- Select Verify Data.
Step 8: Reinstall QuickBooks Point of Sale (POS)
Try to reinstall the POS if this error occurs. Follow these steps.
- Launch the Windows Start menu and look for the Control Panel.
- Under the Control Panel, head over to Programs and Features.
- Then choose the QuickBooks POS to uninstall by right-clicking and selecting Uninstall.
- Follow the on-screen instructions to uninstall the QuickBooks POS.
- After that, reinstall QuickBooks Point of Sale.
- Launch QB Desktop and head over to the File menu.
- Click on the Preferences > Company.
- Under the Sales menu, select Shipping.
- After that, uncheck the box to access QuickBooks Shipping Manager.
- Hit Save.
- Now, reopen File > Preferences > Company and then Shipping.
- Choose the checkbox to access the QB Shipping Manager.
- Access the Point of Sale menu and select Shipping Manager settings.
- Finally, input the details for the Shipping Manager account.
QuickBooks Access Violation Error Within Shipping Module
Sometimes, users may face an access violation error when they try to access the shipping module to create a UPS shipment. Here is a guide to using QuickBooks in multi-user mode.
- Firstly, Launch QB Desktop on the main computer and head to the Help tab.
- Then, Select Audit QuickBooks.
- Look at the User License in the green window. If it has a value of two or more, the QuickBooks license is limited to two users.
- Write the License number and leave QuickBooks open.
In case your multi-user mode is not working, then check out the guide on this error.
Now, on the host computer, follow these steps:
- Head to Shipping Manager Settings > Connection Settings, then choose the “Connect via Network” box. Ensure the Shipping Manager database’s location is “C:\Documents and Settings\All Users\Documents\Shipping Manager v4\Database.v4”
- Now, locate the company file’s directory. By default, it’s at “C:\Documents and Settings\All Users\Documents\Intuit\QuickBooks\Company Files”.
- Exit the QB Desktop on both the main computer and the workstation, and open the location for the Shipping Manager folder. Then head over to the default location “C:\Documents and Settings\All Users\Documents\”
- Then, copy the Shipping Manager v4 folder “C:\Documents and Settings\All Users\Documents\Intuit\QuickBooks\Company Files”
- Quit the QB Desktop on the system and locate the Shipping Manager folder by going to “C:\Documents and Settings\All Users\Documents\”
- Copy the Shipping Manager v4 folder and go to the company file folder at “C:\Documents and Settings\All Users\Documents\Intuit\QuickBooks\Company Files”
- Then, paste the Shipping Manager Settings v4 in the company file folder and open QuickBooks Desktop. After that, look for “Shipping Manager Settings > Connection Settings > Connect Via Network”
- Locate “C:\Documents and Settings\All Users\Documents\Intuit\QuickBooks\Company Files\Shipping Manager v4\Database.v4\”
- Click OK and save. Then, return to the QuickBooks home screen and close the application. Afterwards, access the QuickBooks workstation.
- Head to “Shipping Manager Settings>>Connection Settings>>Connect Via Network”. Now, on the location enter “\[host computer name or ip address]\SharedDocs\Intuit\QuickBooks\Company Files\Shipping Manager v4\Database.v4\”
- Hit OK and Save, and lastly, head back to the QB homescreen.
Now, verify if the Shipping Manager is still not working and causing you trouble.
Conclusion
In summary, we understand why the QuickBooks Shipping Manager not working issue arises and how we can resolve it. Additionally, we determined other methods in case one solution does not fix this error, and it still hinders QB Shipping Manager. If you still face this error and have trouble resolving it, feel free to talk to a QB Expert available 24/7. Dial +1(855)-738-0359.
Frequently Asked Questions
There are simple steps to follow to prevent this error from occurring. Ensure the following for the future.
1. Firstly, ensure that all drivers and the operating system are up to date.
2. Allow necessary permissions and system configuration for QB Desktop.
3. Lastly, allow QuickBooks actions in your antivirus and firewall configuration settings.
Although there are multiple ways to address this problem, the following are some potential solutions.
1. Reinstall QuickBooks Point of Sale (POS): Although reinstalling and verifying the POS can help prevent the error from happening.
2. Check and Rebuild Data File: Verifying and rebuilding the data file can ensure its security and help determine whether the error lies within the file itself.
3. Recreate Shipping Manager Account: If the existing account has an error, creating a new account can be helpful.
4. Rename the Shipping Manager Folders: Adding the extension. Older versions of the folder names can help recreate the folders and solve this error.
5. Register the ShipRush OCX File: Registering the ShipRush OCX file can help fix this standard error.