When connecting a web-based application to QuickBooks Desktop via the Web Connector, various errors may occur at different stages. One of the most common errors is QBWC1039 in the QuickBooks Web Connector, often accompanied by one of the following messages:
| “QBWC1039: This application does not have permission to access the QuickBooks company data file.” |
| “QBWC1039: If the QuickBooks company data file is not open.” |
Multiple error messages may appear on your screen, indicating internal technical issues that disrupt the connection between web-based applications and QuickBooks Desktop on your computer.
The comforting fact is that there are several tried and tested ways to troubleshoot this problem. Alright, then, let’s delve into this article to uncover the factors triggering this error and explore effective solutions.
If you want instant assistance to troubleshoot QuickBooks Web Connector error QBWC1039, dial +1-(855)-955-1942 to contact a QB professional.
Learn More About Web Connector Error QBWC1039 in QuickBooks
QuickBooks Web Connector is a widely used Microsoft application that enables you to link third-party web-based applications with QuickBooks Desktop. It allows for the transfer of data, such as sales orders, customer information, and inventory updates, between online systems and your QuickBooks Desktop company file. However, problems may occasionally disrupt this connection. One such issue is QuickBooks Web Connector error QBWC1039.
This error code can appear with different messages at various times. Below are some of the most common error messages you may encounter on your screen:
Key factors contributing to this issue include insufficient permissions to access the data file and attempting to add an app that is already connected to QuickBooks. Let’s explore all the possible causes in the next section.
Why Do You Get QBWC1039 Error in QuickBooks Web Connector?
Here are the points that detail various prominent causes of QuickBooks Web Connector error QBWC1039:
- The Web Connector might not be configured to operate when QuickBooks Desktop is closed.
- You might have renamed the QuickBooks company file, or you might lack admin access to the third-party web-based app.
- The improper removal of the third-party app or Warehouse Manager from Web Connector can trigger this issue.
- You might be attempting to reconnect a web-based app that has already been added to QuickBooks via Web Connector.
- You might be using an outdated version of QuickBooks Desktop or Web Connector on the computer.
- The QuickBooks company file and Web Connector application might be stored in different locations.
- Any incompatibility between the QuickBooks company file and the third-party web-based application can trigger various internal issues.
Now that you are aware of the fundamental reasons behind this problem, let’s scroll down to the following section to discover how you can fix it.
Fixing QuickBooks Web Connector Error QBWC1039
Before proceeding with any troubleshooting steps, ensure that you have installed the latest QuickBooks Desktop updates. Additionally, download and install the most recent version of Web Connector using the links provided in the table below.
| QuickBooks Desktop Edition | QB Web Connector Edition |
| QB Desktop 2024 | Web Connector Edition 34.0.10010.76 |
| QB Desktop 2023 | Web Connector Edition 33.0.10015.91 |
| QB Desktop 2022 | Web Connector Edition 32.0.10018.93 |
| QB Desktop 2021 | Web Connector Edition 31.0.10015.29 |
Note: You must always install the Web Connector edition that matches the latest version of QB Desktop on your system. For instance, if you have QB Desktop 2023 and 2024 installed, you should install the 2024 Web Connector edition.
As you already know, the Web Connector QBWC1039 error code can appear with various messages on the system screen. Therefore, you should utilize the appropriate troubleshooting method based on the specific error message, as outlined below.
1. QBWC1039: Error Connecting to QuickBooks
This error message may occur if the Web Connector and the QB company file are stored in different folders. To resolve this, move your company file to the Web Connector folder by following these steps:
- Open the Start menu and carefully type File Explorer in the search bar.
- Locate and click the File Explorer icon to launch the window. Then, click the search box at the top of the window under the title This PC.
- Type *qbw in the search box to locate the QB company file. Once found, open its folder and right-click the company file icon.
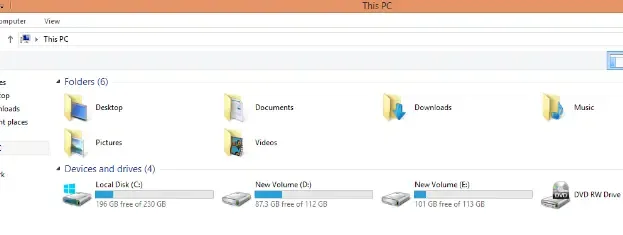
- Select Copy, then navigate to the Web Connector folder.
- Right-click within the empty space inside the Web Connector folder and select Paste to move the company file.
- Finally, you should use the Web Connector to link all web-based applications to QB Desktop.
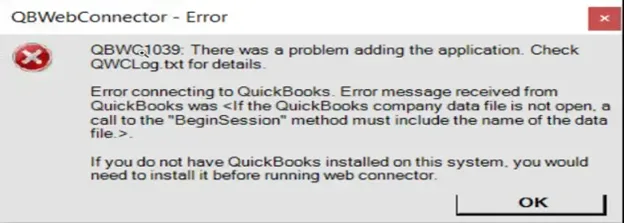
2. QBWC1039: If the QuickBooks Company Data File is Not Open….
| “QBWC1039: If the QuickBooks company data file is not open, a call to the “Begin Session” method must include the name of the data file.” |
This error message may occur if you have renamed the company file, moved it to a different location, or haven’t granted permission for the Web Connector to function when QB is closed.
Let’s troubleshoot the issue based on different scenarios:
Case I: You Have Renamed the Company File or Changed its Location
You can implement the steps detailed below depending on whether you have renamed the data file or changed its current location.
Situation A: You Have Renamed the Company File
If you have changed the company file’s name, revert it to its original name by following these steps:
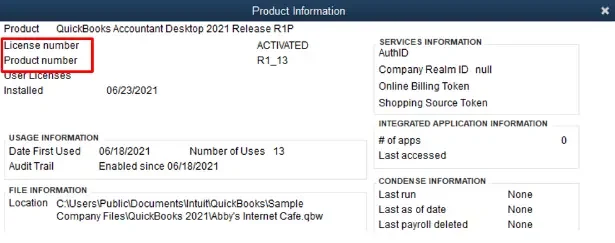
- Open the QB window and press the F2 key to bring up the Product Information window.
- Locate the company file path under the File Information section and make a note of it.
- Open File Explorer and navigate to the company file folder.
- Right-click the .qbw (company file) icon and select Rename.
- Change the file name back to its original name and press Enter.
- Once done, use the Web Connector to connect web-based applications to QB.
Situation B: You Have Changed the Location of the Company File
If you have moved the company file to a different location, create a backup and restore it to its original location by following these steps:
- Open the QB window and navigate to the File menu, then select Back Up Company.
- Click Create Local Backup and choose the Local Backup option in the new window.
- Under Local Backup Only, click Browse to select the folder where you want to save the backup file.
- Click OK, then select Save it Now and click Next to create the backup file.
- Return to the File menu and choose Open or Restore Company.
- Select Restore a backup copy and click Next.
- Choose Local Backup and click Next, then select the recently created .QBB backup file.
- Choose the original folder where you want to restore the company file and click Open.
- Finally, click Save to restore the company file to its original location.
Case II: The Web Connector Does Not Function When QB Desktop is Closed
Follow these steps to ensure the Web Connector remains functional even when QB isn’t running:
- Open QB in admin mode. If QB Desktop is in multi-user mode, go to the File menu and select Switch to Single-User Mode.
- Click the Edit menu and navigate to the Preferences tab.
- Select Integrated Applications, then click Company Preferences.
- Choose the application you want to add and click Properties.
- Mark the Allow this application to log in automatically checkbox.
- In the authorization window, click Yes and sign in using the appropriate user credentials.
- Finally, click OK to save the changes.
3. QBWC1039: There Was a Problem Adding the Application…
| “QBWC1039: There was a problem adding the application. Check QWCLog.txt for details.” |
This error message may appear if you have renamed the company file or moved it to a different location. Additionally, using an outdated version of QB Desktop can also trigger this issue.
To fix this, you can do the following:
- If you have changed the company file’s name or location, restore its original name and location by following the steps outlined in the previous troubleshooting method.
- Ensure you install the latest QB Desktop updates to resolve the error.
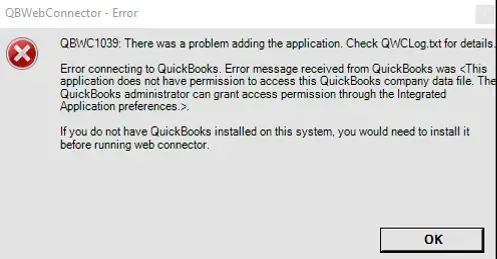
4. QBWC1039: This Application Does Not Have Permission to Access the QuickBooks Company Data File…
This error message may appear if the QB Desktop admin has not granted permission to access the third-party application. To resolve this issue, you need to follow these steps:
- Log in to the QB application using admin credentials. If needed, obtain them from your QB admin.
- If QB Desktop is in multi-user mode, go to the File menu and select Switch to Single-User Mode.
- Open the Edit menu, click Preferences, and select Integrated Applications.
- Navigate to the Company Preferences tab and uncheck the Don’t allow any applications to access this company file option.
- In the SDK App Authorization window, click Yes.
- Check the box for the third-party application and click OK to complete the process.
5. QBWC1039: This Application Has Not Accessed This QuickBooks Company Data File Before
This error message may appear if the QWC file was added to the Web Connector without using an admin account. To resolve this issue, you must follow these steps:
- Launch QB Desktop in admin mode and ensure it is running in single-user mode.
- Open QB Web Connector and select Add an Application.
- Locate and select the QWC file, then click OK to add it to QB Web Connector
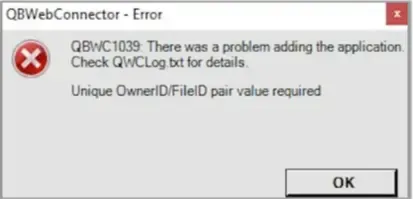
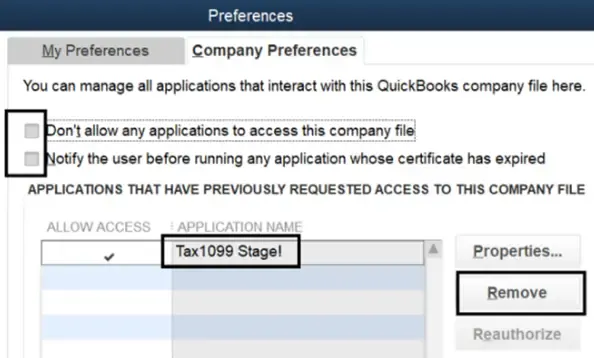
6. QBWC1039: Unique OwnerID/FileID Pair Value Required
This error message occurs when you attempt to add an app that is already connected to QB Desktop. To resolve this issue, you should follow these steps:
- Open QuickBooks and download the CP3 tool.
- Click Open, then use the Select File option to locate the relevant QWC file.
- The QWC file will be transferred to the Enter QBWC file location section—click Open.
- Select Remove Stamp and confirm by clicking Yes in the QuickBooks Application Certificate window.
- Click Continue, then select Done in the Access Confirmation window.
- Follow the on-screen instructions and click OK to remove the Owner ID.
- Click OK, then open QB Desktop and QB Web Connector.
- In QB Desktop, go to the File menu, and select Manage Web Apps under App Management.
- Click Set Up, then select Connect to QuickBooks on the app’s website.
- Finally, click Done in the confirmation window to complete the process.
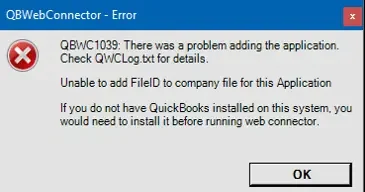
7. QBWC1039: Unable to Add FileID to Company File For This Application
This error message may appear if you have attempted to add an app to the Web Connector multiple times. A web-based app should only be added once in a specific location. To resolve this issue, you must reinstall the Web Connector by following these steps:
Step I: Uninstall the Web Connector From Your System
You can remove the Web Connector by following these points:
- Press Windows + R to open the Run window.
- Type Control Panel and click OK.
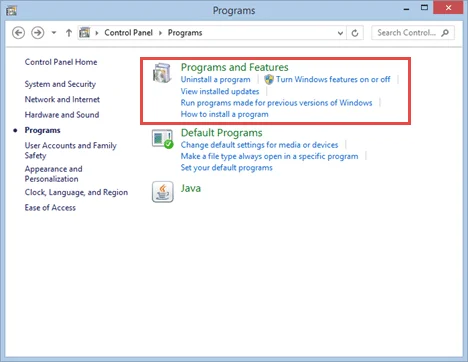
- In the Control Panel window, go to Uninstall a Program.
- Locate the Web Connector, right-click it, and select Uninstall.
- Follow the on-screen prompts to complete the uninstallation process.
Note: If the Web Connector is not listed in the Control Panel, manually delete its folder from the following locations:
- C:\Program Files (x86)\Common Files\Intuit\QuickBooks\
- C:\Program Files\Common Files\Intuit\QuickBooks\
Step II: Install QB Web Connector On Your Computer
To install QB Web Connector, you can do the following:
- Close QuickBooks Desktop on your computer and download the latest QuickBooks Web Connector version from the Intuit website.
- Right-click the downloaded file (QBWebConnector2_R30_xxxxx.zip) and select Extract All.
- Open the extracted folder, then right-click the installation file (QBWebConnectorInstaller.exe).
- Select Run as Administrator and follow the on-screen prompts to complete the installation.
- Check the box for Allow devices to make changes to your computer, then click Next.
- In the License Agreement section, check I accept the terms in the license agreement.
- Click Next, then select Install in the Ready to Install Program window.
- Once the installation is complete, click Finish.
Finally, you can seamlessly use the Web Connector to connect the relevant web-based app to QuickBooks Desktop on your system.
Follow These Key Tips to Prevent QB Web Connector Errors
To prevent QB Web Connector errors, you can do the following:
- Keep QuickBooks and Web Connector Updated: Regularly update QuickBooks Desktop and Web Connector to ensure compatibility and bug fixes.
- Use a Stable Internet Connection: A reliable and fast internet connection helps prevent connectivity issues between QuickBooks and third-party apps.
- Run QuickBooks as an Administrator: Launch QuickBooks with admin privileges to avoid permission-related errors in Web Connector.
- Ensure Correct File Locations: Keep the company file and Web Connector in the same folder to prevent file path errors.
- Limit App Installations: Avoid adding the same application multiple times in Web Connector to prevent duplication errors.
- Check Firewall and Antivirus Settings: Configure firewall and antivirus settings to allow Web Connector access without restrictions.
Wrapping Up
In this comprehensive guide, we showed you how you can seamlessly fix the QuickBooks Web Connector error QBWC1039 using various tactics. Hopefully, you can now effortlessly connect any web-based app to QB Desktop through the Web Connector application. If, however, you continue to experience different problems or have a query, you can reach out to a QB professional for real-time guidance.
Frequently Asked Questions
Here’s why you might get QuickBooks Web Connector error QBWC1039:
1. Company File Renamed or Moved: If the company file’s name is changed or moved to a different folder, the Web Connector may fail to locate it.
2. Web Connector and Company File in Separate Folders: When the company file and Web Connector are stored in different directories, connectivity issues can arise.
3. Insufficient User Permissions: If the QuickBooks admin has not granted access to third-party applications, the Web Connector may not function properly.
4. Outdated QuickBooks Desktop Version: Running an outdated QuickBooks version can lead to compatibility issues with Web Connector.
5. QWC File Added Without Admin Privileges: If the QWC file is added to Web Connector without administrator rights, errors may occur.
6. Duplicate App Addition: Trying to add the same third-party app multiple times in Web Connector can trigger this error.
To resolve QuickBooks Web Connector error QBWC1039, you can do the following:
1. Check Company File Location: Ensure the QuickBooks company file is in the correct location specified in the application’s configuration.
2. Check Admin Access: Run QuickBooks as an administrator to grant necessary permissions for Web Connector.
3. Verify Web Connector Version: Ensure you are using the latest version of QuickBooks Web Connector to avoid compatibility issues.
4. Remove and Re-add Application: Delete the third-party application from Web Connector and re-add it with a fresh ‘.QWC’ file.
5. Restart QuickBooks and Web Connector: Close and reopen QuickBooks and Web Connector to refresh the connection.
6. Reinstall QuickBooks Web Connector: If issues persist, uninstall and reinstall QuickBooks Web Connector to reset any corrupted settings.
Yes, security programs on the system might restrict the seamless operation of QB Web Connector. This is because various security apps might improperly detect QB Web Connector files as a threat to system security. Eventually, you might encounter several problems, such as QB Web Connector QBWC1085 error, on the system. To overcome these issues, you can temporarily switch off these security apps on your computer.