Have trouble opening the company files in multi-user mode? Or are you just not able to open the QuickBooks applications? QuickBooks Error 6175 0 is one such error that leads to such frustrating circumstances. It’s a multi-user mode error that doesn’t let you host your company files but allows you to access them in single-user mode. In some instances, when you try fixing error 6175 0, it may lead to other errors, such as H101, H303, or H505, or you might end up getting the “QBDBMgrN not running on this computer” error message, which is an entirely different error. We understand how intimidating dealing with this company file error is. However, you need not worry, as we have come up with some quick and effective hacks to troubleshoot this error that you will find further in this article.
Errors that completely restrict access to the company file directly hamper business productivity. If your business is also suffering because of errors and issues in QuickBooks, you can reach out to the support team for instant help at +1-(855)-955-1942.
What is QuickBooks Error 6175 0?
The QuickBooks error code 6175 usually appears on your screen when you try to access the company file on the local server. It occurs when the QB Database Server Manager does not respond properly. This error code may also appear if you have hosted the QuickBooks company file in the multi-user access. The error message that appears on the screen for this error says, “ QuickBooks is trying to access the company file, but the database server is not responding. Error: -6175,0 – We’re sorry, but QuickBooks Can’t open your company file.”

What are the Reasons Behind the Occurrence of QuickBooks Error Code 6175 0?
Out of many reasons, we have listed a few common ones that disrupt the multi-user mode in QBDT by triggering QuickBooks company file error 6175 0:
- QuickBooks is not installed on the server.
- One possible situation is when the hosting settings are not correctly configured.
- When a firewall or antivirus software does not allow communication between users’ computers.
- The database server manager is unable to access the company file.
- Windows file permissions are not correctly set.
Implement These Solutions to Overcome QuickBooks Company File Error 6175 0
Although QuickBooks Desktop error 6175 0 is a complex one to deal with, you can resolve it with the right guidance. Here are a few effective troubleshooting solutions for you to implement.
Solution 1: Verifying the Hosting Settings on the Server Computer and the Workstations
Verifying the Hosting Settings on both the server computer and workstations is key in fixing QuickBooks error 6175 0. Let’s learn how to verify and configure them one by one.
Step 1: Check the Hosting Setup on Workstations
The first thing to remember is that one or more of the workstations can be set as the server to host your company files mistakenly. Another key point is that your server should be the only computer set to host the company file for the proper functioning of the multi-user mode. You must ensure that the Host Multi-User Access option is displayed on each workstation. Let’s start by verifying the hosting configuration on the workstations one by one:
- Open the QuickBooks application on any workstation where you are getting error code 6175 0.
- Go to the File menu in your QB program and then select the Utilities option.
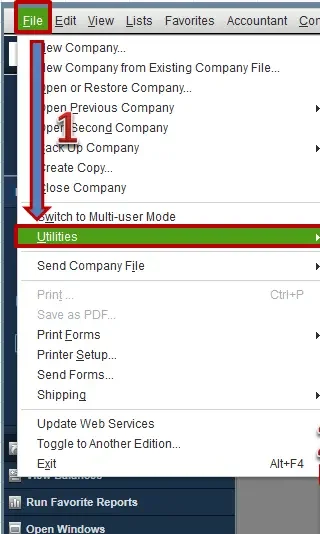
- If you are able to see the Stop Hosting Multi-User Access option on the screen, select it. However,
- if you see the Host Multi-User Access option, don’t select it.
- Now, follow these steps on all workstations where you see error -6175,0
Step 2: Try Scanning Your Folders That Hold Your Company Files
- Open the Windows Start menu on the server computer.
- Type “Database” into the search and then open QuickBooks Database Server Manager on the system.
- The next step is to go to the Scan Folders tab.
- Choose the Browse option. The next step is to select the folders that hold your company files (QBW).
- Hit the OK option when you’re finished.
Related Post: QuickBooks Multi User Mode Not working
Step 3: Check the Hosting Configuration on the Server System
Now that you have the hosting configuration on all the workstations, it’s time to move on to your server computer and reconfigure the hosting settings if required.
- Open the QuickBooks application to begin with.
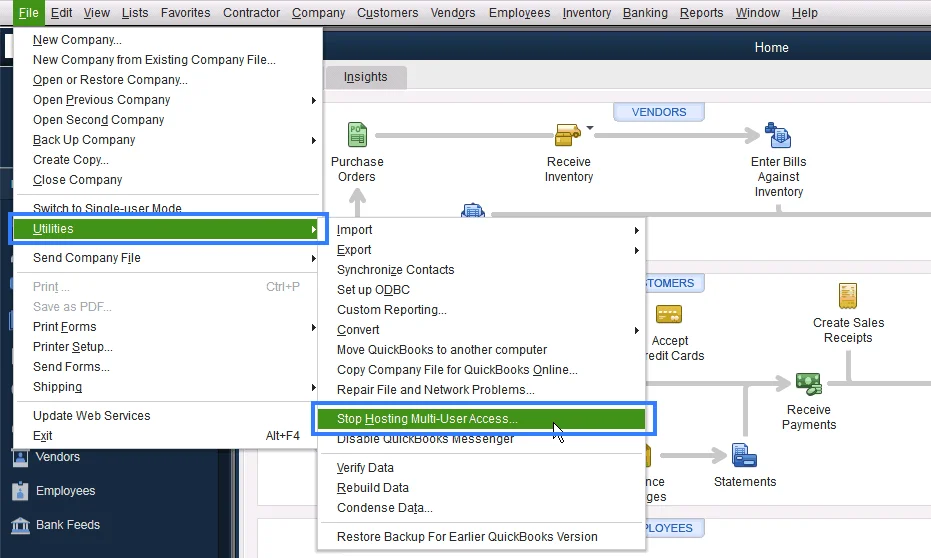
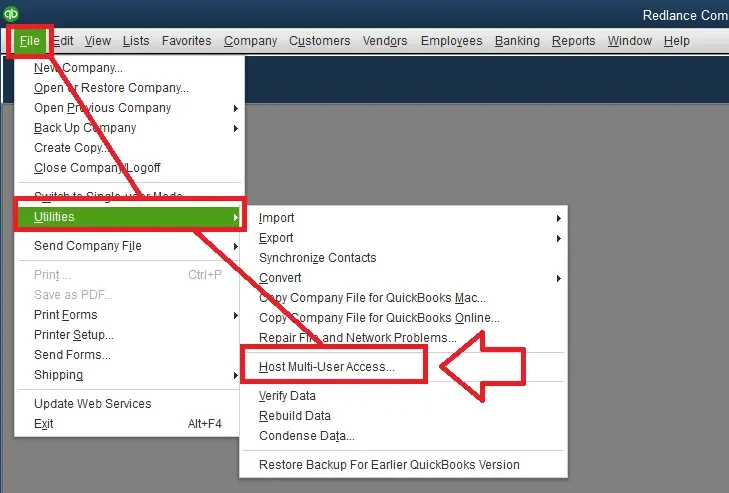
- Go to the File menu, and then opt for the Utilities option.
- If the Host Multi-User Access option is displayed on the screen, select it. Then, repeat this process and select the Stop Hosting Multi-User Access option. It will reset multi-user mode on the server computer.
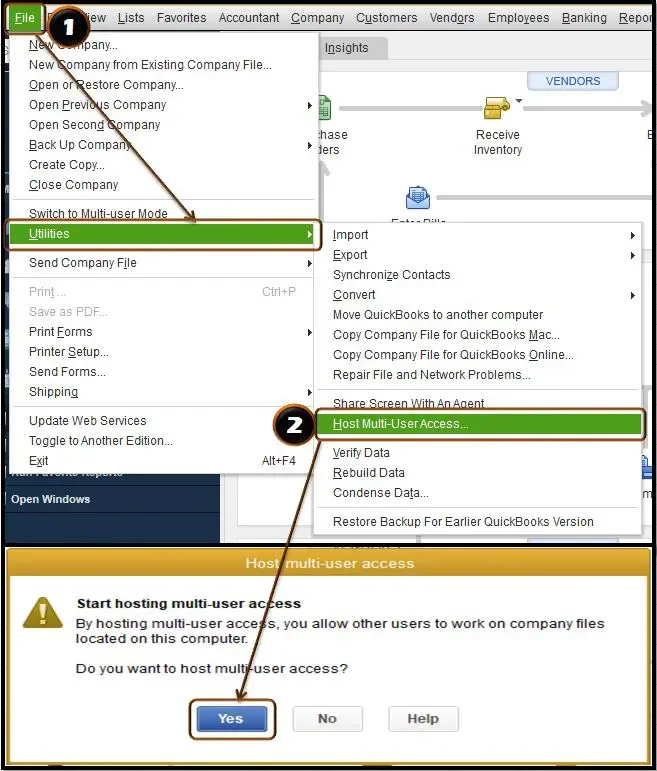
- Finally, repeat the process one more time, and then select the Host Multi-User Access option.
Hopefully, reconfiguring the hosting settings would have resolved QuickBooks Error 6175 0. However, if you still see the same error on the system, you should consider implementing the next solution.
Solution 2: Let QuickBooks File Doctor Fix the Error
- To run QuickBooks File Doctor, you first need to have QuickBooks Tool Hub on your system. This is how you can proceed with the same.
- Using the QuickBooks Tool Hub fixes a range of errors, including the QuickBooks error 6175 0. Using the Tool Hub on Windows 10, 64-bit, is advised for best results. Now, let’s move ahead with the steps to download the tool hub utility.
- First, close the QuickBooks application.
- The next step is to download the latest version of the QuickBooks Tool Hub. Once you have downloaded the latest version, try to save the file to a location that is easily accessible. For instance, the Downloads folder and Windows desktop can be chosen.
Note: Installing the QuickBooks Tool Hub isn’t enough; it is equally important to identify its version. Here, all you need to do is launch QuickBooks Tool Hub and the version will be displayed at the bottom of the window. It is done to ensure you have the latest version to avoid any issues.
- Launch the QuickBooksToolHub.exe file that you have downloaded.
- A set of instructions will pop up on the screen. Follow these steps carefully to install the Tool Hub.
- The app icon will appear on the screen as soon as the installation finishes. Now, you can open the application by double-clicking it.
Note: If you are finding it challenging to locate the Tool Hub icon on the desktop, you can manually search for it by clicking the Windows Start menu.
Follow the steps below to learn how to run the file doctor on your system.
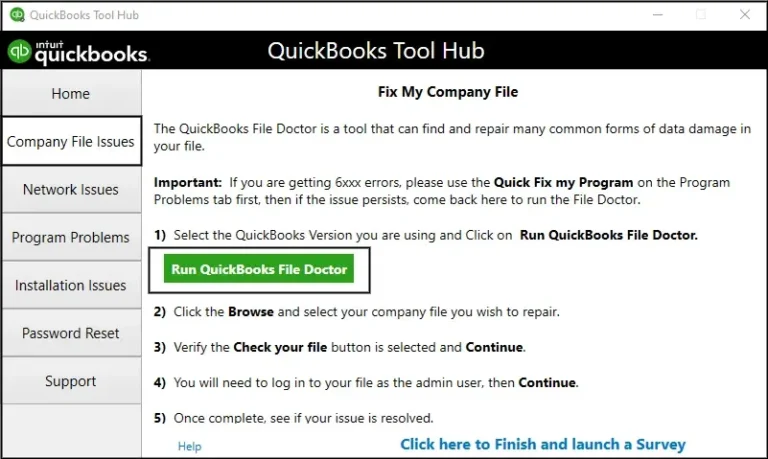
- First, launch the QuickBooks Tool Hub and then move to the Company File Issues tab.
- Here, choose the Run QuickBooks File Doctor option from the three options on the screen. However, it’s important to know that the file doctor may take up to a minute to open.
Note: In case the QuickBooks File Doctor doesn’t open, search for it by clicking the Windows start menu and then open it manually.
- Now, launch the QuickBooks File Doctor. A drop-down option will pop up on the screen. You can choose your desired company file by clicking the drop-down menu. Alternatively, you will find a Browse option next to the drop-down menu. You can simply click the Browse option and then select your desired company file.
- Further, choose the Check your file and network option, and then hit the Continue option.
- Finally, you will be prompted to enter the QuickBooks admin password. Hit Next after entering the password.
Check if this solution helps resolve QuickBooks Error 6175 0. If it doesn’t, try implementing the next solution.
Solution 3: Set Up Firewall And Security Settings Manually
Configuring the Windows firewall and security settings allows access to specific QuickBooks programs and files. So, let’s learn how to set up firewall and security settings for QuickBooks Desktop:
Step 1: Try Adding a Firewall Port Exception for QuickBooks
If you are someone who uses more than one version of QuickBooks Desktop on the same computer, you should consider performing these steps for each version you use:
- Left-click on the Windows Start menu. It will open a search bar at the top of the screen.
- Now, type “Windows Firewall” into the search box and then launch Windows Firewall.
- You can see the Advanced Settings option on the screen; select it to proceed further.
- Now, select the Inbound Rules and then select the New Rule option.
- Further, select Port, and then choose the Next option.
- Make sure TCP is auto-selected.
- In the Specific local ports field, enter the specific ports suitable for your QuickBooks year version.
- For instance,
- If you use QuickBooks Desktop 2020 and later versions: 8019, XXXXX
- If you use QuickBooks Desktop 2019: 8019, XXXXX
- For those who have QuickBooks Desktop 2018: 8019, 56728, 55378-55382
- Lastly, if you use QuickBooks Desktop 2017: 8019, 56727, 55373-55377
Try to get the dynamic port number
- Left-click the Windows Start menu; you will see a search bar at the top of the screen.
- Type “QuickBooks Database Server Manager” into the search bar to launch the QuickBooks Database Server Manager.
- Then, move to the Port Monitor tab.
- Identify your QuickBooks version here. Ensure you notice the port number, as you’ll use it further for your firewall port exception.
- Enter the port number, and then hit the Next option.
- Now, choose the Allow the Connection option, and then choose Next.
- Further, make sure all profiles are marked, and then choose the Next option.
- Here, all you need to do is create a rule. After creating the port, name it “QBPorts(year) and then hit the Finish option to conclude.
Follow the above-mentioned steps one by one to create outbound rules. However, make sure to select outbound rules instead of inbound rules this time.
Solution 4: Try Creating Windows Users and Giving Them Administrator Rights
You need to sign in to Windows as a user with admin rights if you use QuickBooks Desktop in multi-user mode. It allows you to change things like your firewall settings and folder permissions. Additionally, you need to give programs like Database Server Manager admin rights for uninterrupted access to the company file. Let’s learn how to add a Windows user and give permission to make changes so QuickBooks Desktop runs properly.
Step 1: Try adding a Windows user with administrator rights
For Windows Small Business Server 2011 and 2008 R2
- Click the Windows Start menu.
- Go to All Programs, open Windows Small Business Server, and then select the Windows SBS Console option.
- Select the Users and Groups option. Then, select the Add a new user account tab on the screen.
- Fill in the user information, and then follow the Add a New User Account wizard.
- Now, give administrator rights to the new user.
- Hit the Finish option when you are done.
Step 2: Give admin access to the QuickBooks services to host multi-user network
Some QuickBooks services need admin rights to host multi-user networks. You can take the instance of the QuickBooks Database Server Manager. When you install QuickBooks Database Server Manager on the system, QuickBooks automatically creates a new Windows user for this specific program. You must give this user admin rights so it can run on your network. Therefore, let’s learn how to give Windows users or programs admin rights:
- Exit the QuickBooks application.
- Click on the Windows Start menu.
- Go to Control Panel, and then select the User Accounts option visible on the top right side of the screen.
- Look for the QBDataServiceUserXX for your version of QuickBooks Desktop installed on the system.
For instance, let’s say you use QuickBooks Desktop 2020. In that case, select QBDataServiceUser30, as it is befitting for the 2020 edition of QuickBooks. In like manner, if you use the 2019 version of the QuickBooks application, you should look for QBDataServiceUser29.
- Now, choose the Change the Account type option, and then Administrator. Lastly, select the Change Account Type option.
- Now, hit the Apply option to save the changes.
- Repeat these steps in a similar manner for each version of QuickBooks Database Server Manager you have.
Also See: How to Permanently Stop ‘QBDBMgrN Not Running Error’?
Solution 5: Consider Updating the QuickBooks Application
When you update QuickBooks to the latest release, it enables you to get the latest features and fixes, which is helpful in resolving random errors in the program. Follow the steps mentioned below to update it manually.
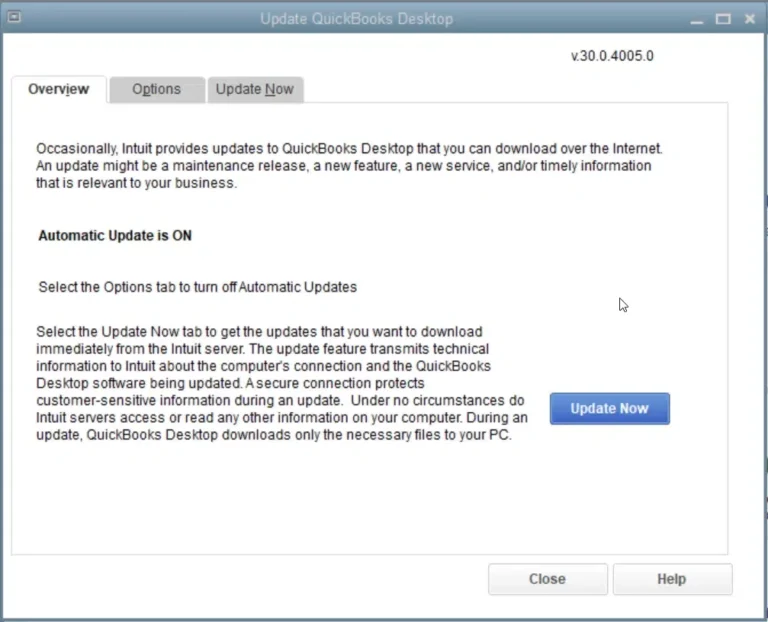
Now, let’s learn how to install the updates by following these quick steps:
- Select the Update Available option in your QuickBooks program to proceed.
- This will prompt QuickBooks to install the downloaded updates.
- Once the updates are installed, relaunch QuickBooks Desktop to check if the error is resolved.
Summing Up
Since some QuickBooks errors can be daunting and might end up messing up your payroll operations, it’s important to implement the right solutions to get the desired outcomes. With this purpose in mind, we have listed some effective solutions to help you get rid of QuickBooks Error 6175 0. On the other hand, we also understand that such multi-user mode errors are challenging to resolve and require the utmost attention. You can reach out to us anytime by calling +1-(855)-955-1942. Our skilled technicians will equip you with some quick troubleshooting solutions to help fix the error at a brisk pace.
Frequently Asked Questions
Ans: Many users have claimed to have encountered errors H101, H303, and H505 while fixing QuickBooks Error 6175 0. Moreover, many users also receive the “QBDBMgrN not running on this computer” error message.
Ans: Try running the QuickBooks File Doctor or configuring your firewall settings to fix it quickly. Additionally, you can also reconfigure the hosting settings to overcome this error.
Ans: You may face the QuickBooks error 6175 in QuickBooks if the database service is not active. Also, if the firewall on your system restricts QuickBooks access, you may also face difficulty opening the company file.
Ans: You can not access the company file in a multi-user mode. You will even face trouble logging into the QuickBooks application on your system.