If you are a regular QuickBooks user, you know that QuickBooks plays an important tool in every organization. Especially with its automated features, you can save a lot of time and effort in doing your accounting work. One such striking feature of QuickBooks is Quickbooks ACH Payments. With this feature, you can say goodbye to paper checks, and hectic bank runs, as QuickBooks allows you to schedule payments to your vendors and customers automatically.
You can easily set up, accept and send QuickBooks ACH Payments with a few simple steps. In this blog, we will guide you through each step of the process and will explain everything about Quickbooks ACH Payments.
What are QuickBooks ACH Payments?
ACH is an acronym for the Automated Clearing House and is run by the National Automated Clearing House Association (NACHA). NACHA is a system that facilitates electronic payments in the United States using Electronic Funds Transfers (EFTs ).
Since you enter each vendor and customer’s bank information into QuickBooks, QuickBooks directly processes the payment and takes care of your accounting needs.
QuickBooks ACH transfers are used to initiate the following types of transactions:
- Payroll
- Online bill payment
- Credit card payments
- Tax refunds
- Annuity payments
- Money transfers
- Interest payments
- Employer reimbursements
- Person-to-person (P2P) transactions
- Mortgage and loan repayment
- Business-to-customer (B2C) transactions
- Business-to-business (B2B) transactions
What is the charge for QuickBooks ACH payments?
It takes about 5-7 days for the ACH to arrive in our account if you opt for not being charged, as Quickbooks makes money on the float. However, QuickBooks also offers a minimal fee per ACH payment. The fees for QuickBooks ACH Payments are set to a maximum of $10 with about 1% per ACH transaction.
The QuickBooks payment rates for QuickBooks ACH payments are given below:
| Fees Type | QuickBooks Online | QuickBooks Desktop “Pay as you go” Plan |
| ACH Bank Transfer | 1% (Max $10) | $3.0 |
How do I Set up QuickBooks ACH payments?
To start with the QuickBooks ACH payments, you need to first sign up for QuickBooks Payments, and then
- Start by selecting either the Check or ACH payment method as you create the sales receipt or receive any payment.
- You need to enter your customer’s detailed bank information.
- Next step involves getting authorization from the customer. You can either read them a script or ask them to fill out a form.
- Then, the last step is to process the transfer and get paid.
All these steps are given below in detail:
Step 1: Select the transactions to receive the QuickBooks ACH Payments.
You can start by entering a bank transfer for an invoice or sales receipt. After that, you need to add your customer’s bank information.
For Sales receipts or invoices:
- First, select +New
- Select the Receive Payment or Sales Receipt option.
- Now, choose the customer name from the Customer drop-down menu.
It is important to select a customer name here so that you can enter ACH banking information later.
- Now, from the Payment method drop-down menu, click on the Check or QuickBooks Payment -Bank.
For Recurring Sales Receipts:
The recurring sales receipts automatically process the QuickBooks ACH payments on the next charge date that you schedule.
- First, go to the Settings option, then select the Recurring Transactions option.
- Next, find your customer’s recurring sales receipt from the list and then tap Edit.
- Now, from the Payment Methods drop-down menu, choose the Check or QuickBooks Payment– Bank.
Step 2: Enter your customer’s bank information to process QuickBooks ACH Payments
- Start by entering the Bank information.
- Then add your customer’s details, including Account Number, Routing Number, and Name.
- You need to select the Use this account information in the future.
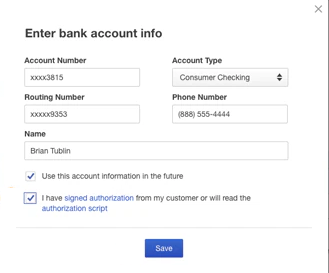
Remember not to forget to select the point mentioned in 3rd step if you are adding payment information to a recurring sales receipt.
If you do not want to save the bank information, you will have 10 minutes to process the payment.
Step 3: Get authorization from the customer to process QuickBooks ACH Payments.
You are required to get the customer’s authorization before you save their information. For that, select the signed authorization link to print an authorization paper that your customer can fill out and sign.
If you want to update a recurring sales receipt, then
Select the Save Template option to save your customer’s payment info.
Now, You can skip step 4. You do not have to process the payment. QuickBooks will automatically process the ACH payment on the next scheduled charge date.
Step 4: Process the Payment for QuickBooks ACH Payments
- Go to the transaction form, and select the I have an authorization and would like to process this transaction option.
- Now, review the transaction details, then Save and Send it.
- Customize the email message that you want to send to the customer and then hit Send and Close.
How to Set up Recurring ACH Payments in QuickBooks?
You can set up recurring ACH payments in the QuickBooks Desktop application and QuickBooks Online to the vendors and from the customers. You will need QuickBooks Payments after getting a linked QuickBooks ACH authorization form from your customers to set up recurring ACH payments.
You will also require a third-party app for bill pay and other payable automation to pay your supplier bills with recurring ACH payments.
Follow these steps to set up a scheduled ACH customer payment using sales receipt recurring billing and send invoices to customers.
- Go to the Settings option, then select Recurring Transactions.
- Now choose New.
- Then from the Transaction Type drop-down menu, choose the Sales Receipt and then click OK.
- You need to enter a Template Name first. (Note: This will not appear on the transaction, it is just for reference.)
- Next, from the Type drop-down menu, choose the Scheduled option.
- Then, from the customer drop-down menu, choose the Customer’s name and verify their email.
Note: Here, you get an option to select Automatically send emails. Click on it to send notifications to your customers when your process their payments.
- The next step involves setting the interval. For example, if you want a sales receipt on the first day of every month, set the interval to Monthly and on the day 1st of every 1 month.
- Next, enter a Start and End date.
- Now, select the Payment Method from the drop-down menu. Choose any one Credit Card type or Check.
- If you choose Credit Card Type: Select the Enter credit card details option to enter the customer’s credit card information or bank account information. Then, hit OK.
- If you choose Check: You will be needed to select the Authorization hyperlink to send the Bank Transfer Authorization form to your customer. Also, do not forget to check the box given there to make sure that a form is created every time a payment is processed.
- Now, enter the line for the product or service, whichever you want, and the amount.
- Choose the Save template option to save the changes that you just made. In case you want to personalize your template, choose the Customize option.
Here Check means eCheck as the ACH is an electronic payment.
Note that A recurring sales receipt will automatically charge a customer at a given interval. However, If you select the option Days in advance to create, it will process the charge on the date you have created the transaction.
For example, in case you have created a sales receipt on the 5th of any month, and it recurs on the 15th of each month, the charge will be processed on the 5th.
Read Also- How to Merge Vendors in QuickBooks
How to Manage Recurring ACH Payments in QuickBooks?
It is easier to manage recurring QuickBooks ACH payments in QuickBooks Desktop than in QuickBooks online. But, here, we have discussed steps for both of them.
Steps to Manage Recurring ACH Payments in QuickBooks Online
- Open the Recurring Template List report and click on the Reports from the left panel.
- Now, look for the report in the search field.
You won’t see the option to open or run a report having all recurring transactions of the current/upcoming quarter. It will only show the date before the template/transaction was created and the next date of the transaction.
Steps to Edit a Recurring Template
- Scroll to the Gear icon and then go to the Recurring Transactions.
- Choose the appropriate template and then select the Edit button.
- You can edit the name of the recurring template by going to the top left of the screen.
- Now set it to Reminder, Unscheduled, or Scheduled.
- Next, you need to specify how long you are going to use it and if you want to be notified in advance.
- Change the transaction setup as needed. (You will get the option below the scheduling information.)
- Once you are satisfied with all the changes, click the Save Template option.
Steps to Change the Date:
- Go to the Gear icon and then to the Recurring Transactions.
- Look in the top next corner and tap Template Type. Select All or the type of template you want to edit.
- Click on the chosen template and then right-click on the Edit button at the bottom.
- You will find the Edit Schedule button on the left of the recurring template; click on it.
- Make the changes to the schedule and then click OK.
- Next, right-click on the Save Template option present at the bottom.
Steps to Manage Recurring ACH Payments in QuickBooks Desktop Application
Once you have set up recurring QuickBooks ACH Payment, go to the Manage Recurring page in the QuickBooks Desktop to make changes.
- Open the Manage Recurring Payments Page, then
- Go to Customers, then Credit Card Processing Activities. Next, to the Set Up Recurring Payment option to sync recurring payments with QuickBooks.
- If you want to use the standalone Recurring Payments, just sign in to Online Service Center. Then from the menu bar, go to the Processing Tool and then to Manage Recurring Payments.
This Manage Recurring Payments option lets you view, edit and customize reports for recurring transactions by customers. Just click on the customer name to view details and/or modify existing recurring payments.
Steps to Edit Recurring Transactions
- Scroll down to the section for which you want to edit the information. Click the Edit link next to it.
- You can change the information there, such as
- Contact information of the customer.
- Amount: But only before the first monthly cycle if items are used, or else you can change at any time if items are not used.
- Description
- The Start Date: But only if the tart Date is still in the future. It won’t give you the edit option if the start date has passed.
- Frequency: You can change the frequency if it is set up to monthly or yearly.
- Day of the Month: You can change the day of the month you want the next payment to occur if the frequency is set to Yearly or Monthly and the start date has passed.
- End Date: You can not change the End Date for the payments with the frequency set to Once. However, the End Date can be changed to tomorrow or the day of expired payments.
The Conclusive Note
This way, you can set up, accept, send and manage the recurring QuickBooks ACH payments. You can also stop or suspend recurring QuickBooks ACH payments whenever you want. For that, just click the edit link in the view/edit recurring transactions option. Now, change the End Date to stop the recurring ACH. If you wish to Delete any record, first go to the Manage Recurring Payments list. Then scroll down to the Status column and click the drop-down arrow to choose Delete. This will make the record disappear, and it will not process any future payments. For any other help, contact us and connect with our QuickBooks Support Experts.
Frequently Asked Questions
A. QuickBooks ACH Payments is an electronic payment method that allows businesses to pay vendors and employees directly from their bank accounts. Instead of using checks or credit cards, ACH payments securely transfer funds through the Automated Clearing House network. This saves time, reduces errors, and improves cash flow management.
A. To set up ACH Payments, first ensure your QuickBooks account is enrolled in QuickBooks Payments. Then, link your bank account and enable ACH as a payment method. You can then schedule one-time or recurring payments directly within QuickBooks, streamlining your payroll and vendor payments.
A. Absolutely. QuickBooks allows you to schedule recurring ACH payments to vendors, contractors, or subscription services. You can set the frequency, amount, and start date, ensuring automated, timely payments. This feature helps maintain consistent cash flow management and reduces manual oversight.
A. If a payment fails, QuickBooks notifies you immediately with the reason—such as insufficient funds, incorrect account information, or bank errors. You can then update the account details, reschedule the payment, or contact the bank for resolution. QuickBooks also allows you to keep detailed logs for auditing and troubleshooting.
