![How To Merge Vendors In QuickBooks [Step-By-Step Guide]](https://dataservicesolutions.com/wp-content/uploads/2021/07/How-To-Merge-Vendors-In-QuickBooks-Step-By-Step-Guide.webp)
All these years, QuickBooks has come up with new and advanced tools to ease your regular accounting work. Merge vendors in QuickBooks is one such feature. If you’re somebody who manages online banking from within the QuickBooks Desktop application, then you have to merge vendors in QB to avoid duplicate transactions. Why so? Well, duplicate entries in the vendors or customers list make it a bit difficult to search for a specific transaction for a customer or a vendor. When you merge vendors, transactions in both the accounts come together, eliminating duplicate transactions. You can easily merge up to four vendors at a time with the latest feature of QuickBooks for accountant 2019 that makes the merging process effortless for the users. Before you proceed to merge vendors, there are certain factors that you must be aware of to avoid any hindrance.
After reading this informative article, you will be introduced to applicable ways to merge multiple vendors in QuickBooks Desktop and QB Online. So let us get started!!
Did you accidentally register more than one vendor profile for the same supplier? Or there can be a possibility that your previous vendors have merged with or acquired another. In any of these cases, you have to incorporate all the other accounts into one master account. But what if you don’t know how to do that? In these circumstances, you must pick up your cell phone and ring us at the TFN +1(855)-955-1942. Our support experts will take care of the issue.
Essential Factors Before You Merge Multiple Vendors In QuickBooks
Before you begin to combine vendors in QuickBooks, please know that once you’ve merged your vendor profiles, this will be permanent; thus, you won’t be able to undo it later. There are undoubtedly other considerations as well that you must follow before you go on to merge multiple vendors in QuickBooks. Below, we have mentioned all the following key points:
- Make sure to create a backup of your company file before you merge vendors in QuickBooks.
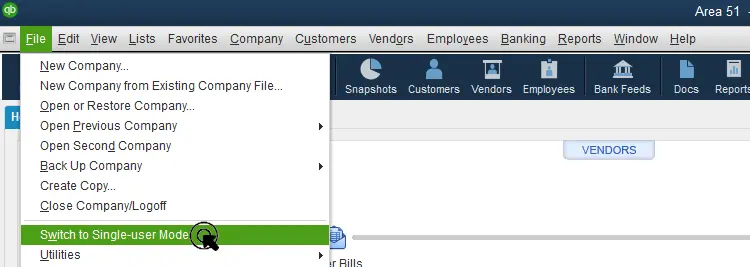
- To avoid any hindrance, enable single-user mode when you start the process. If another user adds an entry to one of the accounts while merging, it can mess up the whole process. Thus, single-user mode eliminates this possibility.
- Before you proceed further, make all the necessary accountant changes.
- You shouldn’t use the Accountant’s Copy File to merge vendors.
- Make sure to turn off the Multi-Currency feature to ensure consistency.
- Never merge tax-exempted vendors or authorities, direct deposit vendors, or those paid through online banking.
- After becoming aware of all the critical aspects related to the merge vendor feature of QuickBooks, let’s proceed to the detailed steps in which you will be able to merge vendors in QuickBooks.
How To Merge Vendors In QuickBooks Desktop
The process of merging vendors in QuickBooks varies from version to version of QuickBooks. Here, we have enumerated the steps for merging vendors in two parts:
- QuickBooks Desktop 2018 & earlier versions
- QuickBooks Desktop 2019
How to Merge Two Vendors in QuickBooks Desktop 2018 and Earlier Versions Successfully?
The below-given steps will help you merge vendors in QuickBooks 2018 and the earlier version as it has a separate Vendors menu:
- Go to the Vendors menu and from there, choose Vendor Center.
- Right-click on the vendor that you want to keep and select the Edit Vendor option.
- Then, copy your vendor’s name and click on Cancel.
- Select the vendor that you want to merge and right-click on it. Then, choose the Edit Vendor option.
- After that, you need to change the name of the new vendor by pasting the name you copied earlier.
- Click on Yes when the confirmation prompt appears on your screen.
Important Note: Whenever you name two vendors with the same name, they will merge. The duplicate transactions will appear once in both vendors, while the unique transactions remain unaltered. This method worked well in the previous versions of the QuickBooks application. However, the 2019 and later versions provide users a specific merge option.
How to Merge Two Vendors in QuickBooks Desktop 2019 Successfully?
The versions of QuickBooks Desktop 2019 give you the function of syncing multiple vendors into one, making the process simpler for the users. These versions are QB Enterprise and QB Accountants, which we will elaborate on below. Employing the Accounting Tools feature in the QB Enterprise is a better option, whereas, in QB Accountant, you can use the Client Data Review tab.
Merging Vendors in QuickBooks Enterprise 2019
Let’s learn to combine several vendors as one or under one name, cutting down the excess time tracking different transactions.
- Begin by launching the QuickBooks Desktop Enterprise software.
- Now, under the Menu tab, choose the option that says Accounting Tools.
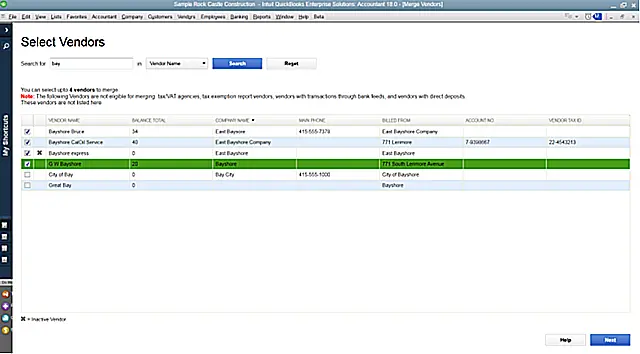
- Then, click on the Merge Vendors option and select the vendors you are willing to merge together.
- Proceed and click on Next and choose the Master Vendor option.
- Further, choose Merger, and when the confirmation text appears, click on Yes.
- Lastly, choose OK on the notification after the process is completed.
Merging Vendors in QuickBooks Desktop Accountant 2019
While going through the entries of all your vendors, if you see numerous similar entries, try to merge those vendors into one. Let us learn how to do it.
- For starters, click on the Accountant tab and choose the option that says Client Data Review.
- Then, click the Merger Vendors option and select the vendors you want to combine into one.
- After that, click Next and click on the list of vendors you want to merge the above-selected vendors.
- As you select the vendors, click the Merger option and then choose Yes to confirm your command.
- Lastly, click OK after the Merge Complete text appears on the screen.
What Are Vendors in QuickBooks Online and How to Add them?
A simple meaning of vendor is someone who sells you products or furnishes you with services. In QuickBooks, you can register your vendors and then make payments to them automatically. Additionally, you are able to keep records of sales and services provided by the vendors and the amount of revenue generated from them. But do you know how to add a new vendor to the list? An easy way is through the bank feed section while reviewing the transactions.
First Way to Add a Vendor
- Start by clicking on the Expenses option to open it.
- Afterward, a new window will appear on the screen where you must add the vendor’s name.
- Then, after adding your vendor’s name, save the details by selecting Save.
- Now, by clicking on the Save option, you will open the window for the bank feed. From there, you can add the expense to the register.
Second Way to Add a Vendor
- You can choose the option that says Get Paid & Pay or Expenses.
- Under it, choose Vendors.
- Now, click on New Vendor.
- In the vendor information window, you must fill both the search fields and click on the Save option.
What if you want to delete an existing vendor?
It is not possible to delete an existing vendor, but you have an option to make any vendor permanently inactive.
- Begin by choosing the Get Paid & Pay or Expenses option.
- Now, click on the Vendors option.
- Now, choose the vendor you want to make inactive, and beside it, click on the drop-down menu. From there, proceed to click on the Make inactive option.
Note: There are better options available than making a vendor inactive, like merging accounts, customers, and vendors.
How to Merge Multiple Vendors in QuickBooks Online?
Procedures in QuickBooks Online are a little different than the Desktop. But don’t panic about it; we’ve covered each step to do this below.
- Firstly, go to the Expenses menu and click on the Vendors tab.
- Find and open the vendor profile that you want to keep. Then, click on Edit.
- Make sure to note down the Company and Display name.
- Now, go back to the Vendors tab.
- There, find and open the vendor that you don’t want to keep. And, then select Edit.
- Further, you need to change the Company and Display name so they match the vendor profile you’re keeping exactly.
- Click on Save then Yes to confirm.
Once the merge is completed, QuickBooks will automatically move past transactions from the duplicate to the vendor you want to keep.
Conclusion
As we are about to end this article, we want to say that if you encounter duplicity or similarities in several vendor’s accounts, try to merge them promptly. It will make your task less complex and might rectify your messed-up accounts. However, if any of the steps mentioned earlier to merge vendors in QuickBooks or any of the concepts become challenging to grasp, do not get frustrated. You might need professional assistance, so we would suggest you get in touch with our experts by dialing QuickBooks Data Service Solutions Helpline Number +1(855)-955-1942.
Frequently Asked Questions
A. Merging vendors in QuickBooks helps clean up duplicates and keeps your vendor list organized. Here’s how to do it:
a. Backup your company file before making changes to avoid accidental data loss.
b. Go to the Vendors menu and open the Vendor Center.
c. Select the vendor you want to merge (the one to keep).
d. Edit the duplicate vendor’s name to exactly match the vendor you want to keep.
e. QuickBooks will prompt you to merge the two vendors — confirm the merge.
f. All transactions from the duplicate vendor transfer to the remaining one.
Remember, merging is permanent and cannot be undone, so double-check before confirming. For detailed guidance, contact support anytime.
A. Yes, when you merge vendors in QuickBooks, all transaction history from the duplicate vendor moves to the vendor you keep. This means no data is lost, and your reports remain accurate. To merge safely:
a. Make sure both vendor names are exactly the same before merging.
b. Confirm the merge when QuickBooks prompts you.
c. Always back up your company file before merging to avoid mistakes.
Merging vendors is a great way to eliminate duplicates and streamline your vendor list. If you run into issues or want help merging vendors correctly, support is available anytime to assist you.
A. The risk lies in its permanence. Once vendors are merged, the original record cannot be restored. Any mistake can only be corrected by re-creating the vendor manually and adjusting entries, which takes time.