
When you buy a new computer and plan to move all your necessary data to the new system, a question might arise in your mind about how to move QuickBooks to the new computer.
Moreover, it is essential to ensure that you create a backup of your data on your hard drive or a USB storage device before you move QuickBooks to new computer. In contrast, this data transferring process is not complicated, although there are some system requirements to install and run the QB Desktop.
This blog will help you understand the process of transferring data to a different system and assist you in moving QuickBooks to new computer. You can be assured that you won’t lose your essential company data thanks to this guide.
Do you have any trouble moving QuickBooks to new computer? don’t get frustrated. Contact a QB professional to get comprehensive assistance. Dial +1(855)-955-1942 now.
Important Aspects to Remember Before You Move QuickBooks to New Computer
Keep the following aspects in mind before you begin moving your QuickBooks data and files to a different system.
- Register the software once installation is complete.
- A good and stable internet connection.
- Back up your files on the older system before deleting QB from your system.
- Keep a backup of your QuickBooks installation software and drivers on an external device.
- Input the correct license and product key details to avoid activation errors.
- Store the QuickBooks company files and data in a USB drive to keep them secure and safe.
Once you have followed all the above-mentioned steps, let’s learn about how you can move QB to another system.
How Can You Transfer QuickBooks From One System To Another?
You can begin moving your QuickBooks data from one computer to another by following the detailed steps listed below.
Step 1: Backup Data to Move
Initiate the backup process of the essential files and storage by following these steps.
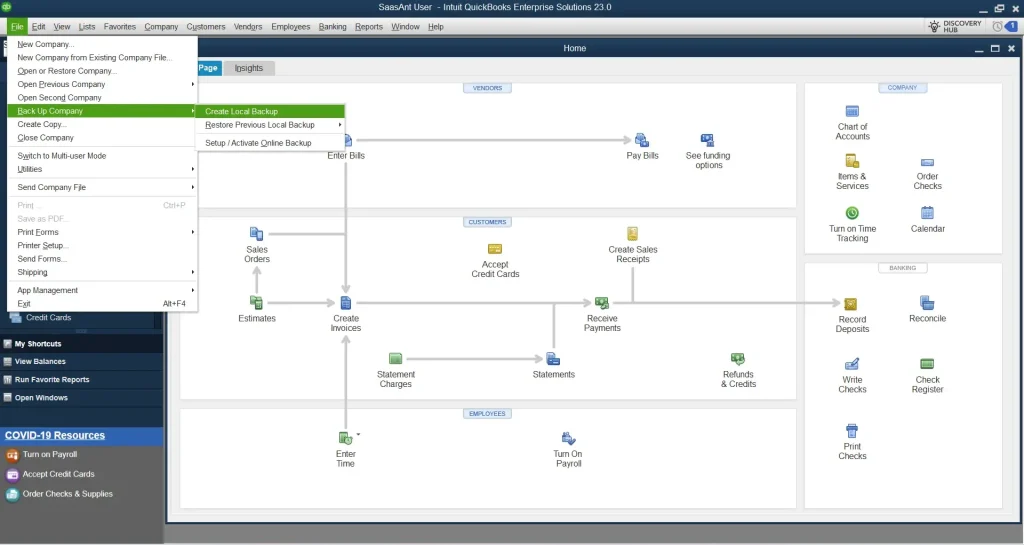
- Head to the File tab, then click the Backup option.
- Follow the instructions on the screen and select a location to save your data.
- Note down the product keys and license information for your version of QuickBooks.
- It will help to access this information easily and use it later on the new system.
- Deactivate QB Desktop on your old computer. To do so, head over to the Help tab and click on Deactivate QuickBooks Desktop.
- It is an essential step because deactivating the older version is necessary before moving on to a new computer.
Once you have created the backup of your data, let’s install QuickBooks Desktop on the new system.
Step 2: Install QuickBooks on the New System
Now, with the process below, let’s begin with the installation of QB Desktop in your new system.
- Launch your preferred browser on the system.
- Head to the QuickBooks website and download the latest version.
- Install the version after the download process is completed.
Once the installation is complete, let’s move on to the process of transferring QuickBooks data to the new computer with the following method.
Step 3: Here’s How to Transfer QuickBooks to the New Computer
Now, let’s begin to move QuickBooks to new computer with the help of the simple instructions given below.
- As mentioned earlier, create a backup of the files in the old computer on a hard disk or a USB drive to transfer them to the new system.
- Copy the files from the drive and paste them into the desired file location on the new computer.
- To restore the data for your company files, open the QB application and click “Open a Restore Company” under the File tab.
- Click on ‘Restore a backup copy‘ and click Next.
- Select a location to backup your files and data in the system.
- After the restoration process is complete, follow the given instructions to verify that the data is correct.
After the backup is completed, begin with the activation process.
Step 4: Here’s How to Activate QuickBooks on New Computer
After you have completed the transfer process, go through the following steps to proceed with activating the QuickBooks Desktop version.
- Tap on Help > Activate QuickBooks Desktop in QBDT.
- Now, enter the product key to activate the QB version.
- Click on the Help tab and click on Update QuickBooks Desktop.
- If an update is available for your QB Desktop version.
It will initiate the update process. Let’s move forward with how a migration tool in QuickBooks can help you move to a new computer.
How Does the Migration Tool Help Move QuickBooks to New Computer?
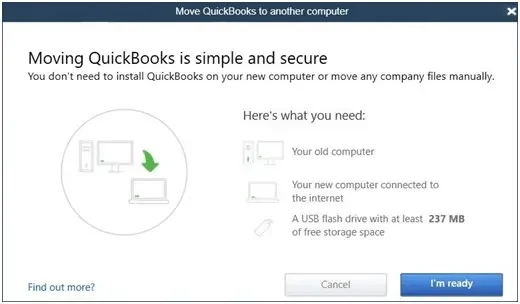
Migration Tool is one of the best tools provided by QuickBooks. You can utilize it when you move QB to new computer. Before diving into how to use the Migration Tool, you will need the following:
- You should have a good internet connection to the new computer.
- Utilize a USB storage device with enough free space to store the QB files.
- QuickBooks Migration Tool requires 150 to 250 MB of storage space on your computer.
Ensure that both your systems have these compatible configurations. After verifying it, proceed to learn how to utilize the QB Migrator Tool’s functions.
How to Transfer the QuickBooks Data via USB Flash Drive from Old to New Computer
Now, we will guide you through a brief understanding of how to move QuickBooks to new computer via the USB flash drive.
- Plug the USB drive into the old computer, referred to as the migrator.
- Next, copy the QuickBooks data and create a strong one-time password.
- Then, plug the same USB into the new computer, and you will also need to enter the created password to access the data.
- After that, the new computer and the launcher will automatically download, install, and activate the QB Desktop on the new system.
Note: The one-time password you have created should be strong and unique. It will help you save your data. Also, remember to note it to keep it safe and find it again when needed to verify the QB license for the new system.
- The USB flash drive will copy the last three company files that were most recently opened.
- The Migrator Tool handles the technical work to move QuickBooks to new computer, and the USB flash drive helps in moving the files from your old system to the new one.
- You will be able to download the correct QB Desktop version with the migrator tool to the new system.
- The tool will protect your drive from reformatting. Also, not a single file is going to be erased.
- You may experience an interruption in using the migrator tool on a 32-bit Windows OS if your system contains files from 64-bit QuickBooks Desktop 2022 or 2023.
Related Post: How and Why to Convert QuickBooks Desktop To Online?
Here’s How to Use the Migrator Tool to Transfer the Data
Let’s go through the comprehensive instructions to move QuickBooks to new Computer from the old one, ensuring the integrity of the financial data.
Section A: Prepare Your Old Computer
To prepare the data transfer from the old computer, follow the procedure below.
- Insert the USB drive, and the QB migrator tool will appear on the screen.
- Sometimes, due to the Windows security restrictions, it doesn’t open. In that case, open the flash drive to view the files.
- Then, tap the Move_QuickBooks.bat file from the USB drive to initiate the migration of QuickBooks to the new system.

- Next, enter the password you set while moving files on the old system.
- Tap Let’s go and wait for the tool to complete the QuickBooks transferring procedure.
Note: The time taken for QuickBooks to transfer to another system depends on your internet speed, system performance, and file size. You may update your Windows OS in case the migrator tool fails to open after selecting and running the file.
- After installation is complete, head to QB Desktop.
- Click on ‘Register QuickBooks‘ from the Help tab.
- Now, enter the required information for registration, such as your contact number, postal code, and license key.
- Then, register the product.
After the installation of QB Desktop on the new system is complete, the migrator tool will automatically remove the QuickBooks files from the USB flash drive. The old computer will still have QB data files. You can modify the file names on the old system to avoid confusion or use the incorrect file.
Section B: Keep the New Computer Ready
Setting up the system is essential to move QuickBooks to new computer. To do so, follow the instructions below:
- Plug in your USB storage device to the new system.
- You need to launch the migration tool manually due to the Windows security measures
- Next, find and run the Move_QuickBooks.bat file located on the USB flash drive
- Lastly, fill in the security credentials you have created earlier, and let the migration tool complete the procedure
After this, the QB migration tool file will automatically delete itself, leaving all the data intact. To complete the process, navigate to the Help tab, select Register QuickBooks, and finish the registration by entering key details, including your phone number, postal code, and license key.
What Comes Along With the Migration Tool When You Move QuickBooks to New Computer?
The following tabular data shows the type of data that will be transferred from the old to the new computer using the migrator tool during the QuickBooks Desktop transfer. Ensure to read this to avoid any further confusion.
| Components That are Copied | Components That are Not Copied |
| Spell Checker | Multi-user mode is not copied. |
| QuickBooks Desktop details, such as version information. | Payroll and Payment Setup. |
| Business planner file (.bpw) | Intuit Data Protect. |
| QB letter and template files. | The older company files |
| Scheduled Reports and Printing settings. | The Backup files. |
| Local attachments. | |
| Advanced Reports, Financial statement, and cash flow projector. | |
| Company and sample files are added automatically. | |
| Cash Flow Projector (.cfp) files. |
You can easily determine which data will move and which will not with the help of the table mentioned above.
Conclusion
In this blog, we have covered all the significant aspects of the best ways to move QuickBooks to new computer. To avoid any further inconvenience, please follow the methods in the order listed above. However, the process of transferring your QB Desktop to a new system could be time-consuming. The process timing depends on the internet connection speed and the size of the company file. Contact our QB expert at +1-(855)-955-1942; they will provide you with further assistance on this topic.
Frequently Asked Questions
To transfer QuickBooks Desktop from one computer to another, you can use the steps below.
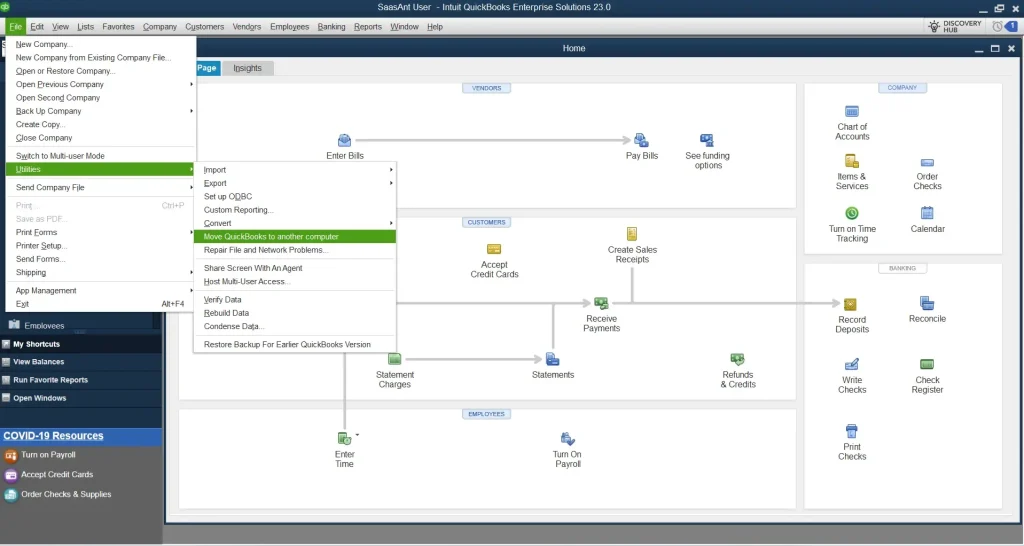
1. Head to the File menu in QuickBooks
2. Select the Utilities and further move QuickBooks to the new system
3. Go through I’m ready and create a strong one-time password
4. Then, follow the on-screen instructions to select the USB flash drive you will use
Once the data is stored in the USB drive, your QuickBooks is ready to move to a new computer.
Most of the process will take approximately 12 minutes. However, the entire transferring process takes up to 72 hours. The AWS security can slow down or interrupt this procedure. Further, the time taken to move QuickBooks to new computer also depends on the internet connection speed and the size of the company’s data.
Some specific data, such as Intuit data, company files, QuickBooks Payroll and Payments service data, and multi-user setup information, will not transfer automatically using the migration tool. Additionally, the other manual backups need to be moved manually.
Once the transfer procedure is complete, register QuickBooks on the new system. To do so, follow the steps below:
1. Head to the Help tab
2. Tap on Register QuickBooks
3. Lastly, fill in your login details, including your phone number, postal code, and license key, to end the process
After filling in all the essential information, you are ready to use and access your company data in the new system.
