Every employer has to file form 941, also generally known as Employer’s Quarterly Federal Tax Return, to report payroll, income, social security, and Medicare taxes withheld from their employees’ wages. Filing Form 941 manually can be challenging, and a single error can lead to unpaid employment taxes, which can even lead to civil and criminal sanctions. However, if you are a QuickBooks user, filing form 941 is an easy and fail-safe process involving a few simple steps. In this guide, we will discuss queries raised on QuickBooks Form 941, like who should file, the due dates, where to find it, how to set it up, e-pay, and e-file Form 941 in different QuickBooks versions. Keep reading this guide till the end and become a pro at filing form 941 in QuickBooks.
Who Should File QuickBooks Form 941?
Generally, all the businesses that hire employees and withhold federal taxes, including wages, tips given to employees, income tax, social security, additional Medicare tax, or payroll tax credit from their employee’s salaries, must file the 941 form in QuickBooks. You have to fill out this form quarterly, and any failure to file the form can lead to strict penalties from the IRS. However, employers of household employees, seasonal employees, and agricultural employees usually do not have to file or fall under the tax bracket of Form 941 but rather report their wages paid differently.
What are the Due Dates for Filing QuickBooks Form 941?
To give you a clear understanding of the quarterly due dates, we have mentioned them below in a listicle.
- First Quarter: To cover the period between January 1st and March 31st, you must file the QuickBooks form 941 by April 30th.
- Second Quarter: To cover April 1st and June 30th, you must file the QuickBooks form 941 by July 31st.
- Third Quarter: To cover July 1st and September 30th, you must file the QuickBooks form 941 by October 31st.
- Fourth Quarter: To cover the period between October 1st and December 31st, you must file the QuickBooks form 941 by January 31st.
Note: If any deadline to file the form mentioned above falls on weekends (Saturday and Sunday) or legal holidays, you should file the tax return on the subsequent business day.
Where to Find From 941 in QuickBooks?
There are various types of QuickBooks payroll subscriptions offered by Intuit to its customers, depending on the amount they are willing to spend. If it is your business’s time to file form 941, then you must be trying to access the form in QuickBooks. Given below are the instructions on how to find the 941 form in QuickBooks.
Note: The steps to get the form differ for each payroll subscription, so proceed accordingly.
Finding Form 941 in QB Desktop Payroll Standard and Enhanced?
Accessing QuickBooks Form 941 in the desktop version differs from the Online version as the Form 941 opens in PDF form. The following are the steps to find Form 941 in QB Desktop Payroll Standard and Enhanced:-
- Under the Employees tab, select Payroll Center and click the File Forms tab.
- Under the Saved Filings tab, move to the Filing History section to access any earlier saved forms.
- Click QB form 941 under the Saved PDF column to view the form.
Recommended To Read: Get Latest 2023 QuickBooks Payroll Tax Table Update
Finding Form 941 in QuickBooks Desktop Payroll Assisted?
Finding QuickBooks form 941 in the assisted version is a little tricky. Keep your Payroll Pin handy while attempting to view it, and then follow the steps mentioned below:
- Under the Employees tab, select the Payroll Center option.
- Choose the File Forms tab and click View/Print form W-2s afterward.
- In the Payroll Tax Center window, enter your Payroll PIN.
- Choose OK.
Note:- If an error message displays on the screen or nothing happens, you must repeat the 3rd step while pressing the Ctrl (Control) and Alt key. You need to keep holding the keys untill all the messages appearing on the screen disappear and the PDF form opens.
- Click File Forms, and finally, click the Form 941 you wish to view.
Finding Form 941 in QBO Payroll Enhanced?
The following are the steps to find QuickBooks form 941 in the Payroll Enhanced version:
- Move to the Taxes tab and click Payroll Tax.
- From the Quarterly Forms or Annual Forms sections, choose View Archived Forms and click Form 941 from the list.
- Select View for each Form 941.
Finding 941 Form in QuickBooks Online Payroll Core, Premium, Elite, and Full Service?
The following is a two-step procedure to find the 941 Form in QBO Payroll Core, Premium, Elite, and Full Service:
- Click Taxes from the left menu, and select Payroll Tax.
- Click the Download option under the Forms section and select Form 941 for the respective year.
How to Setup, E-Pay, and E-File QuickBooks Form 941 in QuickBooks Desktop Payroll Enhanced?
Paying federal taxes and filing the crucial payroll forms timely throughout the year is indispensable. If you have a QuickBooks Desktop Payroll Enhanced subscription, you can electronically pay and file form 941. This is one of the quickest ways to ensure your business complies with the IRS guidelines. If you want to learn how to set up, e-pay, and e-file federal tax forms electronically, follow the steps given below:
Steps to Enroll and Setup QuickBooks Desktop Payroll Enhanced for E-Payment
In QuickBooks Desktop, you must perform a setup to e-pay the taxes. Let’s understand the process step-by-step.
1st Step: Enroll in the IRS Electronic Federal Tax Payment System (EFTPS)
There are two scenarios for enrolling in the IRS EFTPS that are mentioned below:
- To enroll, if the business started after 2011: You only need to enroll in EFTPS once. If you’re unsure you’re registered, contact the IRS at 1.800.555.4477.
- To enroll if the business started before 2011:
- From EFTPS.gov, choose the Enrollment tab and follow the onscreen instructions to submit the enrollment.
- In 7 to 10 business days, you will get your PIN and enrollment number by mail.
Note: To pay before receiving your PIN, call the IRS at 1.800.555.4477 two business days after completing the enrollment. If your information matches IRS records, an agent can take your payment. Due to security reasons, the agent will not give you the PIN over the phone.
- After receiving the 4-digit EFTPS PIN, go to EFTPS.gov and click the Login tab.
- Enter the EIN, 4-digit EFTPS PIN, bank account, or last 8 digits of the enrollment number, and continue to create the password.
2nd Step: Schedule and Set up the Tax Payments
- Under Employees, choose Payroll Taxes & Liabilities.
- Select Edit Payment Due Dates/Methods, choose Schedule Payments, and then Federal 941/944/943.
- Under the Edit Payment Schedule window, change the payment method to E-pay and choose the Payment Frequency.
- Click E-pay accounts, choose the account type, and verify the bank information.
- Click Finish.
Steps to Enroll and Setup QuickBooks Desktop Payroll Enhanced for E-Filing
The following is the process of setting up the e-filing method. Also, if you still haven’t enrolled in the IRS e-file program, follow the process mentioned in step two.
1st Step: To Set up the Federal Filing Method
- Under the Employees tab, click Payroll Tax Forms & W-2s and choose Process Payroll Forms.
- Under the Other Activities list, click Manage Filing Methods and then Filing Methods.
- Choose a federal form (Federal 941/944/943 or Federal Form 940) and click Edit.
- Under the ‘Select how you want to file the Form…’ section, click Filing As Responsible Individual (Owner/Partner/Corporate Officer) for a single FEIN.
- Choose E-file
- Select Finish.
2nd Step: To Enroll in the IRS E-File Program
- Click Enrollments from the Filing Methods screen.
- Click IRS, select Edit, and proceed to follow the instructions on the screen, verify the EIN, and type the company’s legal name and address.
- Click Next and type the name, job title, email, and phone number of the individual the IRS can contact related to your company’s enrollment and payroll tax forms.
- Click Next.
Note: This person should be associated with your company and not a third-party person.
- Click Send Information.
Note: You must wait 45 days to get the 10-digit E-file PIN.
Steps to E-Pay and E-File in QuickBooks Desktop Payroll Enhanced
After successfully enrolling in the IRS EFTPS and creating a setup to e-pay and e-file, it’s time to follow the instructions to E-pay the taxes. The following steps are to pay your business taxes and e-file the tax returns.
1st Step: E-pay the Taxes
Important Notes to Consider
To ensure that federal payments are completed on time, note the following:
- If the federal tax liability is more than $100,000 in a liability period, you must go through the IRS EFTPS website on the next banking day.
- E-payments must be sent before 5:00 PM PT, two banking days before the deadline. If you e-pay after 5:00 PM, you must pay through the IRS EFTPS website.
To E-pay in QB Desktop:
- Move to the Employees, click Payroll Center, and choose the Pay Liabilities tab.
- Choose the Liability to Pay option under the Pay Taxes & Other Liabilities section.
- Click the View/Pay button and re-check the liability details for accuracy.
- Select E-Pay.
- Enter the 4-digit EFTPS PIN and additional login details in the E-Pay Login window.
Note: If you recently changed the bank account for the e-payment, use your new PIN.
Click Submit and print the confirmation notice indicating that Intuit has received your request and will submit the e-payment to the IRS.
Click the Close option.
2nd Step: E-file the QuickBooks Form 941
- Choose Payroll Tax Forms and W-2s from the Employees tab, then select Process Payroll Forms.
- Choose the QuickBooks form 941 or any other federal form you will file from the list.
- Click Create Form and select the form filing period.
- Select OK.
- Carefully review each part of the form.
- You can also click the Check for errors option.
- Make all the necessary corrections, click Submit Form, and select E-file.
- Type the 10-digit IRS E-file PIN and follow the onscreen instructions to file the form further.
How to Manually Setup, Pay, and File Form 941 in QuickBooks Desktop Payroll?
If you can’t e-pay or e-file QuickBooks form 941, you can still prepare the federal tax payments and forms in QuickBooks Desktop Payroll Basic, Standard, or Enhanced to send to the IRS or respective tax agencies. With the help of the steps below, you can learn to prepare the payroll tax payment and print the 941 forms in QuickBooks Desktop Payroll. Afterward, you can manually file the QuickBooks from 941 with the IRS to avoid further complications.
1st Step: Create and Print the Tax Payment
You can easily record federal tax payments in QuickBooks Desktop payroll and subsequently send the payment electronically through the IRS official website.
2nd Step: Pay or Record the Tax Payments
Prior to preparing the QuickBooks form 941, pay all taxes related to the form in QuickBooks; otherwise, you’ll see amounts due on the form. The following are the steps to pay the tax amount in QuickBooks Desktop:
- Choose Employees and select Payroll Taxes and Liabilities.
- Click the Pay Scheduled Liabilities option.
- Choose the Tax from the list you want to pay and choose View/Pay.
- It is important to review the taxes and amounts due, and when you are ready, click Save & Close.
- Choose Print Checks.
3rd Step: Prepare and Print the Payroll Tax Form
- Under the Employees tab, click Payroll Tax Forms and W-2s, and choose Process Payroll Forms.
- From the list, choose Form 941 and click Create Form.
- Click the Filing Period under the drop-down, click OK, and complete the interview for the form.
- Fill in the highlighted green sections, review any pre-filled details on the form, and choose Next.
- Review all pages of the form and select Check for Errors when finished.
- If QuickBooks identifies any errors, you must fix these before printing and saving the form.
- When you can print and save the form, choose the Save as PDF option or Print for your Records.
- Select Save and Close if you want to return to the form later.
4th Step: Send the Form
Once you print the QuickBooks form 941, read and review the instructions page for where to send the tax form.
How to Setup, E-Pay, and E-File QuickBooks Form 941 in QuickBooks Online Payroll?
If you’re a QuickBooks Online Payroll user, choose how you want your payroll taxes and filings handled. You can create a setup or complete some tasks according to your preferences. With the process given in the following steps, you can set QB Online to pay and file QuickBooks form 941 automatically or manually.
Steps to Setup QB to Electronically Pay and File From 941
Complete the following tasks so QuickBooks can e-pay the taxes and e-file the 941 form automatically, or you can complete it electronically in QB.
1st Step: Check or Change the Taxes and Forms Preference
- From the Settings tab, choose Payroll Settings.
- Click Edit under the Taxes and Forms section.
- You must review or choose any one of the following options:
- If you want QuickBooks Online to pay and file form 941 automatically, choose the Automate Taxes and Forms option.
- If you want to pay and file form 941 in QuickBooks electronically, choose; I’ll initiate payments and filings using the QuickBooks option.
- Click Save, then Done.
2nd Step: Check the Automated Taxes Widget
The Automate tax widget gives detailed information about each tax. To complete the tasks, you must check these tax widgets.
- Click Payroll and choose the Overview option.
- Under the Automate Taxes, click Finish up. After that, review the Status option and the Who Pays & Files column for every tax.
- If you see any warning in the status, choose the Action link (Finish up, Start, Mark as done).
- Finally, complete the task(s) as required.
Note: While setting up federal taxes, you must enter any important missing information like Account number or FEIN, how often you pay taxes, i.e., deposit frequency, and rate(s).
Steps to Pay Taxes and File the Form Manually
You must follow the steps carefully to complete these tasks so QuickBooks can accurately track the tax amounts and populate form 941. Afterward, you can quickly generate the payments and filings in QuickBooks to send to the IRS.
1st Step: Check or Adjust the Taxes and Form Preference
- From the Setting tab, choose Payroll Settings.
- Click Edit under the Taxes and Forms section.
- If you want to handle the payroll taxes and filing yourself, click the I’ll pay and file the proper agencies through their website or by mail option and click Save.
- Select Done.
2nd Step: Complete the Tax Setup
To complete the tax setup, make sure to enter your tax rates. If you want to print QuickBooks form 941 from QuickBooks Online, adding your account numbers and how often you pay the taxes is recommended.
Steps to E-Pay and E-file in QuickBooks Online Payroll
If you have chosen to pay and file form 941 in QuickBooks Online payroll electronically, follow these two steps:
1st Step: E-Pay the Payroll Taxes
While e-paying your taxes in QB payroll Online, remember that the IRS and state agencies have separate processing times. You might need to e-pay the respective agencies up to 5 business days before the due date.
Note: You must ensure sufficient funds are available when payroll taxes are due and to create the tax payment.
- Under the Taxes, select Payroll Tax and choose Payments.
- You will see the taxes due now under Action Needed, and upcoming taxes will show under Coming Up.
- To find the specific tax to pay it faster, choose the Filter option and click Pay on the tax you wish to pay.
Note: You still can make late payments to the IRS, but some states will block you. You should contact the state to make the further payment.
- From the Chart of Accounts, ensure the Bank Account is the same payroll account in the QuickBooks application. (this will not impact the actual bank account you use).
- Review your Payment Date or choose a different date if necessary.
- Choose E-pay and select Payment History to review the payments made.
2nd Step: E-file the 941 Tax Form
Ensure you paid all taxes related to the QuickBooks form 941 in the above step before you follow this step to e-file.
- Move to the Taxes tab and click Payroll Tax.
- Click Filings, and you will see 941 under Action Needed. Forms that are due later will show under Coming Up.
- If you cannot find the Form 941, click the Filter option.
- Choose File on Form 941 and ensure the File Electronically box is chosen.
- Click Submit, and you can find the filed form under Done.
- Print the form if needed.
Conclusion
Hopefully, you have understood the process of finding, setting up, paying, and filing QuickBooks form 941 electronically and manually. For some users, the process could be time-consuming or get stuck due to certain errors. If you are also dealing with issues filing form 941 in QuickBooks, don’t let business or miss the due date; get an expert opinion ASAP!!! Dial +1-(855)-955-1942 to get all the necessary help from our team to overcome issues you face while filing tax forms in QuickBooks.
Frequently Asked Questions
A. QuickBooks Form 941 is the Employer’s Quarterly Federal Tax Return used to report payroll taxes, including income tax withheld and employer/employee shares of Social Security and Medicare. It’s crucial for staying compliant with IRS regulations. QuickBooks automates much of this, calculating amounts and filling the form based on payroll data. Filing accurately and on time—by the last day of the month following a quarter—helps avoid penalties and ensures proper recordkeeping. Businesses that run payroll through QuickBooks can generate, review, e-file, or print Form 941 directly. Always double-check figures before submitting to the IRS.
A. To generate Form 941 in QuickBooks Desktop, ensure your payroll subscription is active. Then:
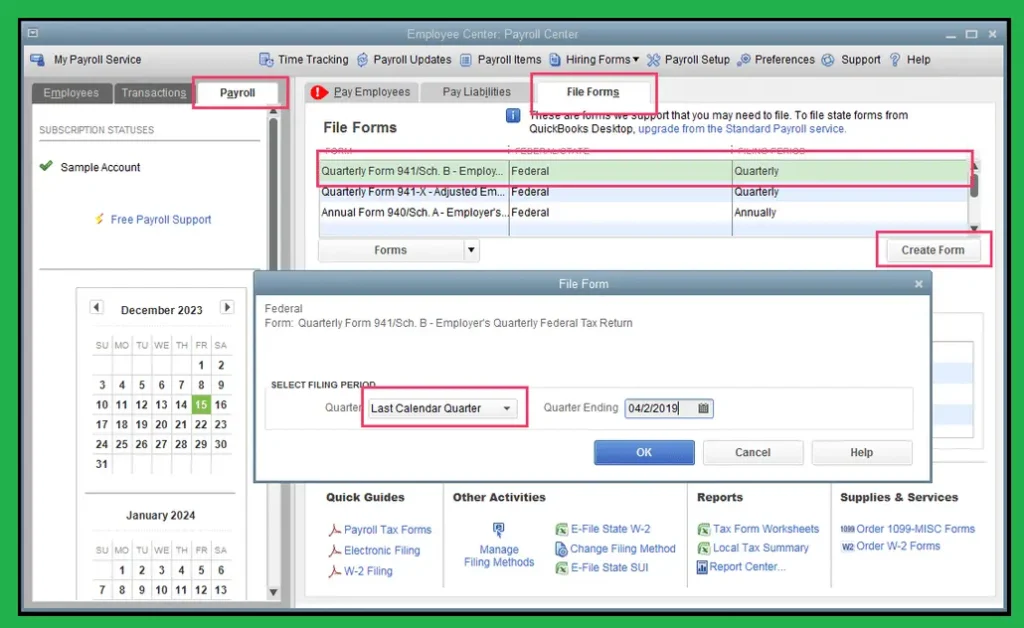
a. Go to Employees > Payroll Center > File Forms.
b. Select Quarterly Form 941.
c. Choose the correct quarter and year.
d. Click Create Form, review auto-filled fields, and correct any errors.
e. Submit via E-file or Print.
QuickBooks will auto-fill based on your payroll records, but reviewing wage, tax, and deposit details is essential. If amounts appear off, check payroll setup or run Payroll Summary Reports. Timely and accurate filings help avoid IRS notices.
