
Sending invoices and financial reports to a client can be a challenging task. Firstly, you need to print it, do a scan, and then send it as an e-mail attachment to the concerned party. Fortunately, QuickBooks has an amazing feature for setting up email services that can help reduce the effort of sending a report. With this feature, you can easily email invoices, reports, and transactions to clients or colleagues directly within QuickBooks. So, if you want to Setup Email In QuickBooks and avoid the lengthy process of sending the report, then go through this blog. We’ve outlined all the benefits and possible ways to get this email setup done.
Unable to complete QuickBooks Default Email Setup? Then get in touch with the experts at Data Service Solutions by calling the helpline number +1(855)-955-1942.
Basic Requirements To Fulfill Before Setting up the QuickBooks Email Service
Setting up email in QuickBooks helps you send & receive invoices and reports to your clients directly from QuickBooks Desktop through Outlook or webmail ID. Thus, it saves you tons of effort and energy to do it otherwise. But, before you set up your email in QuickBooks, fulfill the following basic requirements to make the process easier.
- Your Username is a must.
- A strong password
- Incoming email server address
- Incoming email server type
- Outgoing email server type
Key Benefits of Email Setup In QuickBooks
The Benefits you can avail yourself after you Setup Email in QuickBooks are listed below:
- Email setup in QuickBooks allows you to set payment reminders to the customers (via emails).
- You no longer need to go to your mail client every time you send an email.
- The direct transfer of Invoices, Payment Reminders, etc., to clients or within workplace departments directly from QuickBooks.
- It provides you with the feature to import data from spreadsheets. Besides, you can also insert attachments up to 2MB.
- QuickBooks Email Setup saves a lot of your time and the cost of maintaining a record and storage space.
Different Methods To Set Up Emailing Services In QuickBooks
There are 3 email options that you can use to setup email in QuickBooks. However, sometimes, you might not be able to spot these options for a particular email. This might happen when you have a different version other than the ones listed below. So, check on the list mentioned for different email options in the QuickBooks application.
- Webmail: The Webmail feature of QuickBooks is to bridge with Yahoo, Gmail, or any email platform (launched in the year 2011).
- Microsoft Outlook: One needs to know that Outlook is one of the most preferred email clients. If you have already installed MS Outlook in your system, then you can redeem the Outlook support.
- QuickBooks Email Service: This option is not much in use and is most disliked by the users. Most users prefer the Outlook option for the best experience.
How To Setup Email In QuickBooks? – Easy Ways
Here, we have listed steps for all the available options to setup email in QuickBooks. Go through each step one by one and perform the steps in sequence.
A: Setup QuickBooks Mail via Outlook
To setup email via QuickBooks, you can either use your existing Outlook profile or create a new one. But, remember you will require the information as mentioned above before you proceed ahead. In case you don’t have these details, you need to connect with your ISP (Internet Service Provider).
Note: Before you begin to set up Outlook to work with QuickBooks, make sure that you’re using Outlook 2010 or its latest version. Besides, you also need to have an Outlook email profile.
Follow the given instructions to set up Outlook to work with QuickBooks:
- Open the QuickBooks application in the first place.
- Go to the Edit menu and select Preferences, followed by Send Forms.
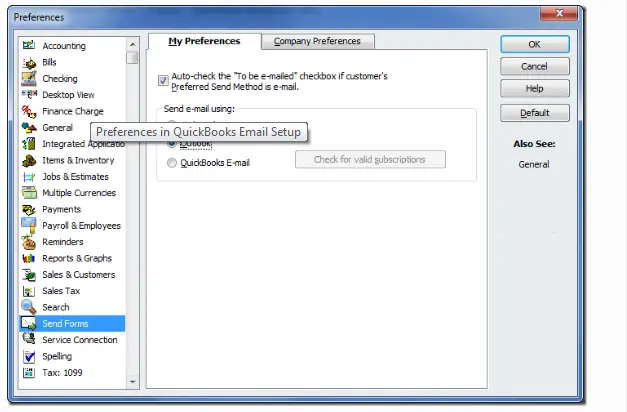
- After that, select Outlook and click OK.
B: Set up your Secure Webmail for QuickBooks
Before you begin to set up Secure Webmail in QuickBooks, there are certain points that you must be aware of ways to avoid any unnecessary hindrance:
- Make sure to use the latest QuickBooks Desktop version when you set up secure webmail in QuickBooks.
- You will need to link your webmail account with the Intuit account before you send an email using secure webmail.
- However, you will only need to link your Intuit account with webmail one time. After that, you just need to open your webmail, and QuickBooks will not ask you to log in to your email again.
NOTE: To help you with the versions of QuickBooks that are compatible with the secure webmail, below we have listed all such QuickBooks versions:
- QuickBooks 2019 and 2020 Version: These versions are suitable for Yahoo Email, Gmail, Hotmail, AOL, and Windows Live Mail. For the Mozilla Thunderbird Email Client they only support the plain text version in Mozilla.
- QuickBooks 2018 Version: This version is only available for Gmail and Hotmail/Live users.
- QuickBooks 2017 Version: Gmail users in the USA only can use R5 and newer versions.
- QuickBooks 2017, R4, & Older Version: The secure webmail is not available for these versions.
We have specified all the prerequisites required for the secure webmail; let’s proceed to configure email in QuickBooks using the QuickBooks Email option.
Follow the given instructions to set up secure Webmail to work with QuickBooks:
- Open the QuickBooks application and select the Edit menu.
- From there, click on Preferences> Send Forms> Web Mail> Add.
- Further, you have to go to provider from the drop-down to type your email address.
- After that, mark the Use Enhanced Security checkbox and click OK.
NOTE: Make sure to uncheck the box if you receive the error message: Network Error. Please try again.
- Sign in to your Intuit account (When prompted).
- It will display your webmail provider’s login page. Sign in and then you have to select to grant Intuit access.
Important points you need to know After setting up secure webmail:
- If you are adding Secure Webmail to your company file (Ensure to set up a complicated password).
- Hosted environments might prompt you to enter your webmail credentials while sending emails.
C: Configure Regular Webmail to work with QuickBooks
There are a few factors that you must take into account before you proceed to setup regular email in QuickBooks:
- Make sure that webmail servers and port settings with your ISP are verified.
- To do the two-step verification, Webmail providers might ask you to enable the account settings.
- For the most common providers, QuickBooks can also auto-fill information.
Steps to set up Regular Webmail in QuickBooks
Follow the below-given steps to use Webmail to setup email in the QuickBooks Desktop application.
- Open the QuickBooks application.
- Select the Edit menu and click on Preferences.
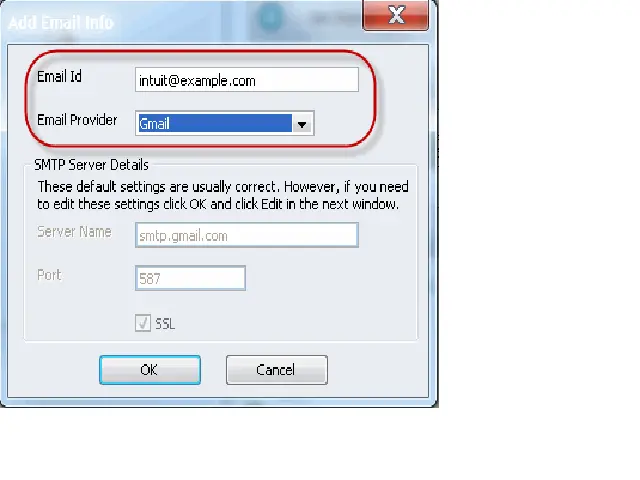
- After that, click on Send Forms followed by Web Mail and Add.
- Fill out the Add Email Info and click OK to save changes.
We hope you are able to setup QuickBooks Email after following the above-listed steps. Once done, you must consider the below-mentioned factors.
- When you try to send an email using webmail for the first time, QuickBooks will ask you to type your webmail password (Unlike Secure Webmail).
- In case, your password isn’t accepted, you have to see QuickBooks will not accept my webmail password for more information.
- If you are not able to log in with Gmail, see Gmail couldn’t sign you in from QuickBooks Desktop for further information.
D: Set up Email service in QuickBooks
To set up Email Service in QB, look at the following steps:
- Firstly, click on the QuickBooks Email option from the Send email using section.
- Verify if you have a valid subscription or not. QB email features only process when you have an Intuit service’s active subscriptions like Accountant’s Copy File Transfer, QuickBooks Payroll, QB Enterprise Full Service, IMS (Intuit Merchant Service), or QB Billing Solution.
- After that, you must follow the instructions that appear on your screen for QuickBooks email setup.
- Lastly, you need to enter some information such as email address, username, password, incoming & Outgoing email settings, and server details.
Note: QuickBooks doesn’t save a copy of the emails that you send. We suggest you enter any of your email addresses for tracking purposes.
Are you a Cox and CableOne user, and cannot find a suitable option to set up email in QuickBooks? Don’t worry! The below section will answer all such queries:
- Cox users: The standard SMTP settings of Cox don’t utilize the SSL or login details while sending emails in QuickBooks. QuickBooks Desktop only uses an SSL connection and login details to send emails via QB. However, if you use port 25 with no SSL connection, the SMTP doesn’t work with QB desktop. Instead of this, you must use port 587 or 465.
NOTE: In case, you found that port 465 isn’t working change the port to 587. Also, ensure that SSL is enabled while sending emails through both ports.
- For CableOne Users: CableOne users can follow the below-given details to set up email in QuickBooks since they use Google servers.
- Email Provider: Gmail
- Email Address: Your User ID
- SSL: Yes
- Port: 465 or 587
There might be times when you may get confused with the different port information and internet service providers. Thus, to help you with that, we present to you the table that contains all the required data associated with it.
Table For Port Information And Internet Service Provider (ISP)
To find out the information related to exact codes and the port, servers, and ISP, you must go through the table given below:
| ISP (Internet Service Provider) | SMTP Port | SMTP Server |
|---|---|---|
| BELL SOUTH | 110 | mail.bellsouth.net |
| ADELPHIA | 110 | mail.adelphia.net |
| 1AND1.com | 587 (SSL enabled, with password) | smtp.1and1.com |
| AOL | 465 or 587 (SSL enabled for outgoing and incoming mail server) | smtp.aol.com |
| COMCAST | 587 | smtp.comcast.net |
| COX Business | 25 | smarthost.coxmail.com |
| COMPUSERVE | 110 or 587 | smtp.compuserve.comsmtp.aol.com |
| COX CENTRAL | 25 | smtp.central.cox.net |
| COX WEST | 25 | smtp.west.cox.net |
| COX EAST | 25 | smtp.east.cox.net |
| EARTHLINK | 25 (with password) | smtpauth.earthlink.net |
| GODADDY with Office 365 | 587 (SSL enabled) | smtp.office365.com |
| MICROSOFT OUTLOOK 365 | 587 (SSL enabled) | outlook.office365.com |
| PRODIGY | 25 (SSL enabled) | smtp.prodigy.net |
| SPRINT PCS | 25 | smtp.sprintpcs.com |
| VERIZON | 465 | outgoing.verizon.net |
| GODADDY | 80, 25, or 3535 | smtpout.secureserver.net |
| LYCOS | 25 | smtp.mail.lycos.com |
| NETSCAPE | 25 (SSL enabled) | smtp.isp.netscape.com |
| ROADRUNNER | 587 | smtp-server.sc.rr.com |
| VERIZON YAHOO | 465 | outgoing.yahoo.verizon.net |
Get Instant Assistance!
We hope the above-provided information will help you set up email in QuickBooks. However, if you get stuck while following any of the above-listed methods, we would suggest you give us a call on our QuickBooks Data Service Solutions helpline number +1(855)-955-1942.
Frequently Asked Questions
At present, QuickBooks does not have the ability to automatically send customers their statements and their invoices in one email. This is true even if the email address is the same or even if sending it to the same customer.
You can do this by exporting your customers’ list and then copying their email addresses. This way, you’ll be able to send emails in bulk in the program. Further, select all the email addresses, or you may copy them by pressing the Ctrl+C keys simultaneously.
You can create and send multiple invoices simultaneously with QuickBooks Online Advanced. Moreover, you can save a lot of your time by sending the same invoice to multiple customers. You may also work on multiple invoices at once in a single window. Then, send all your invoices with one click.