Ensuring adequate data security is crucial for QuickBooks Online (QBO) users. Fortunately, Intuit enables automatic backup of QBO data on its server. Nevertheless, you might need to manually backup QuickBooks Online data to ensure greater control over your data. In this guide, we will explore the steps to create backups for QBO data. Moreover, we will look at various tips to enhance QBO data security for your Enterprise.
There are actually multiple ways to backup QBO data. If you are using the QBO Advanced Company version, you can ensure automatic data backups & one-time manual backups. Moreover, you can utilize Rewind (a third-party app) to back up your business data. Another option is to perform a basic backup by exporting your data to Excel.
Alright, then, let’s dive into the article to discover various processes that will enable you to ensure a complete backup of QB Online data.
Understanding Different Ways to Backup QB Online Data
Here are the points that explain how you can create & save backup QBO data:
- Using the QBO Advanced Company Plan: This is the only QBO plan that allows automatic & manual data backups. Moreover, it enables one-click restores for your business data.
- Subscribing to the Rewind App: Intuit has recommended the Rewind app to create automatic backups & restores for QBO data.
- Manually Exporting Your Data: As a basic backup option, you can export certain lists, reports, & transactions from QBO to Excel.
Now that you have a good grasp of various methods that you can use to backup QBO data, let’s scroll down to the next section to discover how to actually implement them.
Utilize 3 Proven Strategies to Backup QuickBooks Online Data
Here are the three methods you can implement to easily backup QBO data. Ensure that you utilize the steps detailed below in the correct order.
1. Backup & Restore Your QB Online Advanced Company Data
The QBO Advanced Company version allows you to backup your data using the Online Backup and Restore App. Before using this app, it is essential to understand what it can backup & what it can’t. The following points will enable you to comprehend this better:
A. Data That You Can Backup
| Transaction Data | List Data | Other Data |
| Invoices Estimates Sales Receipts Payments Deposits Bills and bill payments Credit memos Vendor credits Journal entries Purchases and purchase orders Refund receipts Time activities Transfers | Accounts Budgets Classes Currencies Customers Departments Employees (except their SSN) Items Payment methods Tax agencies Tax codes and tax rates Terms Vendors (except the Tax fields) | Attachments Company Info Entitlements Exchange rates Preferences Intuit Payroll info backs up as journal entries Inventory shrinkage and adjustments back up as journal entries |
B. Data That You Cannot Backup
You won’t be able to backup the following data:
- Types of customers & price rules.
- Recurring transactions.
- Bank feeds and their connection to bank rules & different transactions.
- QB Online Payments information.
- Reconciliation reports.
- Entries in the Audit Log section.
- Custom form templates.
- Custom reports.
- Account-based & item-based billable expenses.
Now, let’s navigate to the following point to understand how to automatically backup your QBO data.
C. Activate Automatic Backup of QB Online Data
Here are the points that will help you enable automatic backup of QBO data:
- Open Settings and choose Back up company.
Note: You may need to sign in with your Intuit account and tap Authorize to continue.
- Locate the company with the automatic backup you want to disable.
- Click the Action dropdown menu, then choose Turn on backup.
It is also possible to switch off the automatic data backup feature. Let’s explore the next point to understand it better.
D. Switch Off the QBO Automatic Backup Facility
You can easily turn off the automatic data backup facility in QBO Advanced Company by following these points:
- Open Settings and click Back up company.
Note: You may be prompted to sign in with your Intuit account and click Authorize to proceed.
- Locate the company with the automatic backup you want to switch off.
- Open the Action dropdown menu and choose Turn off backup.
Sometimes, you might be working on a specific project & want to save the backup data at once. In such cases, you can perform manual backups as detailed below.
E. Manually Backup Your QBO Data
Here are the points that explain how you can manually backup the QB Online data:
- Open Settings & click Back up company.
Note: You may need to sign in with your Intuit account and choose Authorize to continue.
- Select Add Company. After that, you should pick the company you want to back up from the Search for a company dropdown menu.
- Click Next, then select Connect.
Note: If you need to back up multiple companies, repeat the previous steps for each one.
- Locate the company you want to back up.
- Open the Action dropdown menu and choose Run full backup.
It is also possible to save your backup data to the Google Drive account. Let’s scroll down to the following point to learn how to do that.
F. Save the QBO Backup Data to Google Drive
Here’s how you can save the QB Online backup data to Google Drive:
- Open Settings, and after that, you must click Back up company.
Note: You may need to sign in with your Intuit account and select Authorize to proceed.
- Go to the User menu.

- Choose where you want to save your backup data and tap Link Google Drive.
- Follow the prompts to grant QuickBooks permission to create backups.
Note: It may take 10 minutes or longer for the backup file to appear in Google Drive. Also, data stored using personal cloud archives cannot currently be restored through the Online Backup and Restore feature.
Sometimes, you might need to restore the QBO backup data for different projects. Let’s jump to the following point to discover how you can do that.
G. Restore Your QB Online Backup Data
Whenever you restore the QBO backup data, you can restore everything except the following:
- Budgets and inventory history & inventory adjustments.
- Tax rates that are linked with expense accounts. These are generally restored in your liability accounts.
- Backup data associated with the personal cloud archive feature.
To successfully restore the QBO backup data, you can follow the steps listed below:
- Go to Settings and choose Back up company.
Note: You may need to sign in with your Intuit account and click Authorize to continue.
- Locate the company you want to restore. After that, open the Action dropdown menu and select Restore.
- In the Date field, choose the backup date from which you want to restore.
- Use the Time dropdown menu to pick the specific backup time.
- Click Next and follow the on-screen instructions.
- Finally, select Start Restore to begin the process.
You can also utilize the Rewind app to backup & restore the QBO data. Let’s learn more about it in the next point.
2. Use the Rewind App to Backup & Restore Your QBO Data
Intuit has recommended the Rewind app to backup and restore the QB Online data. This app seamlessly integrates with QBO, and it creates continuous backups for each entry. Moreover, you can easily restore your data as and when needed. The best thing about this app is that it is suitable for small-scale businesses & large firms alike. Furthermore, you get a free 7-day trial with each subscription plan.

Sometimes, you may want to save the backup QBO data on your computer. In such cases, you can export the QBO data to Excel. Let’s navigate to the following point to discover how you can do that.
3. Export Your QBO Data to Excel
Exporting the QBO data to Excel is a basic backup option. In other words, you can export the QBO data to Excel to keep an additional copy of the data on the computer. This allows you to transfer the Excel data to various apps, and you may also share it with other clients. However, you must remember that exporting data to Excel is not a substitute for a full data backup service. Here’s how you can export QBO reports and lists to Excel:
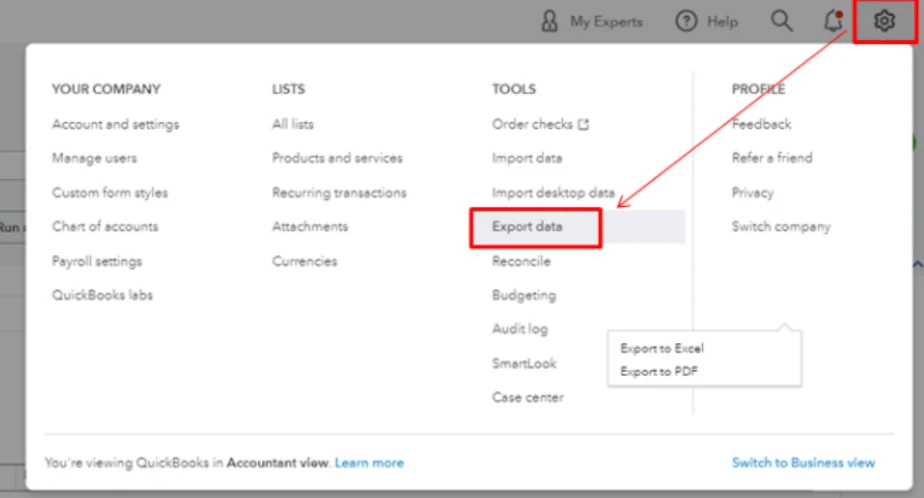
- Go to Settings and, under the TOOLS column, choose Export data.
- In the Reports tab, select the date range from the Pre-selected date ranges dropdown.
- Use the switches on the Reports and Lists tabs to add or remove items as needed.
- Click Export to Excel and select OK to confirm the export process.
Once completed, you’ll receive a confirmation that the data has been successfully exported. You can easily share the Excel data with different clients & business associates.
Crucial Tips to Help You Create Backups For Your QBO Data
You can implement these tips when creating backups for the QB Online data:
- Use a Secure Connection: Always back up data over a secure, encrypted internet connection to avoid the risk of data breaches.
- Sign In with Intuit Account: You may need to sign in with your Intuit account and authorize actions before creating backups.
- Check Backup Settings: Confirm that the correct company file and data range are selected before proceeding with the backup process.
- Choose Reliable Storage: Store backups in a secure and accessible location like Google Drive or a trusted cloud service with proper encryption.
- Avoid Interruptions: Ensure your internet connection is stable, and avoid closing the browser or logging out during the backup process.
- Confirm Backup Completion: Wait for the confirmation message to ensure the backup is successfully completed and available.
- Regularly Schedule Backups: Set up automatic backups or create them periodically to avoid data loss in case of unexpected issues.
Winding Up
In this detailed blog, we showed you how you can easily backup QuickBooks Online data. Hopefully, you can now create & save data backups in QB Online without facing any issues. If, however, you want further information or have a query, you can contact a QB professional for real-time help.
Frequently Asked Questions
A. Yes, QuickBooks Online stores your data in the cloud and automatically backs it up in real-time on Intuit’s secure servers. However, this backup is for disaster recovery, not for restoring to earlier versions or undoing transactions. For more control, consider using a third-party backup app that allows you to schedule backups and restore previous versions if something goes wrong, like accidental deletion or data corruption.
A. No, QuickBooks Online doesn’t have a native feature to restore a previous version or roll back your company file. Once a change is made, it stays unless reversed manually. To enable restore functionality, connect a cloud backup tool that tracks changes and allows one-click restoration to earlier versions. This is essential for accountants and business owners who want version control or protection from data loss due to errors or overwrites.