Exporting reports and other forms from QuickBooks to Excel is an uncomplicated task. However, you may face the issue of being unable to export to Excel from QuickBooks due to errors or glitches in QuickBooks. This issue is typically encountered in two different cases. In one case, QuickBooks crashes/freezes, or the export to Excel option is grayed out when exporting the data to Excel. As has been noted, such problems mainly occur right after you upgrade the office. In another case, you may face this export issue when the accounting software is unable to recognize Excel installed on the system. If you are also going through the same issue, follow the solutions listed in this article to regain access to the QuickBooks export to Excel feature quickly. In addition to this, you’ll also learn about the root triggers that cause this export issue on the system.

Wondering why the QuickBooks Export to Excel option is grayed out or why you can’t select it? If that’s so, reach out to our experts by giving us a call on our Toll-Free Number +1-(855)-955-1942. and get immediate assistance.
Reasons for Being Unable To Export Data From QuickBooks To Excel?
You may face this ‘unable to export to Excel from QuickBooks’ error, mainly when the QB application is unable to recognize the Excel that is installed on the system. However, several other reasons make you unable to export data from QuickBooks to Excel. To help you become aware of all these, we have listed all the causes below:
- Outdated QB application.
- Another reason is a partial or incomplete installation of MS Office.
- You might be unable to export to Excel from QuickBooks due to damaged MS Excel software.
- Many times, the export option for Excel is grayed out due to overly restrictive Windows User Account Controls settings.
- Your system fails to meet the minimum system requirement to run the QuickBooks Desktop application.
As the reasons behind why you are not able to export data from QB Desktop to Excel are now discussed, let’s move on and discuss the solutions to tackle this issue.
Steps to Fix ‘QuickBooks Online Export to Excel Not Working’ Error
Of all the following ways to resolve the issue of being unable to export to Excel from QuickBooks, one of the common ways is to re-register all the keys with Microsoft by reinstalling or merely repairing Microsoft Office. This will enable the software to identify that Excel is present on the computer. However, if this doesn’t work, you can proceed with the other troubleshooting solutions below.
Note: If you’re using Microsoft Office 365, make sure to use the version installed on your system instead of the web browser version. Also, consider updating MS Excel before trying the troubleshooting solutions.
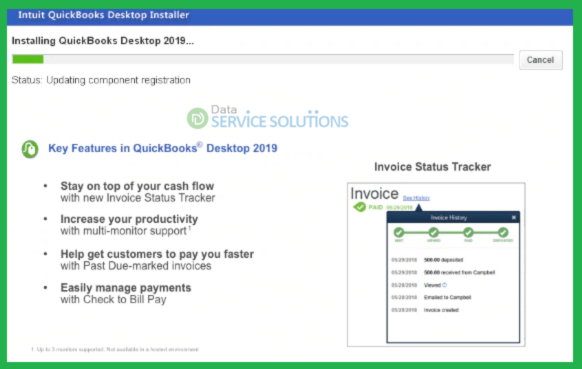
Solution 1: Update QuickBooks Desktop
Make sure to keep your QuickBooks application updated as per the latest release. It ensures that your application works in its optimal state. Moreover, right after you update, open QB and try to export a report by following the below-given steps:
- Firstly, open QB and go to the Reports menu.
- Then, open any report on the list and select the Excel button.
- You will see all the export options, including Excel, on the screen.

If issues with exporting report to Excel continue, move to the next solution.
Solution 2: Check QuickBooks System Requirements
Being a application user, you must know that each version of QB Desktop works best with a specific version of Microsoft Office. Therefore, knowing the basic system requirements for your version of QuickBooks is essential. You can check the same by clicking the links here: 2017, 2018, 2019, 2020, and 2021.
If your version of Microsoft Office isn’t compatible for any reason, you must upgrade your application to a suitable version. In another case, if your version is compatible, but the ‘QB online export to Excel does not work’ error still persists, you must jump to the next solution.
Solution 3: Repair Microsoft Office
If MS Office applications like Word or Excel do not work correctly on your system, restarting the application can sometimes fix the issue. However, if that does not work, you need to repair the application. And after you are done repairing it, you need to restart your system. The steps to access the repair tool may vary depending on the operating system you use.
Follow the steps mentioned here for detailed information on how to repair Microsoft Office. Once the application is repaired, go back to QuickBooks and export a report to check if you are still unable to export to Excel from QuickBooks.
Recommended To Read – How to Enter Opening Balance in QuickBooks Desktop
Solution 4: Try the Correct Method to Export to Excel from QuickBooks
Exporting reports, forms, or files to Excel from QuickBooks inappropriately may trigger issues in QuickBooks. Therefore, you must follow the standard procedure to export Excel files from QuickBooks. We have provided the steps in detail for the same.
- First, go to the Customer Center, and then from the Transaction Pane, you choose Transactions.
- Further, move to the Transaction Journal available in the Transaction list and select a transaction.
- Then, tap the Excel button, create a new worksheet, and export it to Excel.
- Then, make sure that you have first opened the item list and then your report.
- Now, select the List and open the Item List from there.
- Further, from the Report menu, choose and open the report you want to open.
- Then, click the Email option and choose the Export to Excel option.
- Lastly, select Email or Email as an Excel form option from the drop-down list.
If you still find yourself struggling to export Excel from QB, follow the next solution.
Solution 5: Change Windows User Account Controls (UAC) Settings
If, even after following the above solution, you’re unable to export to Excel from QuickBooks, you must try to toggle on and off the Windows UAC settings on your system. It will reset anything that is blocking the export feature. To do so, you must proceed with the below-given steps:
Note: The below steps work for Windows 7, 8, and 10 users.
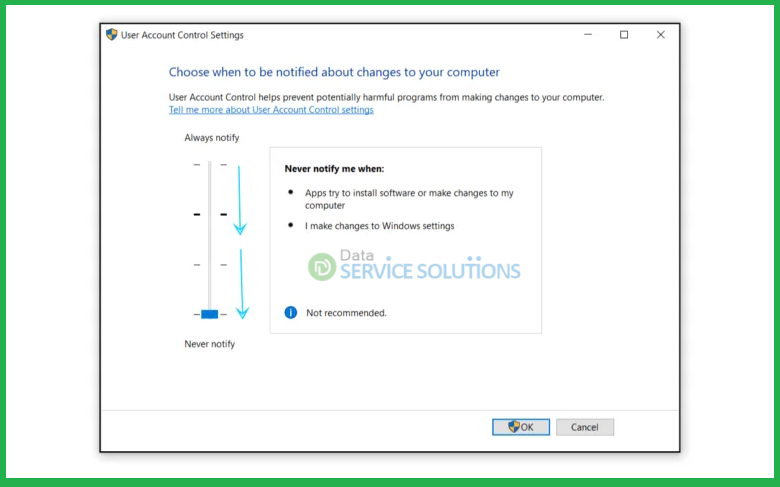
- Click on the Windows icon and type User Account Control Settings into the search bar. Then, tap to open User Account Control Settings.
- Now, select and move the slider to Never Notify. Then select OK.
- Lastly, consider restarting your computer.
Once done, you must go back into QuickBooks and try to export a report. If you can export, it means the ‘QuickBooks Excel export not working’ issue has been fixed. However, if you are still unable to export to Excel from QuickBooks, move on to Solution 6.
Solution 6: Reinstall QuickBooks Desktop on the System
Before you install QB, it’s essential to install Microsoft Office and Excel on your computer. If you haven’t installed Microsoft Office first, uninstall and reinstall QuickBooks Desktop
Step 1. Uninstall QuickBooks
- Tap the Windows Start button on the PC and enter “Control Panel” in the search box.
- Tap to open Control Panel and select Programs and Features or Uninstall a Program.
Choose your QuickBooks Desktop version from the list of programs, click Uninstall/ Change, then Remove, and then hit Next to conclude the uninstallation procedure.
Step 2. Rename the Installation Folders Manually
- Press Windows + E on the keyword to open File Explorer.
- Find and access the QuickBooks folder that holds the company file. It is usually found in one of these locations.
- C:\ProgramData\Intuit\QuickBooks (year)
- C:\Users\(current user)\AppData\Local\Intuit\QuickBooks (year)
- C:\Program Files\Intuit\QuickBooks (year)
- 64-bit version C:\Program Files (x86)\Intuit\QuickBooks (year)
- Further, right-click the folder and choose the Rename option.
- Include .OLD at the end of the folder name to prevent QB from opening it when you reinstall.
Step 3: Reinstall QuickBooks
Prepare your system for installation:
- Ensure that the computer fulfills the QuickBooks system requirements.
- Also, download your version of QuickBooks and save the setup (.exe) file somewhere you can easily find it.
- Note down the product and license number of QuickBooks, as you will need them during installation.
Install QuickBooks Desktop:
- Open the QuickBooks set-up file QuickBooks.exe.
- Follow the instructions displayed on the screen and accept the software license agreement. Then, click Next.
- Enter the product and license numbers in their relevant fields, and then click Next.
Note: You can install QuickBooks in two ways. First is Custom and Network Options, and the next one is Express Install. As you are reinstalling QuickBooks, you must choose the Express installation path.
- Choose Express and then click Next. Then, click Install.
- Once done, click Reopen QuickBooks
Once you are done, go back into QB and try to export a report. If you’re still unable to export to Excel from QuickBooks even after uninstalling and reinstalling QBDT, follow the steps below to uninstall and reinstall Excel.
Solution 7. Reinstall Excel on the System
If repairing the application doesn’t work, consider reinstalling it from the system to eliminate the issue from the root. In this section, we’ll learn how to uninstall and then reinstall Excel. Therefore, let’s follow the steps below for the same.
Steps To Uninstall Office
The steps to uninstall MS Office depend on the type of installation you have. However, the most common installation types among all are Click-to-Run and Microsoft Windows Installer (MSI). Let’s follow the detailed steps below:
- Click on the Windows icon and open the Control Panel.
Note: How you open the Control Panel depends on your Windows version.
Windows 10
- Type Control Panel in the search box on the taskbar and then tap the icon to open it.
- Select Programs> Programs and Features.
- Right-click your Microsoft Office product and choose Uninstall.
Windows 8.1 or 8
- Right-click on the Windows icon in Windows 8 and tap the Control Panel icon.
- Select Programs and Features.
- Lastly, right-click the Office product and choose Uninstall.
Windows 7
- Click on the Windows icon on your keyboard and select Control Panel> Programs and Features.
- Right-click the Office application that you want to remove, and then click Uninstall.
- Follow the prompts appearing on the screen to complete the uninstallation procedure.
- Further, reinstall Office, depending on the version you have. [Download Microsoft Office 365 from HERE]
Note: Before you begin reinstalling Office, ensure that your PC or Mac meets the system requirements.
Steps To Reinstall Office
- Sign in to the official MS Office website and select the Install Apps option on the Microsoft 365 home page.
- Select Install or Install apps depending on the version, and this action will download Microsoft 365 on your system.
- Depending on the browser you use, you need to select from the following options: Run (in Edge or Internet Explorer), Setup (in Chrome), or Save File (in Firefox).
- If you see the User Account Control prompt asking if you want to allow this app to make changes to your device, then select Yes. It will begin the installation.
- When you see the phrase “You’re all set! Office is installed now” on the screen, it means the installation is completed.
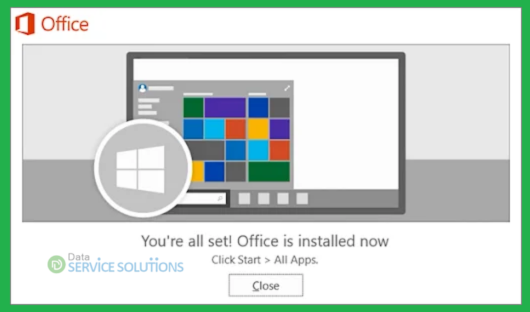
- Further, it will display an animation that will tell you where you can find the Office applications on your computer. Select the Close option to conclude.
Additional Troubleshooting Solution for Exporting from QuickBooks to Excel Problems
- Open Microsoft Excel and move to the File menu.
- Select Options at the left pane and click on Advanced under Excel Options.
- Check the settings under Advanced Options for working with Excel and click OK to conclude.
Solutions for MAC Users facing the ‘QuickBooks Won’t Export To Excel’ Issue
- Firstly, you must verify the compatibility of your system with the Excel version that you are using.
- Then, check the specifications required for your system to work efficiently with the QuickBooks software, as mentioned above.
- If the above-mentioned requirements are fulfilled, the chances are that there is an issue with the installation of Excel or QuickBooks.
- If you want to check whether the issue is with Excel or not, you must register all the keys again with MS by reinstalling or repairing MS Office. This technique allows the QB to detect that you are using Excel again on your computer system, and thus, it helps you resolve the issue.
- You can also check whether the issue is with QuickBooks installation by running a clean install of the application.
Conclusion
We hope the troubleshooting solutions mentioned in this blog have helped you resolve the issue of being unable to export to Excel from QuickBooks without any hassle. However, if you need any further assistance, we suggest you give us a call at the QuickBooks Data Service Solutions Helpline Number +1-(855)-955-1942. Our QB experts can provide immediate solutions for small or major issues.
Frequently Asked Questions
A. If you’re unable to export to Excel from QuickBooks, it’s usually due to a compatibility issue. QuickBooks requires a compatible version of Microsoft Excel installed on the same system. Here’s what to check:
a. Ensure Excel is installed and activated.
b. Make sure you’re using 32-bit Excel, not 64-bit, for older QuickBooks versions.
c. Update both QuickBooks and Excel to their latest versions.
d. Run QuickBooks as administrator.
e. Reinstall Microsoft Office if Excel isn’t detected.
This issue often arises after Windows or Office updates. Restart both programs, and try again.
A. QuickBooks won’t export to Excel if it can’t detect the Excel installation. To fix this:
a. Reboot your system first.
b. Make sure Excel opens separately and isn’t in Safe Mode.
c. Run QuickBooks and Excel using the same user account.
d. Go to Programs > Default Programs, and set Excel as the default for .xls and .xlsx files.
e. Try a QuickBooks repair install from the control panel.
If all else fails, uninstall and reinstall Microsoft Office. Then, reopen QuickBooks and test the export again. This usually restores the integration.
A. Absolutely. QuickBooks only supports specific versions of Excel, and a mismatch often causes export issues. For example:
a. QuickBooks 2022 works best with Excel 2016 to Excel 365.
b. Using Office Online or web versions of Excel won’t work.
c. Incompatibility between 32-bit QuickBooks and 64-bit Excel is a common issue.
d. A corrupted Excel installation may prevent detection altogether.
To resolve this, confirm both QuickBooks and Excel are installed locally and match in bit-version. Updating or reinstalling Excel typically restores export functionality.