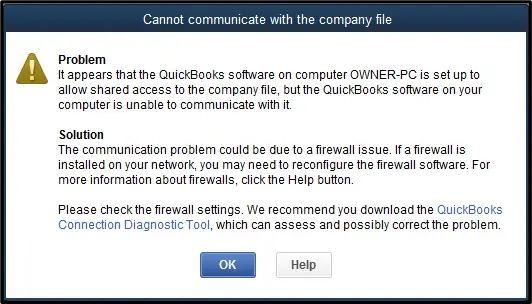
While downloading QuickBooks updates, you might encounter various error codes like 12029, 12031, 15101, 15270, 12009, and 15214. A primary cause of these problems is the Windows fi blocking QuickBooks. This issue can also lead to several error messages when accessing QuickBooks company files in multi-user mode. For instance, you may see the following error message when opening a company file:
To fix these issues, you’ll need to manually adjust the Windows Firewall settings on your computer. This will ensure that all QuickBooks programs can access the Internet and allow you to seamlessly use the multi-user mode feature to open all QB company files.
Alright, then, let’s dive into this article and learn how to effortlessly reconfigure Windows Firewall settings for QuickBooks Desktop & QB Point of Sale.
| If you want immediate assistance to configure Windows Firewall settings to allow QuickBooks, you can dial +1-(855)-955-1942 to connect with a QB professional. |
Follow These Steps If Windows Firewall is Blocking QuickBooks
Here are the steps that you need to implement each time you discover that Windows Firewall is Blocking QuickBooks. Be sure to complete them in the order listed below.
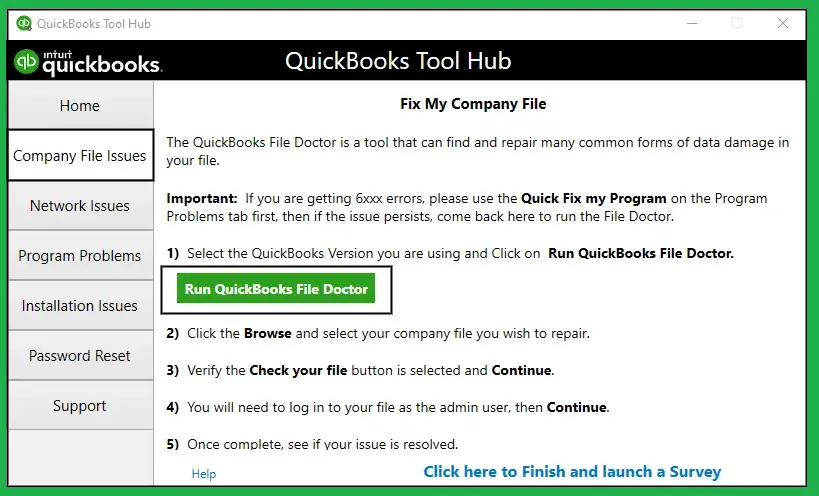
Step I: Resolve Network Problems By Running QuickBooks File Doctor
If the Windows Fi app is blocking QuickBooks, you may encounter various company file errors and network issues. One of the fastest ways to resolve these problems is by using the QuickBooks File Doctor tool.
If, however, QuickBooks File Doctor couldn’t resolve the issue, it indicates that Windows Firewall is still blocking QuickBooks. Let’s proceed to the next step and manually configure the Windows Firewall settings to grant QuickBooks access.
Step II: Manually Configure Windows Firewall Settings to Allow QuickBooks
Let’s explore how to configure Windows Firewall settings and create port exceptions for QuickBooks programs. The points below outline how to do this quickly and efficiently.
1. Create Windows Firewall Port Exceptions For QB Desktop
Follow these steps to set up Firewall port exceptions for QuickBooks programs:
- Open the Windows Start menu, type “Windows Firewall” in the search box, and select Windows Firewall.
- Click on Advanced Settings.
- Right-click on Inbound Rules and select New Rule.
- Note: We’ll create Outbound Rules later.
- Select Port and click Next.
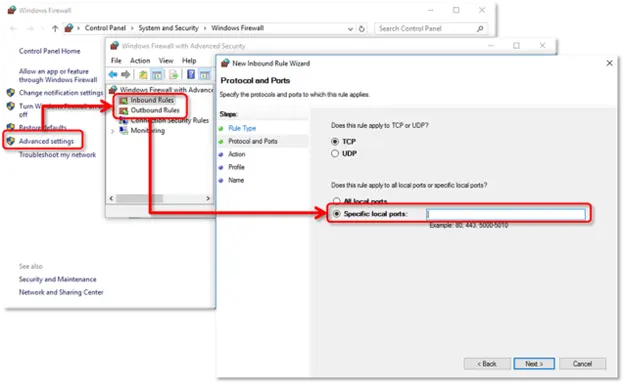
- Make sure TCP is selected.
- In the Specific Local Ports field, enter the required ports for your QuickBooks version:
- QuickBooks Desktop 2017: 8019, 56727, 55373-55377
- QuickBooks Desktop 2018: 8019, 56728, 55378-55382
- QuickBooks Desktop 2019: 8019, XXXXX
- QuickBooks Desktop 2020 and later: 8019, XXXXX
Important Note: QuickBooks Desktop 2019, 2020, and later versions use dynamic ports — specific firewall ports (not a range) assigned during installation. These ports give QuickBooks Desktop exclusive access to a designated port.
Once you’ve entered the port number:
- Click Next.
- Select Allow the Connection, then click Next again.
- If prompted, ensure all profiles are selected, then choose Next.
- Create a rule and name it something like “QBPorts(Year)“.
- Finally, click Finish.
Next, create outbound rules for QuickBooks by following the same steps. However, when you reach the part where you right-click Inbound Rules, select Outbound Rules instead.
Now, try accessing QuickBooks over your network using multi-user mode. If you still encounter multi-user mode errors, proceed to the next step.
2. Add Exceptions For QB Programs in Windows Firewall
QuickBooks relies on several program files to carry out various tasks. Below is a table listing the different QuickBooks executable files (programs).
| Executable File (Program) | Relevant File Path |
| DBManagerExe.exe | C:\Program Files\Intuit\QuickBooks YEAR |
| AutoBackupExe.exe | C:\Program Files\Intuit\QuickBooks YEAR |
| QuickBooksMessaging.exe | C:\Program Files\Intuit\QuickBooks YEAR |
| QBW32.exe | C:\Program Files\Intuit\QuickBooks YEAR |
| FileManagement.exe | C:\Program Files\Intuit\QuickBooks YEAR |
| OnlineBackup.exe | C:\Program Files\QuickBooks Online Backup |
| QBDBMgrN.exe | C:\Program Files\Intuit\QuickBooks YEAR |
| Dbmlsync.exe | C:\Program Files\Intuit\QuickBooks YEAR |
| IntuitSyncManager.exe | C:\Program Files\Common Files\Intuit\Sync |
| QBCFMonitorService.exe | C:\Program Files\Common Files\Intuit\QuickBooks |
| FileMovementExe.exe | C:\Program Files\Intuit\QuickBooks YEAR |
| QBServerUtilityMgr.exe | C:\Program Files\Common Files\Intuit\QuickBooks |
| QBLaunch.exe | C:\Program Files\Common Files\Intuit\QuickBooks |
| QBUpdate.exe | C:\Program Files\Common Files\Intuit\QuickBooks\QBUpdate |
Note: If you see Program Files (x86), it indicates that you’re using a 64-bit operating system.
Let’s go through the steps below to create exceptions for QuickBooks programs:
- Open the Start menu and type Windows Firewall in the search bar.
- Double-click Windows Firewall to open it.
- Select Advanced Settings.
- Right-click Inbound Rules and choose New Rule.
- Note: We’ll create Outbound Rules later.
- Select Program and click Next.
- Choose This Program Path and click Browse.
- Select one of the executable files from the QuickBooks program list provided earlier.
- Click Next, then choose Allow the Connection.
- Click Next again.
- If prompted, ensure all profiles are selected, then click Next.
- Create a rule and name it something like “QBFirewallException(name.exe)”, replacing “name” with the actual executable file name.
After finishing, create an outbound rule for the same program by following the same steps — but this time, right-click Outbound Rules instead of Inbound Rules. Repeat this process for each QuickBooks program listed in the table above.
After completing these steps, restart your computer and open QuickBooks Desktop. Try performing the same tasks where you previously encountered issues. If Windows Firewall is still blocking QuickBooks, proceed to the next step.
3. Exempt QB Programs in Your Antivirus or Security Software
Your antivirus program can also block QuickBooks Desktop, sometimes mistaking it as a security threat to essential system files and folders. This can prevent you from using QuickBooks Desktop for various tasks.
If you have an antivirus installed, you’ll need to create port exceptions for QuickBooks within the antivirus settings. Once that’s done, restart your computer and open QuickBooks Desktop to use it smoothly for all your projects.
Now, let’s move on to the next section and learn how to configure the firewall for the QuickBooks Point of Sale application on your system.
Configure Windows Firewall For QuickBooks Point Of Sale
When Windows Firewall blocks the connection between the server and workstations on your network, the QuickBooks Point of Sale (POS) application typically configures it automatically. However, there are instances where you may need to manually set up Windows Firewall ports for QuickBooks POS.
The table below lists the various programs that won’t function properly if Windows Firewall restricts QuickBooks POS on the network:
| Program/Service | Functionality |
| Electronic Funds Transfer | To process Intuit Merchant Service Credit Card |
| Intuit Entitlement Service | Product license and user data validation |
| Database Server Manager | Connect and record transactions/ Modifications to the company file |
Before configuring Windows Firewall for QuickBooks POS, keep the following in mind:
- You must be logged into Windows with full administrative privileges on your computer.
- It’s essential to add the necessary executable files and ports that QuickBooks POS requires to function properly.
Once ready, follow the steps below to successfully set up the Firewall for QuickBooks Point of Sale.
Steps to Effortlessly Configure Firewall For QuickBooks POS
- Start by opening the Run window by pressing the Windows + R keys simultaneously.
- Type Control Panel in the Run window and click OK.
- In the Control Panel, select Windows Firewall and go to the Advanced Settings menu.
- Choose Inbound Rules, then click on the New Rule.
- Select Port and click Next, then enter all the necessary port numbers.
| PORT | PORT NUMBERS |
| TCP (Incoming) | 8035, 8025, 46228, 46203, 443, 8040, 46216-46220, 8443, 8024, 46225, 2638 |
| UDP (Outgoing) | 2638, 8035,8024,8036 |
- Click Next and select the Allow the Connection option. Then, click Next again and give the Firewall rule a name.
- Choose Finish, and repeat the same steps to create the Outbound Rule.
The table below shows all the necessary ports and QuickBooks POS executable files that need to be configured in Windows Firewall.
| Default Port Number | Executable Program File | When Required |
| 443 | EFTsvr.exe | For the whole operation Merchant service transactions |
| 8024, 8025 | QBPOS.exe Setup.exe | Web installation During license verification For the whole operation |
| 2638 | DataImporter.exe EFTSvr.exe QBPOSDBServiceEx.exe QBDBMgrN.exe QBDBMgr.exe | Conversion from the previous edition Startup Changing the currently executing database Help>Manage my license Discovering changes to QBDatabases.ini During the entire operation |
| 8443 | EFTSvr.exe | During the whole operation Merchant service transactions |
| 46203, 46204 | EFTSvr.exe QBPOS.exe QBDBMgrN.exe | For the whole operation Changing the currently running database |
Additionally, refer to the table below to find the locations of various QuickBooks POS files. Please note that “XX” in the file paths represents the highest version number available.
| QuickBooks POS File | Relevant Location |
| DataImporter.exe QBPOSShell.exe (version 10.0 and higher) EFTSvr.exe (version 9.0 and lower) QBPOS.exe | For 64-bit Systems: C:\ProgramFiles(x86)\Intuit\QuickBooks POS XX\ For 32-bit Systems: C:\ProgramFiles\Intuit\QuickBooks POS XX\ |
| QBDBMgr.exe QBPOSDBService.exe QBDBMgrN.exe | For 64-bit Systems: C:\ProgramFiles(x86)\Intuit\QuickBooks POS XX\DatabaseServer\ For 32-bit Systems: C:\ProgramFiles\Intuit\QuickBooks POS XX\DatabaseServer\ |
After adding all the necessary executable files and ports to Windows Firewall, you’ll be able to use QuickBooks POS smoothly for all your projects.
General Measures to Run QB Desktop Smoothly On Your Computer
To keep QuickBooks Desktop functioning seamlessly on your computer, follow these pointers:
- Keep QuickBooks Updated: Always use the latest version of QuickBooks Desktop to access new features, security patches, and performance improvements.
- Ensure System Compatibility: Check that your computer meets the minimum system requirements for your QuickBooks version to avoid slow performance or crashes.
- Run QuickBooks as Administrator: Launch QuickBooks with admin privileges to prevent permission-related errors and ensure smooth functionality.
- Maintain Proper Firewall and Antivirus Settings: Configure Windows Firewall and antivirus programs to allow QuickBooks programs access to the Internet.
- Regularly Update Windows: Keep your Windows operating system up to date for compatibility and better system performance.
- Use QuickBooks Tools Hub: Utilize tools like QuickBooks File Doctor and QuickBooks Install Diagnostic Tool to fix common errors and network issues.
Winding Up
In this comprehensive guide, we have discussed troubleshooting steps that you can follow whenever you find that Windows Firewall is blocking QuickBooks. Hopefully, you should now be able to seamlessly use QuickBooks and continue with your accounting operations. If, however, you are still getting different error messages or have any questions, you can contact a QB expert for immediate help.
Frequently Asked Questions
A. Windows Firewall may block QuickBooks if it detects the program as a security risk, especially during updates or network setup. This leads to multi-user mode errors or inability to access company files. To fix it:
a. Open Windows Defender Firewall.
b. Click Allow an app or feature through Windows Firewall.
c. Make sure all QuickBooks entries (QBDBMgrN, QBCFMonitorService, etc.) are checked for Private and Public networks.
d. Save and restart QuickBooks.
If issues persist, add specific firewall ports manually through Advanced Settings.
A. If QuickBooks is being blocked, open these TCP ports based on your version:
a. QuickBooks 2024: 8019, 56728–56730
b. QuickBooks 2023: 8019, 56725–56727
c. QuickBooks 2022: 8019, 56722–56724
To do this:
1. Go to Windows Defender Firewall > Advanced Settings > Inbound Rules.
2. Create a New Rule > Port > TCP, enter the ports, and allow the connection.
3. Repeat for Outbound Rules.
Restart QuickBooks and check if network errors disappear.
A. You don’t need to turn off the firewall. Just allow QuickBooks services through it:
a. Open Control Panel > Windows Defender Firewall.
b. Click Allow an app or feature through Windows Firewall.
c. Click Change settings, then Allow another app.
d. Browse to QuickBooks install location, add QBW32.exe, and other related services like QBDBMgrN.exe.
e. Check both Private and Public boxes.
Click OK. This lets QuickBooks work securely without turning off firewall protection.