
QuickBooks migration error 1009 arises when running the migration tool. This issue is related to migrating company files and data and can occur when moving data from QuickBooks Online to QuickBooks Desktop or when exporting data during an annual backup. Let’s grab a coffee and learn about the possible causes and solutions for this error. First thing you might notice about the error code 1009 is that it might be accompanied by an error message stating:
| “1009 – Internal Error: exception unknown” |
| “Error 1009: There was an issue with the connection to QuickBooks Online.” |
To resolve the error code 1009 in QB, first, we need to understand what leads to it. Therefore, go through this guide and explore the causes and solutions for this error.
Self-troubleshooting the migration error might prove to be tricky and time-consuming. If you feel stuck or need an expert to provide you with real-time assistance, speak to them at +1(855)-955-1942.
Reasons Why QuickBooks Migration Error 1009 Occurs
Facing the QuickBooks migration error 1009 could interrupt your workflow and make it hectic. Firstly, you need to learn about the causes that trigger this issue. Here are the possible reasons behind the QuickBooks Desktop migration tool error 1009.
- The system slows down, which prevents QuickBooks from running smoothly.
- Data might be migrated from a 32-bit system to a 64-bit one, and hence, the formats might not match.
- QuickBooks Desktop or the Windows operating system has not been updated.
- The current internet configuration does not consider Intuit a trusted site.
- A task window is running in the background and interrupting the migration.
- The company file might not be open.
- QuickBooks Desktop might not be running.
- Antivirus or security software is one reason why the QuickBooks migration tool may not be running.
After understanding the possible causes for this problem, let’s delve into the troubleshooting methods.
Top Methods to Resolve Migration Error 1009 in QuickBooks
Once you understand the main reason behind the error, it becomes easy to troubleshoot it. Let us now examine the techniques that will help to resolve the QuickBooks migration error 1009.
Solution 1. Update the QuickBooks Desktop
When the QuickBooks migration error 1009 appears, you should begin by updating the QuickBooks Desktop to the latest version. To get the latest QB update on your system, you need to navigate to the Help menu > Update QuickBooks.
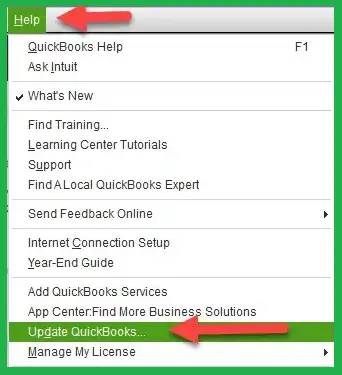
Finally, install the newest version available for download. Next, move to the following step.
Solution 2. Update the Operating System
Once done with updating QuickBooks Desktop, try updating the Windows operating system if the issue persists. Sometimes, the QB processes run into errors because the Windows version is outdated; therefore, updating it can resolve this issue and allow the application to run properly.
Even after updating, if this error still occurs, try the next step.
Solution 3. End All Tasks in QuickBooks and Reattempt the Migration
When Tasks are running in the background, they can interfere with and prevent the migrator tool from transferring the data. You need to close all the running tasks (including QB processes) and restart QuickBooks.
Since merely closing the QuickBooks application won’t eliminate the tasks running, you need to head over to Task Manager to close QB Desktop properly.
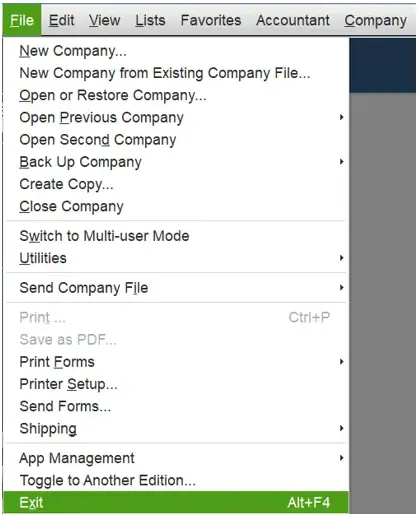
- Head to the File menu and click the Exit button or press Alt + F4 on the keyboard.
- Then, use the Ctrl + Shift + Esc keys on the keyboard to bring forth on your screen the Task Manager.
- Move to the Processes tab and locate the QuickBooks programs.
- Right-click on each program individually and select ‘End Task‘ for all of them.
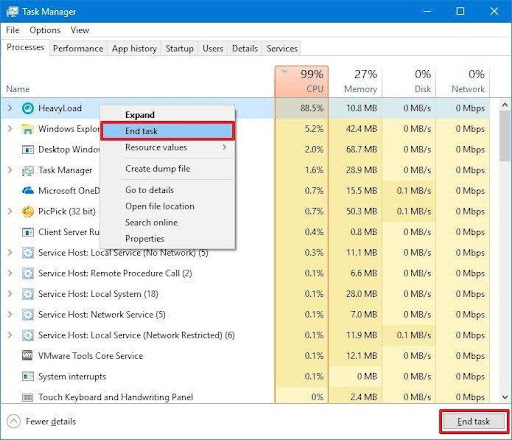
Now, restart the system and then try to move the QB data.
Solution 4. Reboot and Retry Running the Move.QuickBooks.bat File
Restart the system and then try to run the move.QuickBooks.bat file.
- Firstly, insert the USB drive into the system.
- Disable Windows security and antivirus software to let the QuickBooks Migration Tool run.
- Open the files and folders in the USB drive, look for and double-tap on the move.QuickBooks.bat file to launch the migration process.
- Write the password and select Let’s Go.
- Lastly, let the QuickBooks migrator tool run and complete the process.
Usually, the time the migrator tool takes will depend on your system’s performance, internet speed, and the length of your QB company file.
Solution 5. Manually Transfer QuickBooks to Another Computer
If you find yourself unable to move QuickBooks Desktop data to another computer with the help of the tool, try moving it manually. Remember, this step is not for users trying to export QuickBooks Online data to their computer or QuickBooks Desktop.
- Keep your license information ready to install QuickBooks Desktop manually.
- Firstly, uninstall QuickBooks Desktop on the old computer.
- Then, install QuickBooks Desktop on the new computer, where you wish to move your QB data.
- Input the product and license information to register and activate the QB Desktop.
Lastly, copy the QuickBooks data files to the new system and restore the backup for the software. Transferring the files one by one to the new computer is essential because, during the transfer process, not all files may be carried over.
Solution 6. Check and Fix the Internet Settings
While exporting data from QBO to QB Desktop, internet settings have a role to play. Hence, you need to check the internet settings. However, first close all the QuickBooks Desktop windows and then follow the steps given below.
- Firstly, run the Start menu and search for Internet Options.
- Then, head to the Security tab.
- Click on Trusted Sites and then unmark the checkbox for Require server verification (https:).
- Now, type *.intuit.com in the Add this website area.
- Click on the Trusted Sites and unmark the checkbox for Enable Protected Mode.
- Lastly, close the Internet Options.
Once done with that, try to transfer data again with the help of the QuickBooks migration tool.
After Migration, Activate the QuickBooks Desktop
You should now be able to migrate the data from QB Online to QB Desktop. Thereafter, you will need to activate the QuickBooks Desktop. Here are the steps that will help:
- Launch QB Desktop, open a sample company file, and then tap on the ServiceSample company option.
- Close your company file, and then tap on the No Company Open window.
- Then, open the Help menu and click on the Activate QuickBooks Desktop option.
- Next, select the Activate button.
- When a browser window says, “We just need to verify your identity to activate,” close it and return to the No Company Open window.
- Finally, try converting QuickBooks Online data to Desktop again.
Suppose you continue to experience the QuickBooks Migrator tool not working error. In that case, follow the next method.
Conclusion
We discussed the reasons that give way to QuickBooks migration error 1009, which commonly arises during the transfer of company files. To assist in resolving this issue, we have outlined several troubleshooting methods.
However, resolving this error could often be tricky and a time-consuming process. If you need assistance or continue to encounter this error after trying the recommended solutions given above, we recommend contacting a QuickBooks specialist for assistance. Dial +1(855)-955-1942!
Frequently Asked Questions
The migration error 1009 occurs while transferring or migrating files from one system to another. However, there can be multiple causes why this error occurs, such as missing company files, incompatible versions, or issues with firewalls and antivirus software. It is also possible that the computer doesn’t meet the system requirements for the QB Desktop version you are installing.
There are multiple ways you can resolve it if you see error code 1009 when moving QuickBooks data:
1. Update QuickBooks Desktop to the Latest Release: Install the latest release of QuickBooks software on your system.
2. Update Windows Operating System: Check for updates for the Windows Operating System by heading to Settings > Updates and Security and downloading if available.
3. Reboot and then Run the Move.QuickBooks.bat File: Access the USB drive in the system to transfer the files and retry the process after rebooting the system.
4. Exit QuickBooks, End All Tasks, and Reattempt the Migration: End all the tasks running on the computer by accessing the Task Manager (press Ctrl+Alt+Esc on the keyboard) and then reattempt the migration.
5. Manually Move QuickBooks to Another Computer: Try moving the QB Desktop to another system manually by following the steps and providing the license and essential credentials.
Yes. If the company file (.QBW) is damaged, migration may fail. Running the QuickBooks File Doctor or restoring a recent backup can repair the file before retrying the migration.